Hi steemit friends,
<center></center>
Today I wanted to do something a bit different and share with you the steps you can take to import live cryptocurrency prices from CoinMarketCap.com into a Microsoft Excel spreadsheet.
I recently started making an extensive crypto portfolio for myself as I wanted an easier way to track my current profits (or should I say losses given the current bear market...) in a personal Excel spreadsheet. I find that keeping track of my trades through Excel gives me some extra piece of mind so that my trade history is not easily available to the public, and so that I can be sure that I have a personal copy with this information for when tax time comes. I found a few guides online detailing how to import live data from CoinMarketCap.com using the Public API, but I saw a noticed that come December 4th, 2018 the Public API will be migrating to the Professional API. I decided that rather than using the public data, I would rather use the professional data to save myself the hassle in December.
Unfortunately the Professional API is quite a bit more difficult to figure out for newbies, especially as I don't have much technical knowledge and am not too familiar with API's and related technologies or terminologies. After much trial an error, however, I was successful and I'll share with you here a detailed but easy to follow summary for how you too can import live crypto prices into your very own Excel spreadsheet!
<ol>
<li>The first thing that you will need to do is go to https://pro.coinmarketcap.com/ to sign up for a free account. Click "GET YOUR API KEY NOW". Input an email address, your name, a password, and select the "Starter Plan" - this one is free of charge but you can upgrade later if you want. Fill out the CAPTCHA, agree to the terms of service and click "CREATE MY ACCOUNT".</li>
<center>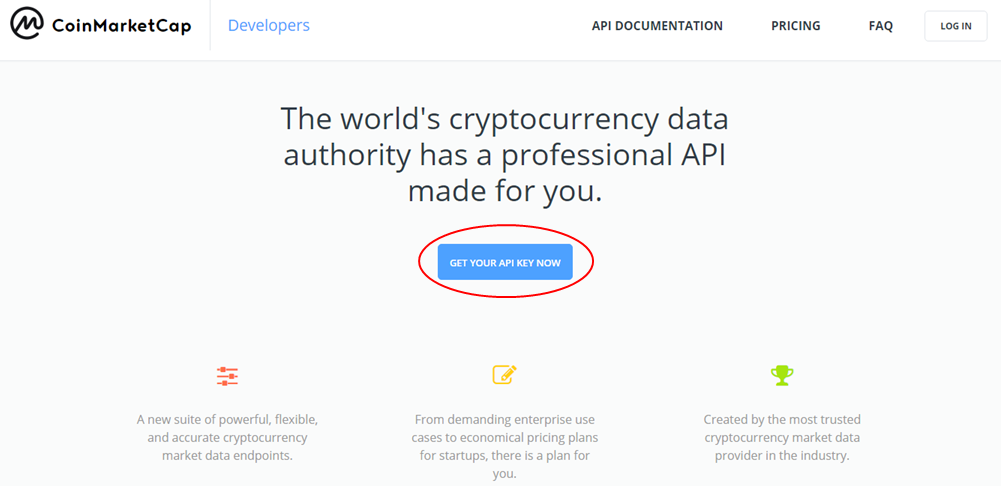</center>
<center>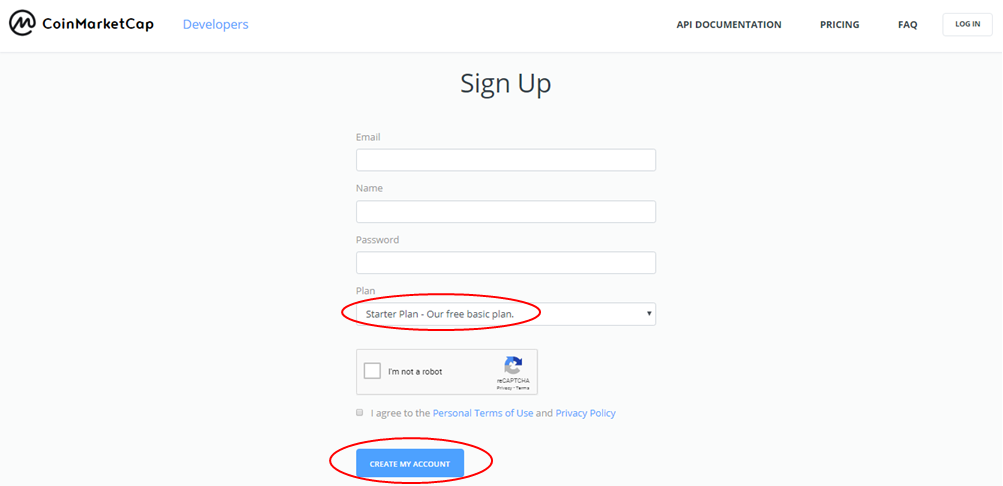</center>
<li>You will receive a verification email after creating your account. Go to this email, click on the verification link and you will be taken to the dashboard of your CoinMarketCap Professional API account. Here you will be able to see your API KEY, a summary of your current usage, and a detailed log of previous API requests.</li>
<center>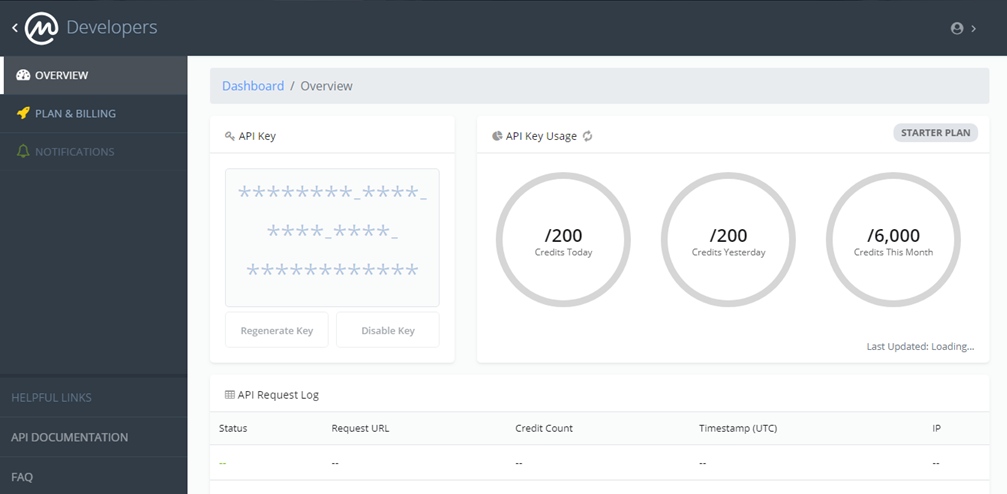</center>
<li>Next, open up an Excel Spreadsheet. We will be using the "Power Query" feature in Excel to import the live crypto price data. If you have Excel 2016, the Power Query package comes pre-installed in the base version of Excel. If you have previous version of Excel such as Excel 2010 or Excel 2013 you will need to follow a few quick steps first to install and enable Power Query. </li>It takes only a couple of moments and Excel Campus has put together a <a href="https://www.excelcampus.com/install-power-query/">detailed guide</a> on how to install the free Power Query add-in.
<center>**Please follow either option A or B for Steps 4 and 5 depending on your version of Excel!**</center>
<li>Now that you have Power Query, we can begin the process of importing the live price data.
A) Excel 2016: The Power Query feature is found by clicking on the "Data" tab, then on the "Get Data' drop down menu, and finally click on "Launch Power Query Editor".
<center>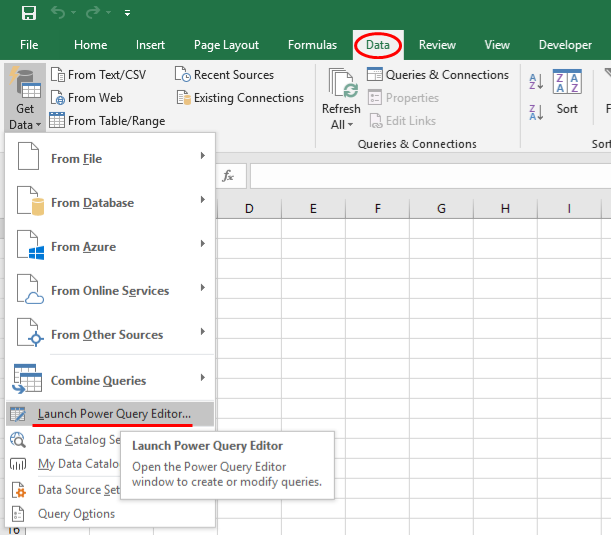</center>
B) Excel 2010/2013: There should now be a ribbon at the top that should say "Power Query". Click here and you will be good to go for the next step.</li>
<center>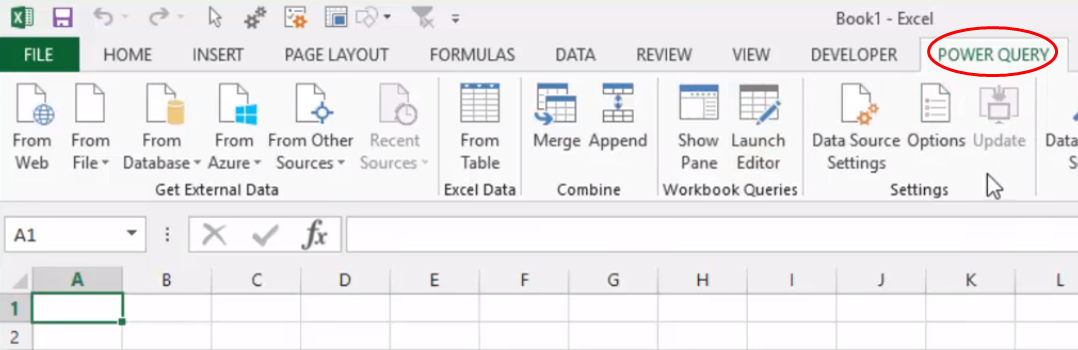</center>
<li>Open a source from the web in Power Query by doing one of the following:
A) Excel 2016: Now that you are in the Power Query Editor, go to the "New Query" section, click on the "New Source" drop down menu, hover over the "Other Sources" option and click on "Web".
<center>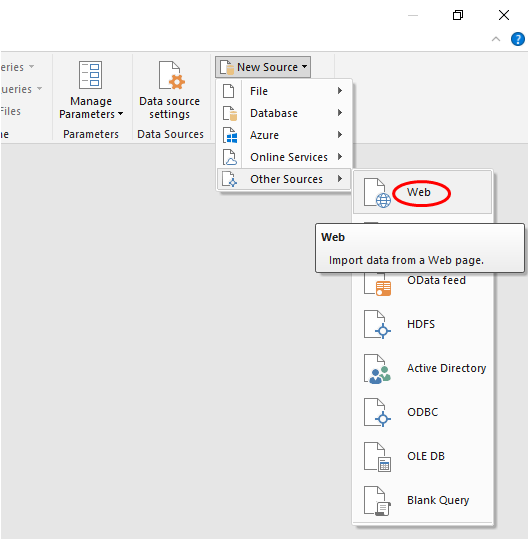</center>
B) Excel 2010/2013: Now that you are clicked on the Power Query ribbon, click on "From Web".</li>
<center>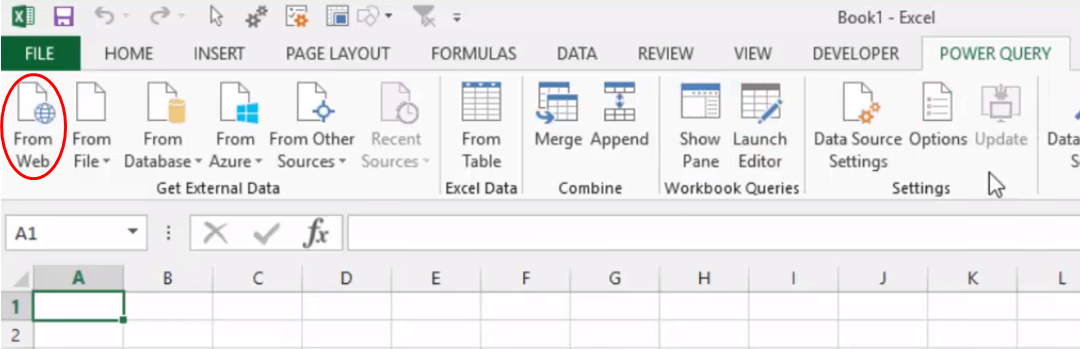</center>
<center>**After this point, the steps should be essentially the same regardless of your version of Excel (things may look slightly different depending on your version)**</center>
<li>After clicking the "Web" data source option, a window will pop up in which we can input a URL. Depending on your exact personalized needs, your URL will vary, but in this case we will input something simple to give you a basic idea of how it works. A full list of all CoinMarketCap.com Professional API documentation and commands can be found <a href=https://pro.coinmarketcap.com/api/v1">here.</a></li>
<center>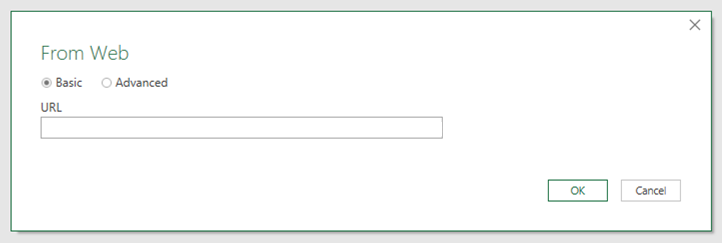</center>
<li>For our simple example, we will import the latest prices for BTC (bitcoin), ETH (ethereum) and STEEM (steem). This will require you to copy and paste the following URL in the space as shown below:
<center>https://pro-api.coinmarketcap.com/v1/cryptocurrency/quotes/latest?symbol=BTC,ETH,STEEM&CMC_PRO_API_KEY=INPUT_YOUR_OWN_API_KEY_HERE</center>
</li>
<center>**Please note that after the "CMC_PRO_API_KEY=" portion of the URL, you should copy-paste your own personal API key from the dashboard as described back in Step 2**</center>
<center>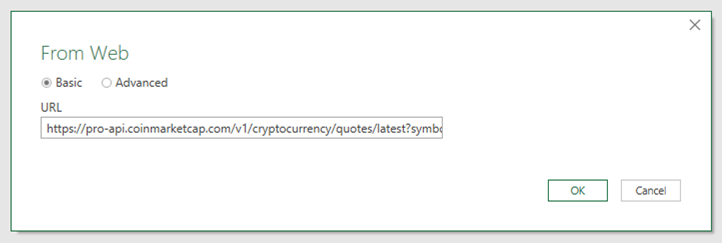</center>
<li>The very first time that you submit a URL to the Professional API, you may get a screen that pops up as shown below. Simply input your CoinMarketCap.com Pro API username and password from Step 1. These settings should save globally after this point, meaning that you will likely not need to update these permissions again when interacting with the CoinMarketCap.com Professional API.</li>
<center>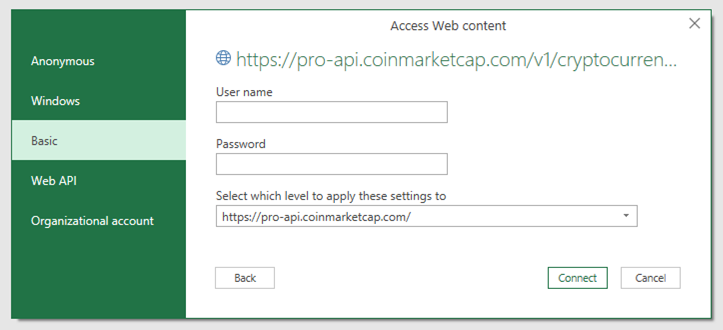</center>
<li>Once successful, you will see the screen shown below. Click on the green "Record" option next to Data.</li>
<center>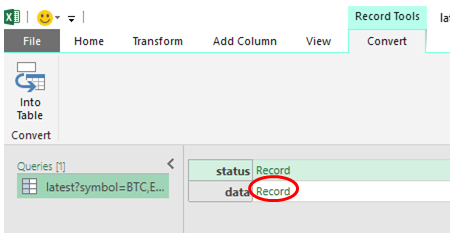</center>
<li>Click on the "Into Table" option.</li>
<center>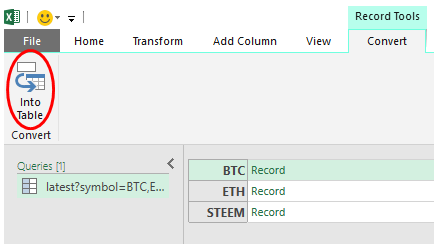</center>
<li>Double click "Name" and re-name this field to "Cryptos" or a similar name of your choice.</li>
<center>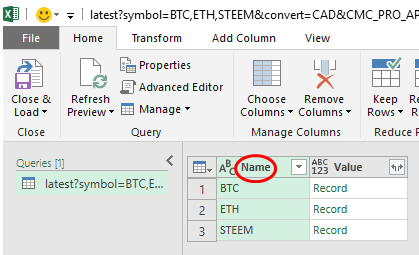</center>
<center>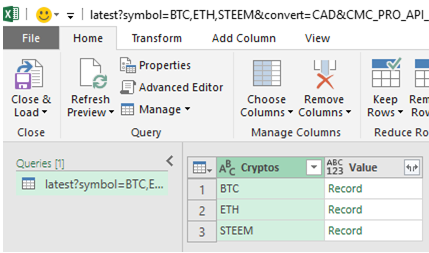</center>
<li>Next, click the little arrows next to the "Value" column as shown below. Click OK.</li>
<center></center>
<li>You should now see several columns. Scroll all the way to the right until you see one called "Value.quote". Once again click on the little arrows as shown in the image below. Click OK.</li>
<center>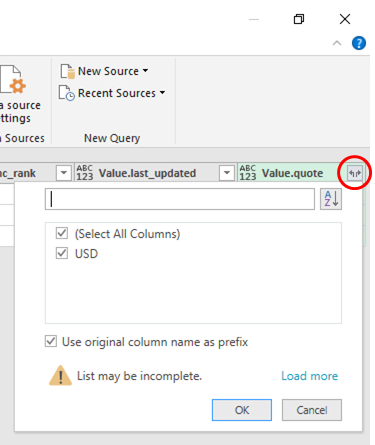</center>
<li>Scroll all the way over to the right again until you see a column called "Value.quote.USD". Once again, click on the little arrows as shown in the image below and click OK.</li>
<center>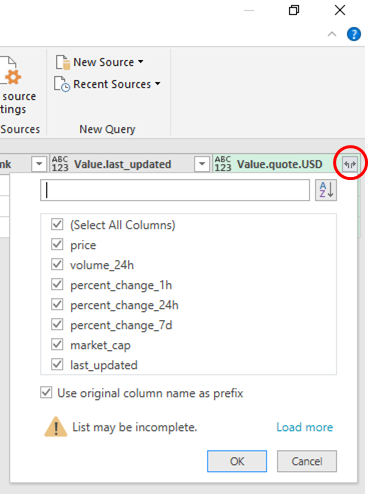</center>
<li>Now you will see a new column called "Value.quote.USD.price". This is the field in which the current price of the cryptocurrency is displayed. See the image below to see this from our example.</li>
<center>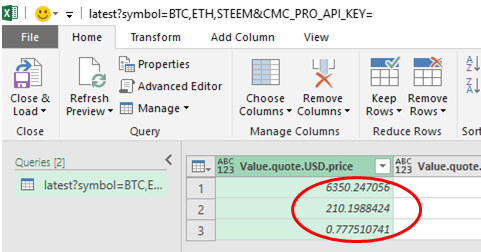</center>
<li>You can also delete any columns that you don't want to have included in your personal table. I tend to delete mostly every column with the exception of the "Cryptos", "Value.quote.USD.price", and "Value.Last_Updated" columns, but that is just my personal preference. To delete a column, simply click on it, then click the "Remove Columns" option.</li>
<center>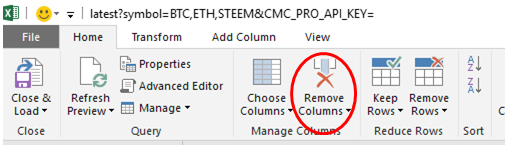</center>
<li>Once you have edited your table as much as desired, click on "Close & Load".</li>
<center>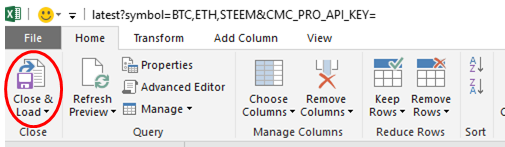</center>
<li>This will take you back to your Excel workspace and you will see your finalized data table with the prices!</li>
<center>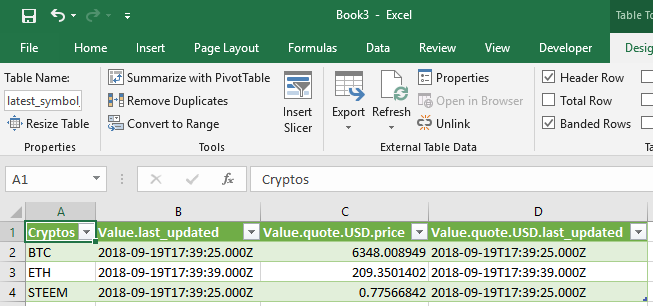</center>
<li>Some of you may want to have these data update on their own. I personally don't like to do this, because with the Starter Plan on CoinMarketCap.com's Professional API, you have are only allowed to access/refresh your data a limited number of times per day and per month. To edit the settings for when your crypto prices will refresh, right click on the data source as shown in the screenshot below and select "Properties".</li>
<center>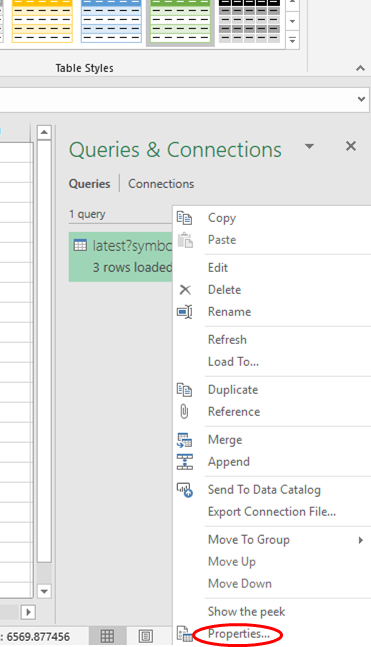</center>
<li>In this menu, you can check the boxes corresponding to your data refresh preferences and you will be good to go!</li>
</ol>
<center>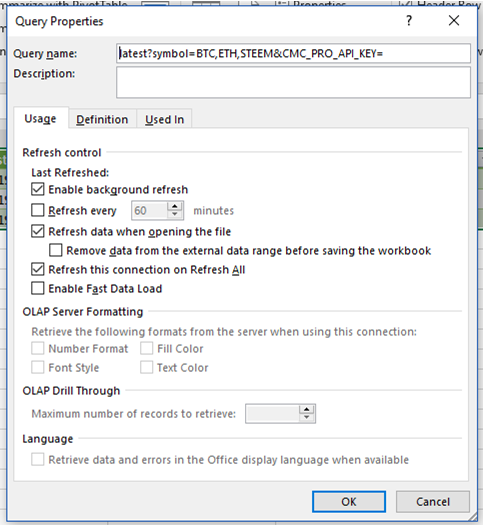</center>
You can add as many cryptocurrencies as you'd like to your custom URL depending on which ones you want in your spreadsheet. Simply look up the ticker symbol that CoinMarketCap.com uses for that crypto, insert add it to your URL, and you'll be off to the races!
<center>**But wait...There's more!**</center>
Want to see your crypto prices in a currency other than USD? I've got some good news for you - this is very easy to do! You can easily edit the URL that you submit to the Power Query Editor in Step 7 to account for this! For example, I am Canadian so I use CAD as my default currency. This means that I copy and paste the following URL during Step 7 to get my prices to display in CAD:
<center>https://pro-api.coinmarketcap.com/v1/cryptocurrency/quotes/latest?symbol=BTC,ETH,STEEM&convert=CAD&CMC_PRO_API_KEY=INPUT_YOUR_OWN_API_KEY_HERE</center>
You can then proceed in the exact same way through the rest of the steps. At Step 14, the only difference you will see is that instead of "Value.quote.USD", you will see "Value.quote.CAD".
<center>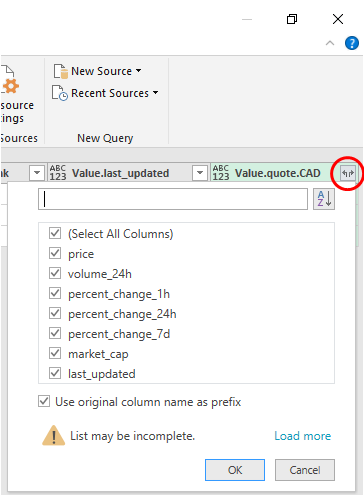</center>
This will take you back to your Excel workspace and you will see your finalized data table with the prices!
<center></center>
<center>**Finally, DON'T FORGET TO SAVE YOUR DOCUMENT BEFORE EXITING!!!**</center>
___
### <center>Thanks for taking the time to check out my post!
If you found this guide useful, please let me know! If you have any suggestions or comments for how I could improve my guide, I'd love to hear from you as well!</center>
___
### <center>Please upvote, comment, resteem and follow me if you'd like to see more content like this!
@shawkr13</center>
<center>[<img src="https://steemitimages.com/DQmarWRv4wXiqPZbmtDCDRTwE5jewDQrG1ATrXcFrTThxht/Gifbanner.gif">](https://steemit.com/qurator/@qurator/qurator-3-0-update-post-guidelines-or-registration-details-or-tier-changes)</center>