<div class="text-justify"> <CENTER>  </CENTER> I'm delighted to have completed this project. It's the first time I've knitted a 'button jointed' rabbit. I used this old knitting kit for the rabbit and worked out the button joint : <CENTER>  </CENTER> I followed the instructions to the best of my ability but as you can see there are some differences in the face. I'm not sure how they get that nice stitch line ( see the red arrow ) that leads to the nose. I tried many times but it just didn't work out. I'm actually keener on the face I chose to make because it is simpler and the nose is not so 'solid'. This face pays homage to Julie Williams' [Cotton Rabbits](https://www.ravelry.com/patterns/library/small-rabbit). The _Little Cotton Rabbits_ is a collection of many knitted toys which includes rabbits, dogs, bears, and cows amongst [others](https://www.ravelry.com/patterns/sources/little-cotton-rabbits/patterns). Each toy comes with an outfit but as they're all the same size you can buy other outfits as well. The patterns are not so pricey at £4, about 20 Steem, in comparison to other patterns on the market ( at double that price). One reason for the price difference may be their publication date of 2016 : they're older patterns that may be considered 'old fashion' in relation to crocheted amigurumis. The knitting kit I used did include some bright pink yarn for a dress as well, but I haven't made it yet. I've also considered knitting a scarf for my rabbit but haven't decided on the colour (watch this space). I'm currently thinking about my next project. <CENTER>  </CENTER> Thank you for reading ! </div>
<div class="text-justify"> |<center><a href="https://steemit.com/trending/hive-129948">রঙিন কাগজ দিয়ে পাখি তৈরি।</a><br><sub><sup>💐 "আমার নতুন ব্লগে সবাইকে কে স্বাগতম" 💐</sup></sub></a></center>| |---| |<center></center>| |---| <center><sub>"ছবিটি Canva দিয়ে তৈরি"</sub></a></center> ### শুভ সকাল 🌅 জুমা মোবারক 🕌 হ্যালো আমার বাংলা ব্লগ পরিবার। প্রথমেই সবাইকে আমার সালাম ও আদাব। কেমন আছেন সবাই? আশাকরি আপনারা সকলেই আল্লাহর রহমতে ভালো আছেন। আমিও আলহামদুলিল্লাহ আল্লাহর রহমতে ভালো আছি। সবার সুস্বাস্থ্য কামনা করে আজকের পোস্ট শুরু করছি। আজকে আমি আপনাদের মাঝে হাজির হলাম আমার নতুন একটি ব্লগ নিয়ে। **অরিগ্যামি পোস্ট:- রঙিন কাগজ দিয়ে পাখি তৈরি।** ঈদের ছুটিতে বেশ ব্যস্ত সময় পার করেছি। গতকাল একটু সময় পেলাম তাই ভাবলাম রঙিন কাগজ দিয়ে কিছু তৈরি করার চেষ্টা করা যাক। এর পরে আমি ধৈর্য সহকারে কাজটি করার চেষ্টা করেছি। আশাকরি রঙিন কাগজ দিয়ে পাখি তৈরি দেখে আপনাদের সবার ভালো লাগবে। তাহলে চলুন দেখে নেওয়া যাক আমি কিভাবে কাজটি সম্পুর্ন করলাম। |<center>**✂️ "প্রয়োজনীয় উপকরণ" ✂️</a>**</center>| |--| <center></center>| |---| * রঙিন কাগজ। * পেন্সিল। * কাঁচি। * আঠা। * স্কেল। * সাইন পেন। |<center><sub> "তৈরির প্রক্রিয়া চলছে" </sub></a></center>| |--| <center></center>| |---| * প্রথমেই আমি রঙিন কাগজ নিলাম। তার পরে এস্কেল দিয়ে ১৫ সে.মি মেপে নিলাম। তার পরে পেন্সিল দিয়ে দাগ দিয়ে কাঁচি দিয়ে কেটে নিলাম। এবার আমি কোনাকুনি ভাবে ভাঁজ দিয়ে দিলাম। তার পরে দুপাশে ভাঁজ করে নিলাম। |<center><sub> "তৈরির প্রক্রিয়া চলছে" </sub></a></center>| |--| <center></center>| |---| * এবার আমি কাগজ টিকে ঘুরিয়ে নিলাম। উপরের দিক থেকে নিচের দিকে ভাঁজ করে নিলাম। তার পরে কাগজ টিকে ঘুরিয়ে নিলাম। এখন আমি উপরের দিকে দুপাশে ভাঁজ করে নিলাম। |<center><sub> "তৈরির প্রক্রিয়া চলছে" </sub></a></center>| |--| <center></center>| |---| * এখন আমি কাগজ টিকে আবারো ঘুরিয়ে নিলাম। এখন আমি দুপাশে ভাঁজ বরাবর ভাঁজ করে নিলাম। এবার আমি নিচের দিকে ছোট করে ভাঁজ দিয়ে দিলাম। এর পরে অপর পাশে ভাঁজ দিয়ে দিলাম। |<center><sub> "তৈরির প্রক্রিয়া চলছে" </sub></a></center>| |--| <center></center>| |---| * এবার আমি নিচের দিকে ভাঁজ করে নিলাম। এর পরে মাঝখানে ভাঁজ করে নিলাম। এবার আমি পাখির ঠোঁট বানিয়ে নিলাম। এবারে আমি পাখির চোখ বানিয়ে নিলাম সাইন পেন দিয়ে। এর পরে সাইন পেন দিয়ে পা ঠোঁট এবং লেজ এর মধ্যে হালকা করে দাগ দিয়ে দিলাম। এবার আমার কাজ শেষ। |<center><sub> "তৈরির প্রক্রিয়া চলছে" </sub></a></center>| |--| <center></center>| |---| <center></center>| |---| * রঙিন কাগজ দিয়ে পাখির অরিগ্যামি তৈরি করা হয়েছে। এবার আমি আমার মতো করে ফটোগ্রাফি করে নিলাম। আমার কাছে পাখির অরিগ্যামি দেখে মনে হচ্ছে অরজিনাল একটি পাখি। এধরনের কাজ গুলো করার সময় ভীষণ আনন্দ উপভোগ করি। আশাকরি আপনাদের সবার রঙিন কাগজের পাখি তৈরি দেখে ভালো লাগবে। কেমন লাগলো অবশ্যই জানাতে ভুলবেন না। আপনাদের সবার সহযোগিতা কামনা করছি। আজকের মতো এখানেই বিদায় নিলাম। সবাই ভালো থাকুন সুস্থ থাকুন সব সময়ই এই কামনাই করি। |<center>পোস্টের বিবরণ:-</center>| |--- বিভাগ| অরিগ্যামি। ---|--- ডিভাইজ | realme 9 বিষয় | রঙিন কাগজ দিয়ে পাখি তৈরি। লোকেশন | উত্তরখান, ঢাকা, বাংলাদেশ। ফটোগ্রাফার | @limon88 ___ ___ .gif)  <div class="text-justify"> |<center>🙎♂️ "আমার পরিচয়" 🙎♂️</center>| |--| <div class="pull-left">  </div> > <sub>আমি মোঃ লিমন হক। আমার স্টিমিট একাউন্ট @limon88. আমি একজন বাংলাদেশী। আমার বাড়ি নীলফামারী জেলায়। আমি এখন বর্তমানে জীবিকার তাগিদে পরিবার নিয়ে ঢাকা উত্তরায় থাকি। আমি একটি কোম্পানিতে চাকরি করছি এবং পাশাপাশি স্টিমিট এ কাজ করে আসছি। আমার ব্লগিং ক্যারিয়ার আড়াই বছর। এখন আমার সবথেকে বড় পরিচয় আমি আমার বাংলা ব্লগের একজন ভেরিফাইড মেম্বার। আমি সত্যিই গর্বিত আমার বাংলা ব্লগের সাথে থাকতে পেরে। স্টিমিট আর আমার বাংলা ব্লগ আমার জীবনের একটা অংশ হয়ে গেছে, তাই যতদিন স্টিমিট রয়েছে ইনশাআল্লাহ আপনাদের সাথেই থাকবো। ভালোবাসি পড়তে ও লিখতে ব্লগিং, ফটোগ্রাফি, মিউজিক, রেসিপি, ডাই, আর্ট আমার অনেক পছন্দের। আমি ঘুরতে অনেক ভালোবাসি। আমি একজন মিশুক ছেলে আমি সবার সাথে মিশতে ভালোবাসি। আমি আমার মতো। আল্লাহ হাফেজ 💞</sub>  </div>  **<center> <div class="phishy"> >>>>>|| [এখানে ক্লিক করেন ডিসকর্ড চ্যানেলে জয়েন করার জন্য](https://discord.gg/7SyC6uWBTS) ||<<<<< </center>**   <h2><center>আমার ব্লগটি ভিজিট করার জন্য সবাইকে অসংখ্য 💞"ধন্যবাদ"💞</center></h2>  </div>
<div class="text-justify"> I have continued the stuffing and sewing process of my little friend-in-the-making [here](https://steemit.com/burnsteem25/@flowertron/knitting-project-body-parts-14-april-2024). <CENTER>  </CENTER> The photo above shows you the profile of its head, which reminds me a bit of [ET](https://en.wikipedia.org/wiki/E.T._the_Extra-Terrestrial). Having completed all that I realised that the arms were going to be ‘fixed’ like that, ie without any movement. It was too late to change that step which actually follows the instructions in the knitting kit. It was too late because after sewing the arms I decided to join the neck to the head using the same yarn so if I cut it off to redo the arms I would have to sew the whole thing again; it’s taken me a long time to get here as it is. I decided to look into ways of attaching toy legs so there's movement. The kit is quite simplistic and it does not offer any options. After a lot of thinking and checking You Tube for inspiration, it seems that the best way to go about it is to attempt a _Button Joint_. I do not own anything that uses this method so I cannot clarify further here other than just show you what I’m aiming to achieve. See the photo below : <CENTER>  </CENTER> The idea is that you join a button on the outside of the leg of the toy through the leg and body. You need to do this without cutting the thread. This in theory is not complicated but it requires some fiddly sewing. It was great to find that couple of small transparent buttons suitable for the size of the toy. I also managed to find a long needle to go through them. This clear tutorial shows how to do this process. I haven't attempted it yet as I've been collecting matching thread, that long needle and the buttons. In the video the person uses an extremely [long needle](https://www.youtube.com/watch?v=xakBaLJ6j2A&ab_channel=WendiGratz) . I don’t own one like that but as this is such a small toy it may not be necessary anyway. I've linked the video below in case you are interested: <CENTER> <iframe width="560" height="315" src="https://www.youtube.com/embed/xakBaLJ6j2A?si=dEMvuypTcbJEr9oj" title="YouTube video player" frameborder="0" allow="accelerometer; autoplay; clipboard-write; encrypted-media; gyroscope; picture-in-picture; web-share" referrerpolicy="strict-origin-when-cross-origin" allowfullscreen></iframe> </CENTER> Thank you for reading ! </div>
<div class="text-justify"> Very often knitting magazines include a 'gift' which can be needles, stitch markers, or a small knitting kit. Also very often people who buy magazines do not want the small knitting kits and give them away to charity shops where they're sold very cheaply. That's how I got this kit I think over 4 years ago but never felt confident enough to tackle it. This kit included two small balls of yarn and the pattern. I found the 3mm knitting needles required in my old set. In my opinion the yarn is a bit too thick for the needle size recommended. I reckon that it's designed that way so the stuffing doesn't come out through the knitted fabric. Anyhow, what I've knitted so far doesn't really look like the photo on the kit bag. This project has taken a bit long because I'm following the pattern very closely. <CENTER>  </CENTER> I reckon this pattern is intermediate level because just like when you make socks it includes 'short rows' which is a bit tricky with such small pieces varying from only 16 stitches to 12 stitches. There has also been quite a lot of sewing of pieces together because the parts are knitted 'flat'. You need to make the tubes and stuff them later. I'm nearly done with all of the sewing and after that I need to decide how I embroider a few bits and whether or not I use all of the kit. I'll try to include an update soon. In the meantime I leave you with the mystery. You're welcome to write a comment guessing what I'm making. Thank you for reading ! </div>
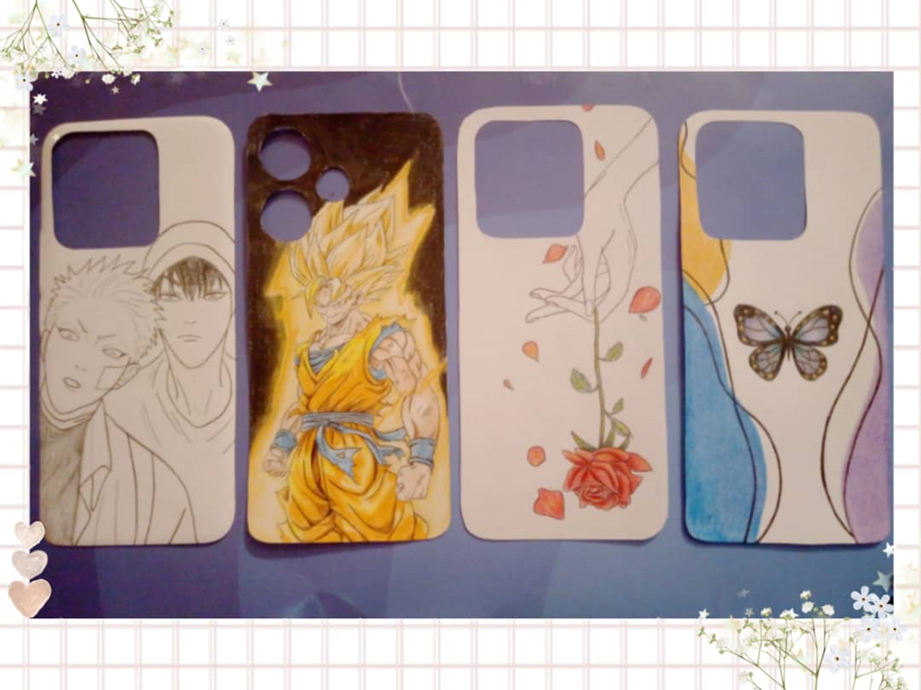 ¡Hola a todos! Me encantan las manualidades y hoy les traigo una manualidad muy divertida, que es como hacer forros de teléfonos personalizados ¡Los forros de nuestros teléfonos muestran una parte de nosotros y nuestros gustos! Aunque podamos comprarlos, también podemos hacerlo nosotros mismos, y así hacerlo mucho más personalizado sin necesidad de gastar mucho dinero. ¡Solo necesitamos algunos materiales, nuestra creatividad y listo! Materiales: Forro de teléfono transparente Cartulina blanca o de color Colores Marcadores de punta fina Lápiz Tijeras Cuando ya tengamos nuestros materiales, debemos marcar los bordes del forro en la cartulina, esto incluye marcar la parte de la cámara.  ¡Después tenemos que recortar!, debemos tener cuidado en la parte de la cámara, que es un poco más complejo recortar. 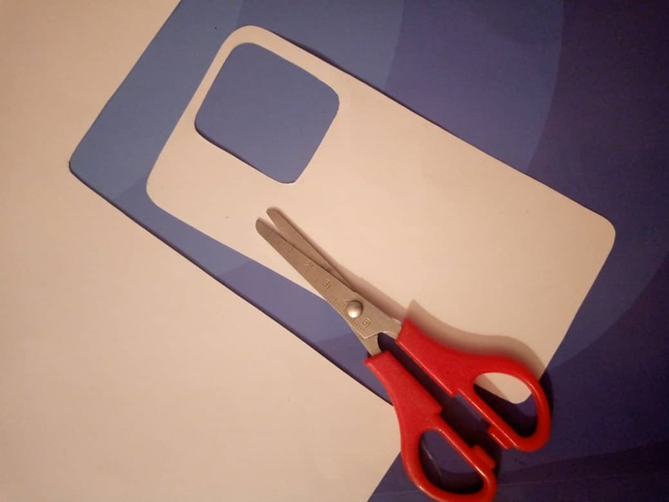 Después de recortar todo viene la parte divertida: ¡Elegir que dibujo queremos para nuestro forro! Podemos elegir el que mejor quedé con nuestro gusto. Empezamos dibujando por partes, primero hacemos el boceto, luego marcamos las líneas y después pintamos. Finalmente, terminaremos dando los toques finales al dibujo y ya tenemos un nuevo forro. 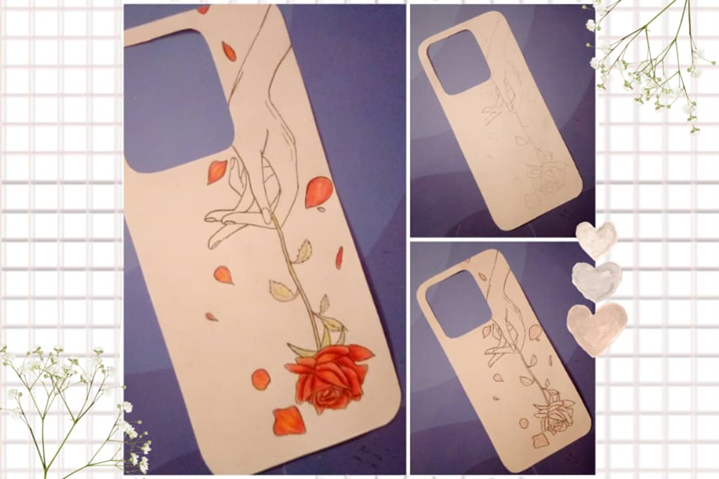 Lo mejor de todo es que podemos hacer uno diferente cuando queramos. Hay algunos más complejos como este de Goku. 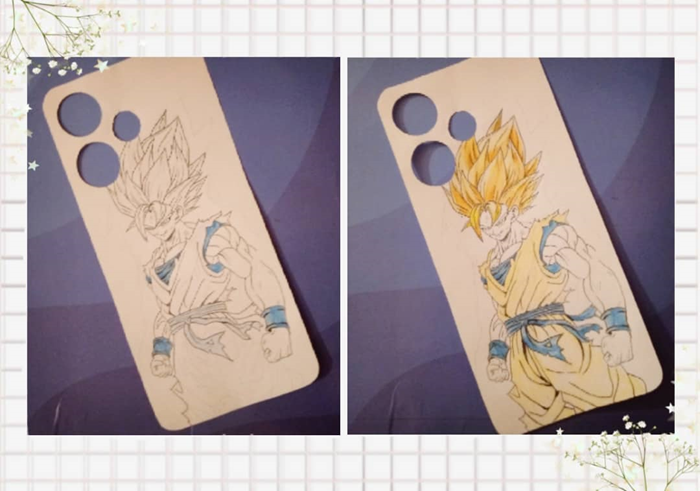 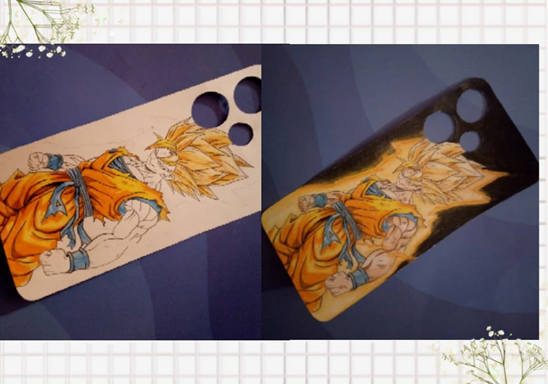 Este me tomo un día y lo hice para mi hermano menor. 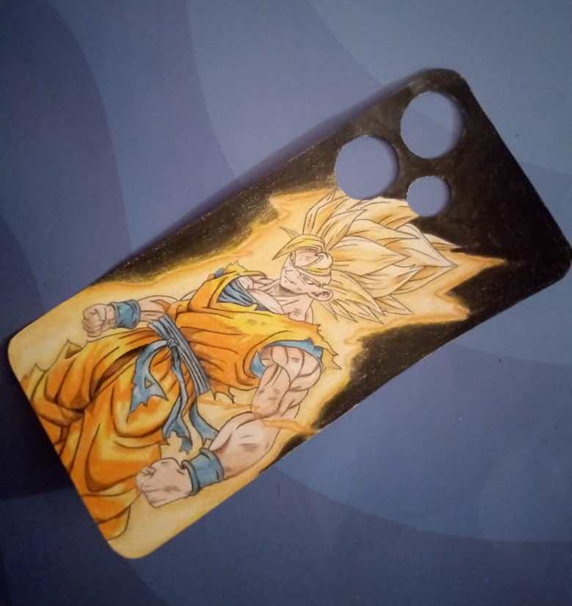 ¡También he hecho uno del Manhua 19 días! Estos son unos de mis personajes favoritos! 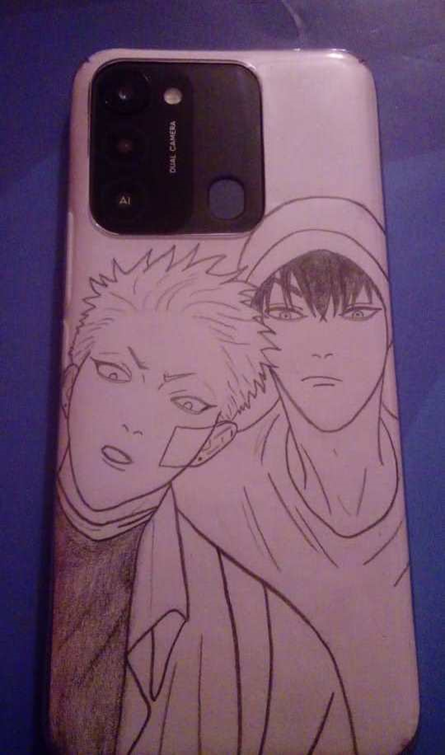 ¡Los forros son muy fáciles de hacer y podemos tener uno diferente cuando queramos de nuestras mangas, anime, videojuegos o serié favoritas! Las manualidades también son muy buenas para compartir y podemos regalarle un forro personalizado a alguien que queramos, seguro le gustara! ¡Aunque existen dibujos muy complejos, hay otros muchos más fáciles! Si sabemos pintar en acuarela podemos darle un toque más original a nuestros forros. ¿Les gustaría que les enseñará a hacer un dibujo? Las fotos fueron tomadas de mi telefono Tecno Spark y las imagenes las edite en Picsart Espero que les haya gustado este artículo! Bye, bye
</center> <div class="text-justify"> |<center>**আসসালামু আলাইকুম**</center>| |---| ---- **আমার বাংলা ব্লগ কমিউনিটিতে আজকের নতুন ব্লগে আপনাদের সবাইকে স্বাগতম। কেমন আছেন সবাই? আশা করি সবাই ভালো এবং সুস্থ আছেন।আমিও আলহামদুলিল্লাহ ভালো আছি।** ---- ---- প্রতিদিনের মতো আজও আপনাদের মাঝে নতুন একটি পোস্ট নিয়ে হাজির হলাম। আজ আমি আপনাদের সাথে অনেক সুন্দর এবং ইউনিক একটি ডাই শেয়ার করতে আসলাম। আজকের এই ডাইটি তৈরি করার পর দেখতে অনেক সুন্দর লাগছিল। আজ মূলত আমি আপনাদের সাথে শেয়ার করার জন্য রঙিন কাগজ দিয়ে ময়লা ফেলার বেলচা এবং ঝাড়ু তৈরি করেছি। এই ধরনের ডাইগুলো তৈরি করতে অনেক বেশি সময় লাগে। যদিও রঙিন কাগজের তৈরি জিনিস গুলো দেখতে অনেক কিউট লাগে। তাই প্রায় সময় রঙিন কাগজ দিয়ে বিভিন্ন জিনিস তৈরি করা হয়। আশা করি আজকের এই ডাই প্রজেক্টটি আপনাদের কাছে ভালো লাগবে। ---- ----  ---- ---- তাহলে চলুন রঙিন কাগজ দিয়ে বেলচা এবং ঝাড়ু তৈরি করতে আমার কি কি উপকরণ প্রয়োজন হয়েছে এবং কিভাবে তৈরি করেছি সেটি দেখে নেওয়া যাক। ---- ---- |<center>**উপকরণ সমূহ :**</center>| |---| ---- • রঙিন কাগজ • কেঁচি • আঠা • কলম • সাইন পেন ----  ---- ---- |<center>**ধাপ-১**</center>| |---| প্রথমে একটি হলুদ পেপার গোল করে কেটে নিয়ে মাঝ বরাবর ভাঁজ দিতে হবে। | -|- |<center>**ধাপ-২**</center>| |---| এরপর একটি গোলাপী কাগজ দিয়ে একটি স্টিক তৈরি করে নিলাম। | -|- |<center>**ধাপ-৩**</center>| |---| এখন একটি গোলাপী কাগজের সাথে রাউন্ড করে রাখা হলুদ পেপার দুইটি আঠা দিয়ে জোড়া লাগিয়ে নিব। | -|- |<center>**ধাপ-৪**</center>| |---| ঝাড়ুটি কিউট দেখানোর জন্য দুইটি কান তৈরি করে নিচ্ছি রঙিন পেপার দিয়ে। | -|- |<center>**ধাপ-৫**</center>| |---| এখন ঝাড়ুর উপরের অংশের সাথে কান দুইটি জোড়া লাগিয়ে নিব এবং চোখ মুখ আঁকিয়ে নিব সুন্দর করে। দেখতে অনেক কিউট লাগছে এগুলো করার পর। | -|- | -|- |<center>**ধাপ-৬**</center>| |---| এখন ঝাড়ুর অংশটুকু কেঁচির সাহায্যে চিকন করে কেটে নিব। | -|- |<center>**ধাপ-৭**</center>| |---| এখন প্রথমে বানিয়ে রাখা স্টিকের সাথে ঝাড়ুটা আঠা দিয়ে জোড়া লাগিয়ে নিব। | -|- |<center>**ধাপ-৮**</center>| |---| দেখুন কত কিউট একটি ঝাড়ু তৈরি হয়ে গেল।  |<center>**ধাপ-৯**</center>| |---| এই পর্যায়ে তৈরি করব বেলচা। বেলচা তৈরি করার জন্য আমি গোলাপি পেপার ব্যবহার করছি। বেলচা তৈরীর জন্য সুন্দর মত ভাঁজগুলো দিতে হবে। পারফেক্ট ভাঁজ না হলে বেলচা দেখতে একদমই ভালো দেখা যাবে না। তাই বেলচা তৈরির পদ্ধতি মুখে বলা কিংবা লিখে প্রকাশ করা যাবে না। ছবিগুলো দেখেই আপনারা বুঝে নিবেন। | -|- | -|- | -|- | -|- |<center>**ধাপ-১০**</center>| |---| এখন হলুদ কাগজ দিয়ে আরো একটি স্টিক তৈরি করে বেলচার পিছন সাইডে আঠা দিয়ে আটকে নিব। | -|- |<center>**ফাইনাল লুক**</center>| |---| ---- ----   ---- ---- এই ছিল আমার আজকের ডাই পোস্ট। আশা করি, আজকের এই ডাই পোস্টটি আপনাদের কাছে ভালো লেগেছে। ভালো লাগলে অবশ্যই আপনাদের মূল্যবান মতামত শেয়ার করবেন। সকলের সুস্থতা কামনা করে আজ এখানেই বিদায় নিচ্ছি। দেখা হবে পরবর্তীতে নতুন কোন পোস্ট নিয়ে ইনশাআল্লাহ। |<center>**আল্লাহ হাফেজ**</center>| |---| ---- ---- |<center>**সময় নিয়ে পোস্টটি ভিজিট করার জন্য সবাইকে অনেক ধন্যবাদ**</center>| |---| ---- ---- </center> <div class="text-justify"> https://cdn.steemitimages.com/DQmeujUPDrQhudSha4LC9y2EXbzgURrWu9s8WWcrtegdxf2/1611692327532.png <div class="pull-left">  </div> *আসসালামু আলাইকুম। আমি নীলিমা আক্তার ঐশী। জাতীয়তাঃ বাংলাদেশী। আমি একজন স্টুডেন্ট। আমি অনার্স ৪র্থ বর্ষের ম্যানেজমেন্ট বিভাগের ছাত্রী। আর্ট করা,ঘুরতে যাওয়া এবং রান্না আমার খুবই প্রিয়। প্রিয়জনদের পছন্দের খাবার রান্না করে খাওয়াতে এবং তাদের প্রশংসা শুনতে আমার খুবই ভালো লাগে। নতুন নতুন রেসিপি শেখার আমার খুব আগ্রহ রয়েছে। আমি ২০২৩ সালের জুন মাসে স্টিমিটে জয়েন হয়েছি।আমি বাংলা ব্লগ কমিউনিটিতে জয়েন হয়েছি সবার সাথে বিভিন্ন রেসিপি এবং আর্ট শেয়ার করার জন্য এবং সেই সাথে অন্য সবার থেকে দারুন দারুন সব ক্রিয়েটিভিটি শিখতে। বাংলা ব্লগ কমিউনিটি একটি পরিবারের মত আর এই পরিবারের একজন সদস্য হতে পেরে আমি অনেক খুশি।*  **<center> <div class="phishy">Support @heroism Initiative by Delegating your Steem Power </div></center>** | | | | | | | ------------------------------------------------------------------------------------------------------- | ------------------------------------------------------------------------------------------------------- | --------------------------------------------------------------------------------------------------------- | --------------------------------------------------------------------------------------------------------- | --------------------------------------------------------------------------------------------------------- | | [250 SP](https://steemlogin.com/sign/delegateVestingShares?delegator=&delegatee=heroism&vesting_shares=464400.000000%20VESTS) | [500 SP](https://steemlogin.com/sign/delegateVestingShares?delegator=&delegatee=heroism&vesting_shares=928400.000000%20VESTS) | [1000 SP](https://steemlogin.com/sign/delegateVestingShares?delegator=&delegatee=heroism&vesting_shares=1856800.000000%20VESTS) | [2000 SP]( https://steemlogin.com/sign/delegateVestingShares?delegator=&delegatee=heroism&vesting_shares=3713600.000000%20VESTS) | [5000 SP](https://steemlogin.com/sign/delegateVestingShares?delegator=&delegatee=heroism&vesting_shares=9283699.000000%20VESTS) | _____ <center>  **<center> <div class="phishy"> || [Join the Discord Server for more Details](https://discord.gg/UnNhq7gHst) || </div></center>** 
<div class="text-justify"> A _finished object_ , or FO, in knitting is a completed project; I’m so glad I’ve completed this pair of socks : <CENTER>  </CENTER> As you may recall I was inspired by the bright colours of a [flower](https://steemit.com/burnsteem25/@flowertron/sock-making-colours-inspired-by-nature-2-april-2024) I saw some days ago. I decided to use a different colour for the heel as I was a bit unsure whether or not I was going to have enough of the yellow yarn. I added a bit of green colour yarn thinking it matched the stem colour of the daffodil. In hindsight I made a good decision because the amount of yarn left would not have been enough for both heels: <CENTER>  </CENTER> I will keep that remnant handy as I will probably need some in the future to mend the socks and it will be nice to have a matching colour. The green colour I found at home was bought at a very well known second-hand and charity shop called Oxfam, and it was very cheap : <CENTER>  </CENTER> I took a photo of the label because it's important to familiarise oneself with the product before using it. <CENTER>  </CENTER> It's got some interesting information: firstly it’s 100% super wash wool which means that it’s machine washable. This [page](https://ysolda.com/blogs/journal/superwash-v-non-superwash-wool) goes into a lot of detail of ‘super wash’ wool and what it means. If you buy wool because it’s a natural product, you may choose to avoid ‘super wash’ as the treatment used on the yarn to make ‘easy care’ may include a plastic coating. The second point I thought was interesting on the label was its recommendation to use 3.25 mm knitting needles. It’s an extremely thin yarn and the 2.25 mm needles I used were much more suitable in my opinion. I love this green colour but didn’t actually like using the yarn very much because it splits easily so knitting with thin sharp needles was not easy at all. I’ve decided to give these socks to my friend so she’ll have to tell me what they’re like when worn. Thank you for reading ! </div>
# <code><div class="phishy"><strong><em>Dear Ukraine on Steem community!</em></strong></div></code> <div class ="text-justify"> Hello friends how are you all? Wishing you all a blessed Ramadan. I went again to maintain my consistency. I came to participate in the handmade competition in the Ukraine on steem community. I always like this competition so I always try to participate here every time. Today I have again appeared before you with my handiwork. Before sharing my handiwork, first thanks to @strecoza, the owner of this contest. Who organizes such a beautiful competition every week to showcase our handicrafts to everyone. Today I will show you how to make a well out of paper. The tradition of our Bengalis is this well. The people of earlier times used to keep this well at home. A well is a place from which water can be drawn and used. This water is available from very deep in the soil. This water was drawn by attaching something to the well. Most of the people used to set the bucket with this well. Earlier this well was seen in every house. Now with the touch of modernity, this well is not seen much. So what to make today, so I suddenly came to my mind, let's make this koa with paper. So let's see how I made this well and now share with you, |<center><div class ="phishy">Colorful wells made of paper</div></center>| |-|  # Step 1, First I took a thick paper. And I have glued that paper round.  # Step 2, Then this rounded paper is attached with a plane paper glue.  # Step 3, Then I made two long long sticks with this thick paper. And those two sticks were glued to the two sticks on both sides of the rounded paper.  # Step 4, Then I made it like a canopies with paper. Then I set the canopies paper on two sticks. After setting it looks like a whole well.  # Step 5, Then I painted the well pink.  # Step 6, Then I made some small flowers with some color paper. Then I put the flowers on top of the well with glue. This makes the well look more beautiful.   # Step 7, Then after I have set the whole quota, I cut a black paper to design a small bucket. And put a small stick in the middle of the well and hung the bucket with that stick.  # Step 8, Finally my color flower design paper well is done.  Hope you will like my craft. I'm not taking your time today, God bless you all.</div> I am inviting @josepha, @goodybest, @kuzboy and @anthony002 <center><i>◦•●◉✿ Thank You ✿◉●•◦ Everyone prays for me. Thank you so much for reading my post so patiently. Best Regards</center></i> 
<Center>Buenas tardes mi querida comunidad de Recreative Steem hoy nuevamente aquí trayendo algo de arte 🎨 para liberar un poco de estrés.</Center>  <div class="text-justify">Hace un par de días mi sobrino Yeison que está en Colombia me mandó arregalar unas témperas de colores neón son hermosos pero me gustaría hacer un buen proyecto con ellas pero en cartulina negra eso ya será un poco adelante cuando pueda comprar la cartulina y como no me aguantaba decidí hacer una flor con palitos de hisopos y hacía aprovecha para liberar un poco de estrés que e tenido estos días fue algo muy sencillo sin planificar pero con mucho amor y cariño para la comunidad de Recreative Steem, ya les pasó los materiales que use </div> ## Lista de Materiales ## <div class="pull-left"> https://cdn.steemitimages.com/DQmPEVyBEugaG6jHkWrTPCheTBtn3iinzcGWGAoRRhhcWbG/IMG_20240402_143733_923.jpg</div>• Mi tabla de apoyo. • Hoja blanca. • Mis témperas de Neón. • Lápiz de grafito. • Borrador. • Sacapuntas. • Hisopos. <div class="text-justify">Como van haber hice un dibujo muy sencillo, aprovechando de poner en practique la técnica del hisopo primera vez que la uso y fue algo muy divertido y desestresante.</div> ## • Pasó 1 ## <div class="pull-right"> https://cdn.steemitimages.com/DQmcegc5x2UdaZBvXQZFeLJPeimvufBDVesxnspVCK73Ntd/IMG_20240402_144517_808.jpg</div>Tomé mi hoja blanca y con mi lápiz dibuje el botón y el talló de lo que va hacer mi flor ese fue mi boceto. ## • Pasó 2 ## <div class="pull-left"> https://cdn.steemitimages.com/DQmdxA2eGXBjaZ6hyekiUN4KaAEiemQG9rNG9WvSdYdtuzd/IMG_20240402_150113_694.jpg</div>Remarque mi boceto con marcador verde oscuro, verde claro y negro. ## • Pasó 3 ## <div class="pull-right"> https://cdn.steemitimages.com/DQmSgi1n23mLK3zsaU7YmQm2rhL3wWDxCcJ35ALDEyEWXQH/IMG_20240402_151414_585.jpg</div> Agarro un hisopo y lo moje con un poquito de color y empiezo a dar de golpes muy leves a mi flor y así lo hago por todo el alrededor de lo que va hacer mi flor y poco a poco voy jugando con mis colores y me pareció muy divertido hasta risas me sacó este proceso deberían de hacerlo en realidad muy bueno. ## • Pasó 4 ## <div class="pull-left"> https://cdn.steemitimages.com/DQmZkyWiXLGtzEYmKdgPwPVypWnQ21gQBaXJXayrKFTnrcm/IMG_20240402_153239_485.jpg</div> En esté pasó lo que hago es ponerle unos puntos alrededor por arriba y por abajo de la flor le hago un poco de sombra con mi lápiz, con residuos de Creyón y mi dedo índice pintó la hoja para oscurecer un poco y asi fue el proceso. > >>>Así quedó mi dibujito espero que les guste fue algo muy divertido y emocionante aquí estrenandome mis témperas gracias a mi sobrino. <div class="pull-right"> https://cdn.steemitimages.com/DQmbTFkXXcXqn1nfZ8idg6GETuCnENWQRcuHYxr1CnfFXgF/IMG_20240402_155933_284.jpg</div> Quiero invitar a mis amigos @ochoa @keycama @seikoh para que participen en los martes de arte 🎨 <div class="pull-left"> https://cdn.steemitimages.com/DQmRJVEYn8zajC1ykukxt8DaNt3QrH1UXpc9JEZ2cq8C7xC/IMG_20240402_181615_661.jpg</div> <sup>Mi resultado final.</sup> <sup>Las fotos son de mi propiedad tomada con mi teléfono tecno pova exclusivamente para Recreative Steemit. Gracias por el apoyo y leer mi post bendiciones </sup> 
<div class="text-justify"> I finished the cardigan but I'm still pondering what sort of buttons I should use; perhaps I will even print my own buttons ! In the meantime I started a pair of socks and you can see the first photo below: <CENTER>  </CENTER> I decided to start the second sock before finishing the first one so it's not so daunting when one is completely done and then there's a whole sock to knit. I would compare the process of knitting the second sock to the 'sleeve island' effect I wrote about [here](https://steemit.com/burnsteem25/@flowertron/project-update-2-20-march-2024). <CENTER>  </CENTER> That's the main yarn I'm using, Li Hao or 利好 in Mandarin [lì hǎo] in pinyin. I feel I have to give my heartfelt thanks to Google for clarifying the spelling there. I then went to Google Translate and got the meaning _good_. I'm just hoping it is good enough to make a pair of socks. The label has minimum information : <CENTER>  </CENTER> I'm guessing it is 100% acrylic. The yarn came in a bundle of yarn I got as a present. It seems to be the right thickness to make 4ply socks (ie 'thin' socks), though it is a bit thicker than the bright orange yarn, which is also a present but didn't have a label; it doesn't feel like real wool or from natural fibres either. Incidentally, I got the inspiration for the colour combination from nature. I found this truly bright flower during my walk some time ago : <CENTER>  </CENTER> I used Google Lens to try and identify it; all I could tell is that it was a beautiful daffodil. It seems to be called _Sealing Wax_. I didn't find a lot of information about it but I did see it flowering in [March](https://bulbs.co.uk/product/daffodil-sealing-wax). I guess it got totally obliterated by the snow and all the rain that's fallen recently. I happened to see both colour yarns together and felt I needed to put them together - I didn't plan to combine them. I have barely 70g of yarn : 52 g of the yellow Lihao and about 18g of the orange. I could only 'afford' to make socks with that. In fact I may well have to make the heels and the toes in a different colour. I haven't decided yet. Actually making the socks nearly at the same time will allow me to determine how much I can spare per section. Thank you for reading ! </div>
<div class="text-justify"> |<center><a href="https://steemit.com/trending/hive-129948">অরিগ্যামি:)- রঙিন কাগজ দিয়ে কিউট ইঁদুর তৈরি।</a><br><sub><sup>💐 "আমার ব্লগে সবাইকে কে স্বাগতম" 💐</sup></sub></a></center>| |---| |<center>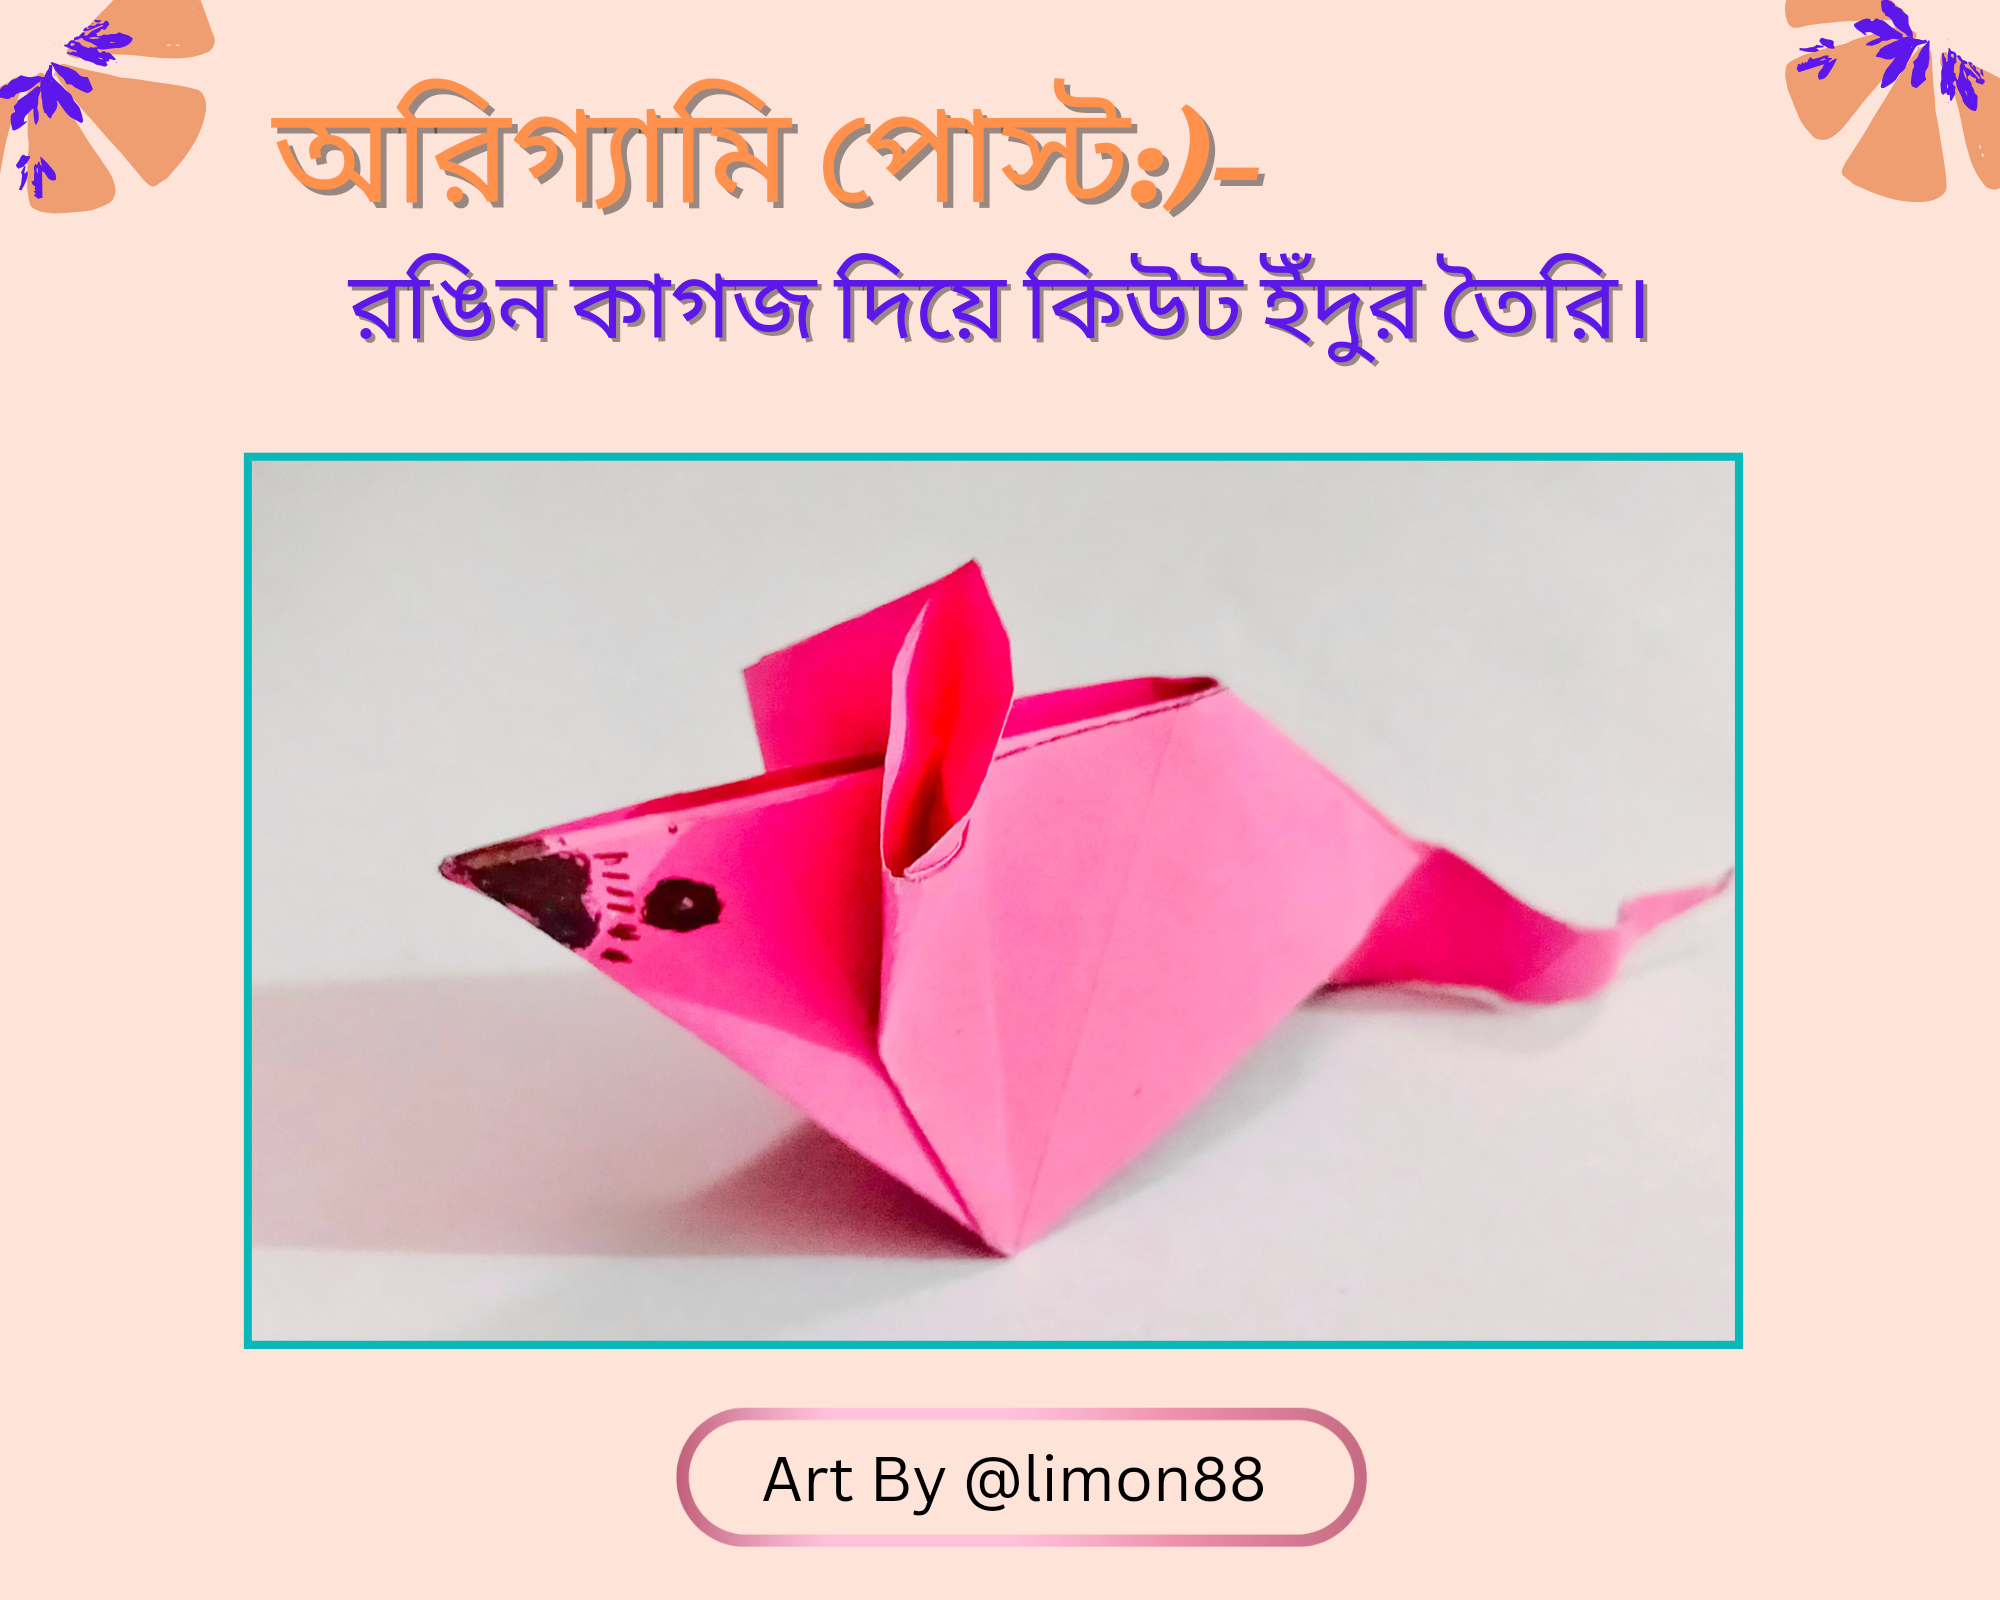</center>| |---| <center><sub>"ছবিটি Canva দিয়ে তৈরি"</sub></a></center> ### শুভ সকাল 🌅 হ্যালো আমার বাংলা ব্লগ পরিবার। প্রথমেই সবাইকে আমার সালাম ও আদাব। কেমন আছেন সবাই? আশাকরি আপনারা সকলেই আল্লাহর রহমতে ভালো আছেন। আমিও আলহামদুলিল্লাহ আল্লাহর রহমতে ভালো আছি। সবার সুস্বাস্থ্য কামনা করে আজকের পোস্ট শুরু করছি। আজকে আমি আপনাদের মাঝে হাজির হলাম আমার নতুন একটি ব্লগ নিয়ে। **অরিগ্যামি:)- রঙিন কাগজ দিয়ে কিউট ইঁদুর তৈরি।** আশাকরি আপনাদের সবার ভালো লাগবে। তাহলে চলুন আমি কিউট ইঁদুর কিভাবে তৈরি করলাম দেখে নেওয়া যাক। |<center>**✂️ "প্রয়োজনীয় উপকরণ" ✂️</a>**</center>| |--| <center>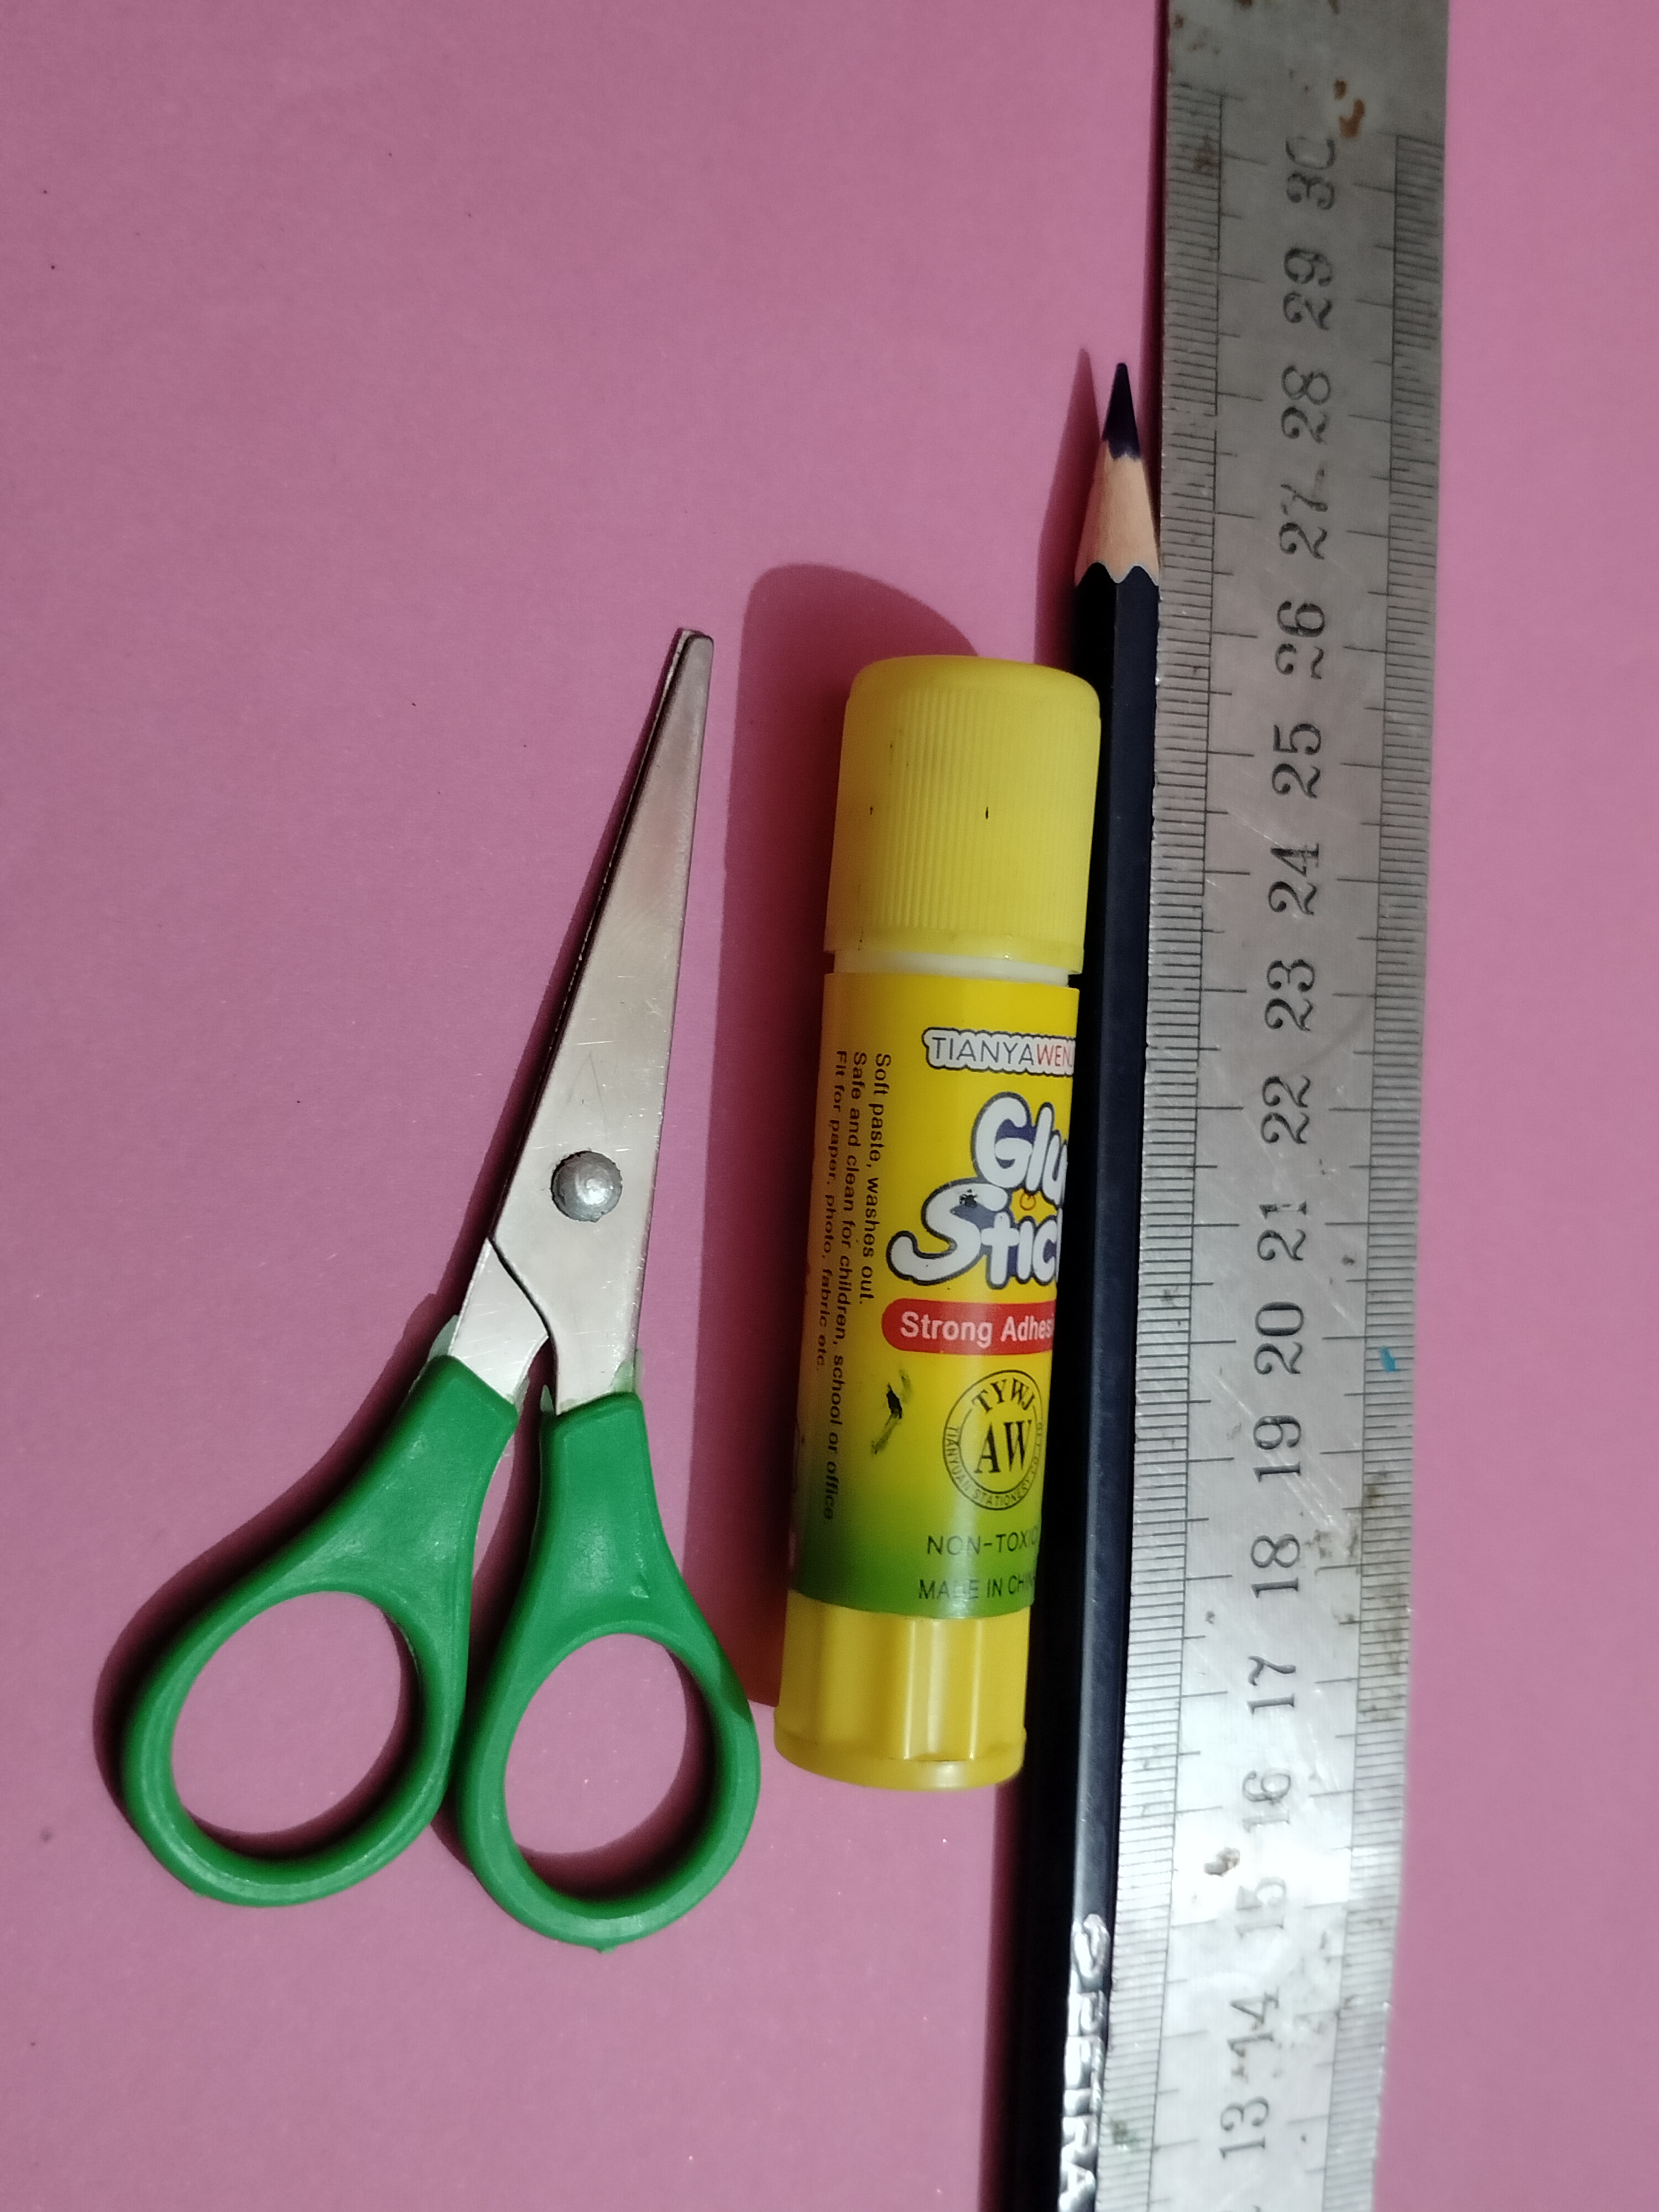</center>| |---| * রঙিন কাগজ। * পেন্সিল। * কাঁচি। * আঠা। * এস্কেল। |<center><sub> "তৈরির কাজ চলছে" </sub></a></center>| |--| <center>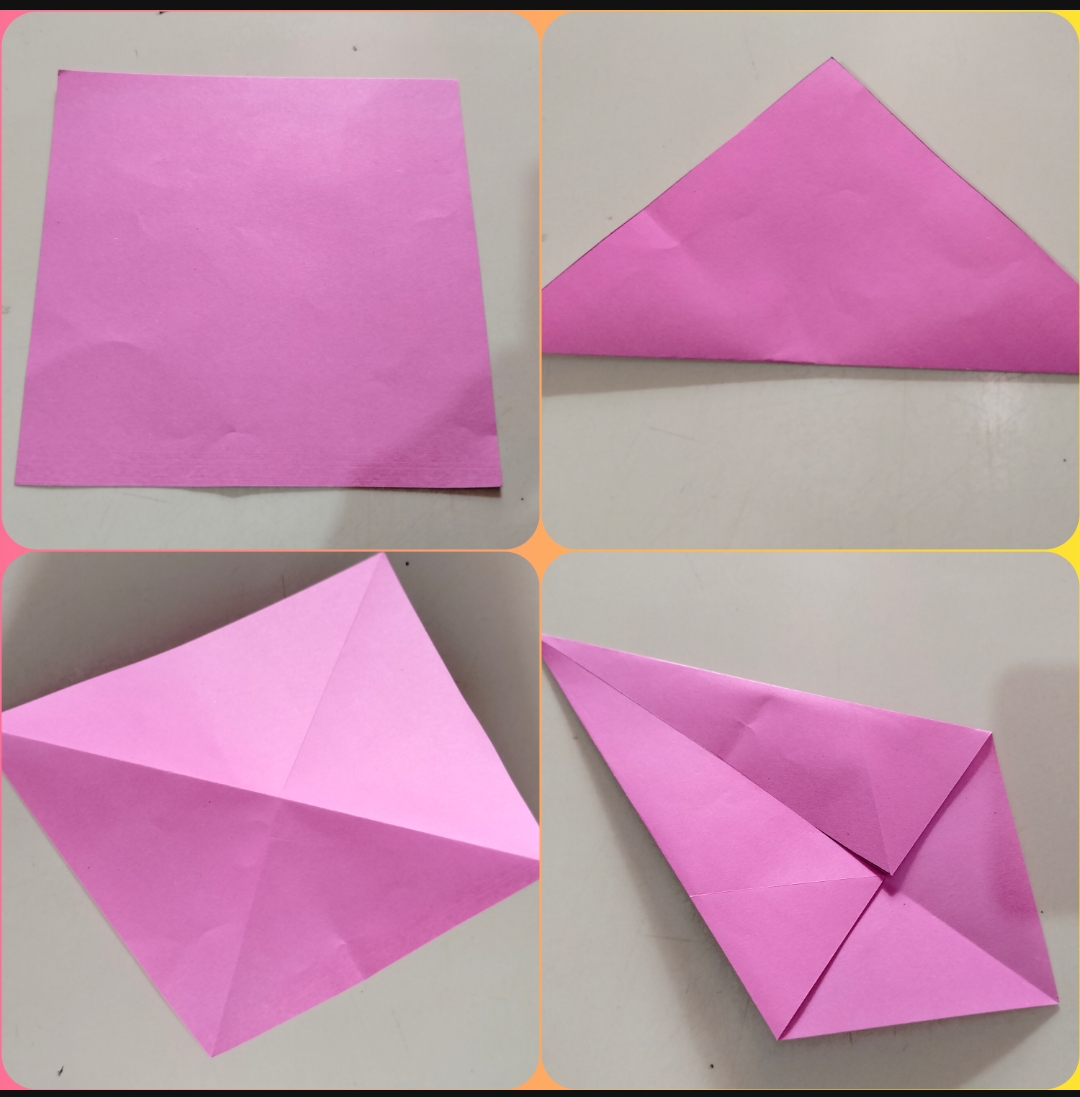</center>| |---| * প্রথমেই আমি রঙিন কাগজ নিলাম। তার পরে ১৫সে.মি করে কাঁচি দিয়ে কেটে নিলাম। এর পরে কোনাকুনি ভাবে ভাঁজ করে নিলাম। অপর পাশে ভাজ করে নিলাম। এবার আমি উপরের দিকে থেকে নিচের দিকে ভাঁজ করে নিলাম। |<center><sub> "তৈরির কাজ চলছে" </sub></a></center>| |--| <center>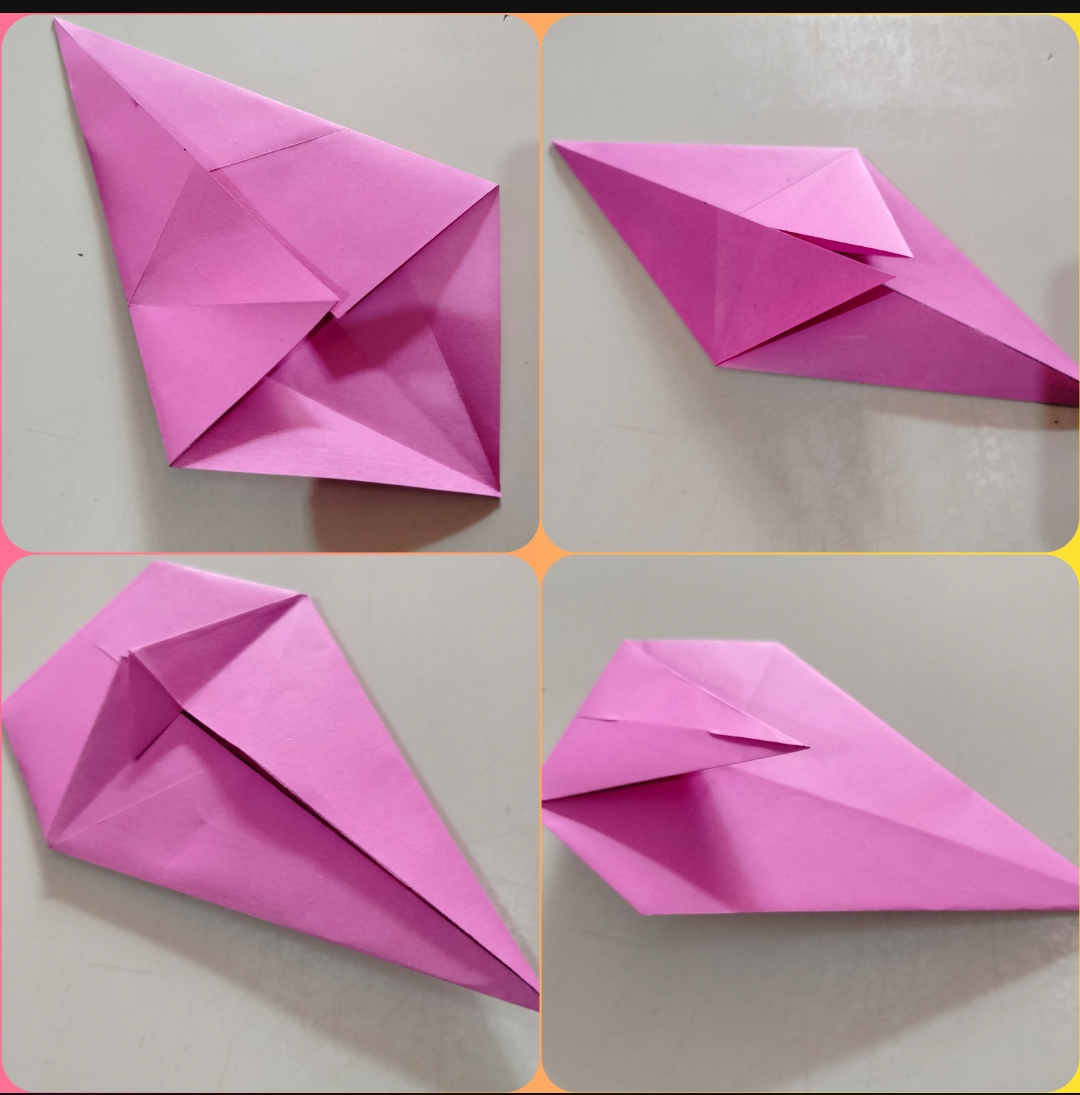</center>| |---| * এবার আমি ভাঁজ গুলোকে খুলে নিলাম। তার পরে অপর পাশে ভাঁজ করে নিলাম। এবার আমি কাগজ টিকে ঘুরিয়ে নিলাম। তার পরে ছোট করে ভাঁজ করে নিলাম। এবার আমি উপরের দিকে ভাঁজ করে নিলাম। তার পরে কাগজ টিকে ঘুরিয়ে নিলাম। |<center><sub> "তৈরির কাজ চলছে" </sub></a></center>| |--| <center>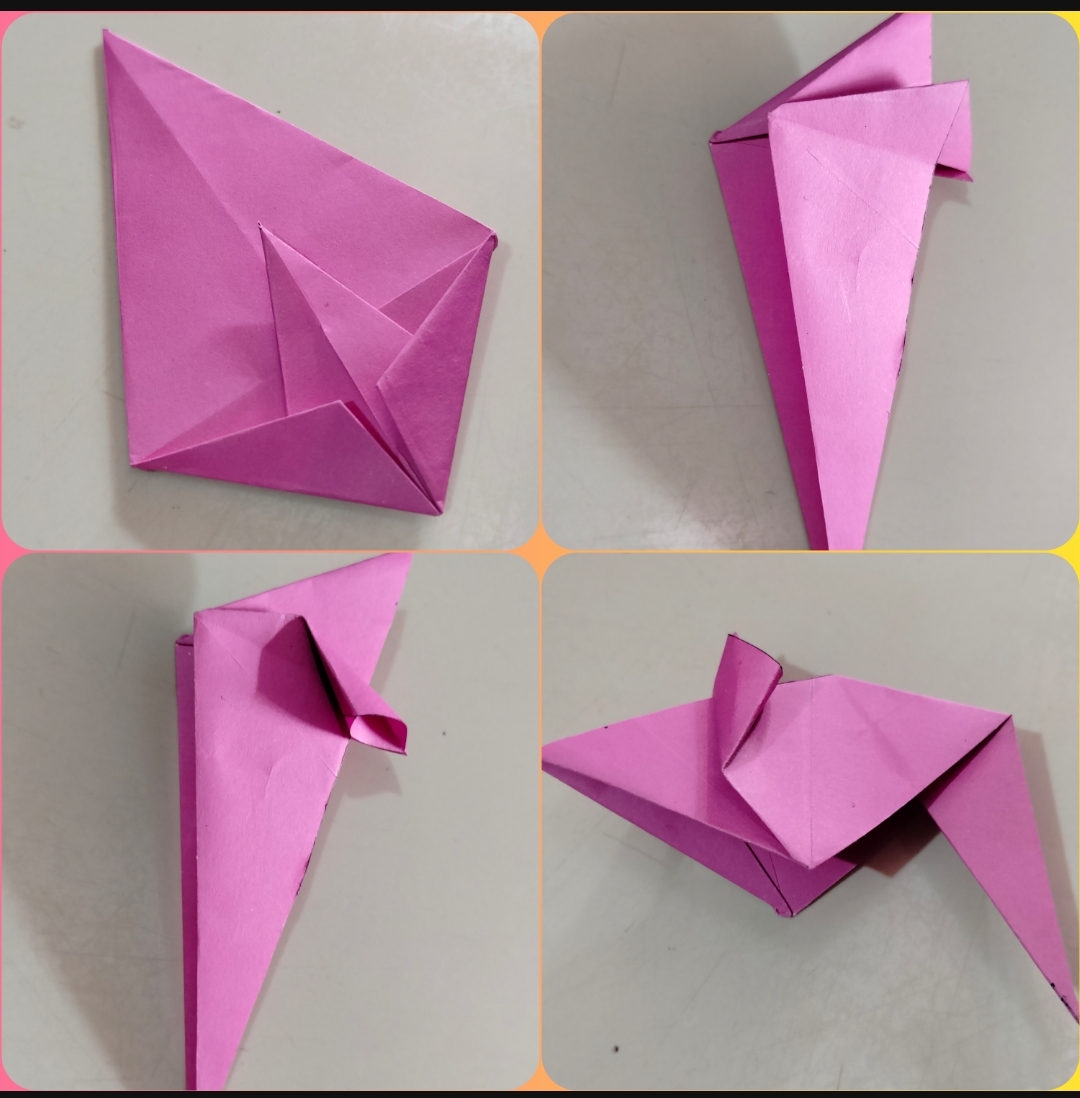</center>| |---| * এবার আমি দুপাশে ছোট করে ভাঁজ করে নিলাম। এর পরে মাঝখানে ভাঁজ করে নিলাম। এবার আমি ইঁদুরের কান বানিয়ে নিলাম। এর পরে নিচের দিকে ভাঁজ করে নিলাম। |<center><sub> "তৈরির কাজ চলছে" </sub></a></center>| |--| <center>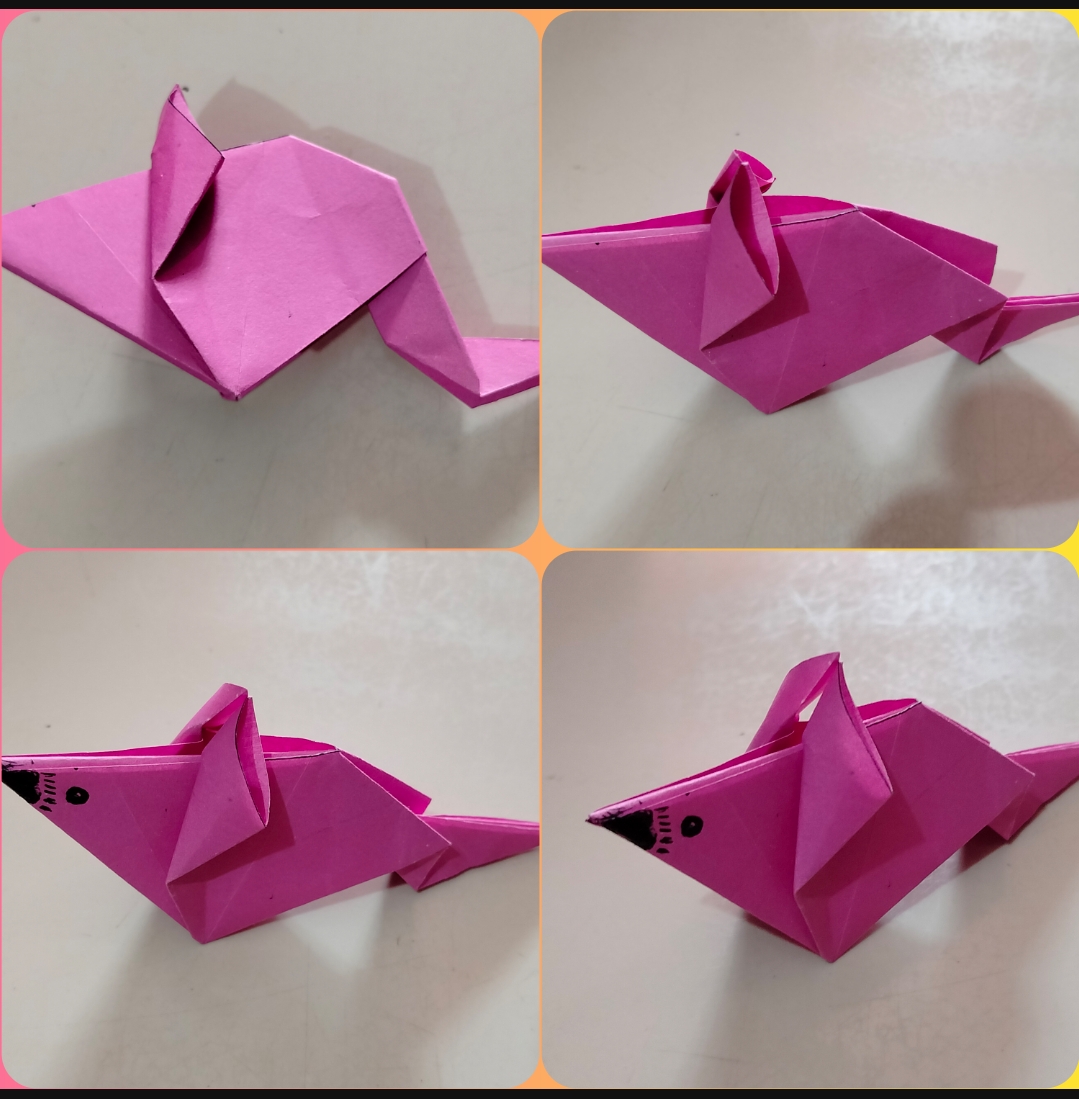</center>| |---| * নিচের দিকে ভাঁজ খুলে নিয়ে নিলাম। এর পরে ভাঁজ গুলো আস্তে করে ভিতরে ঢুকিয়ে দিলাম। এর পরে আমি ইঁদুরের লেজ বানিয়ে নিলাম। এর পরে আমি সাইন পেন দিয়ে চোখ মুখ বানিয়ে নিলাম। |<center><sub> "ফাইনাল-আউটপুট" </sub></a></center>| |--| |<center>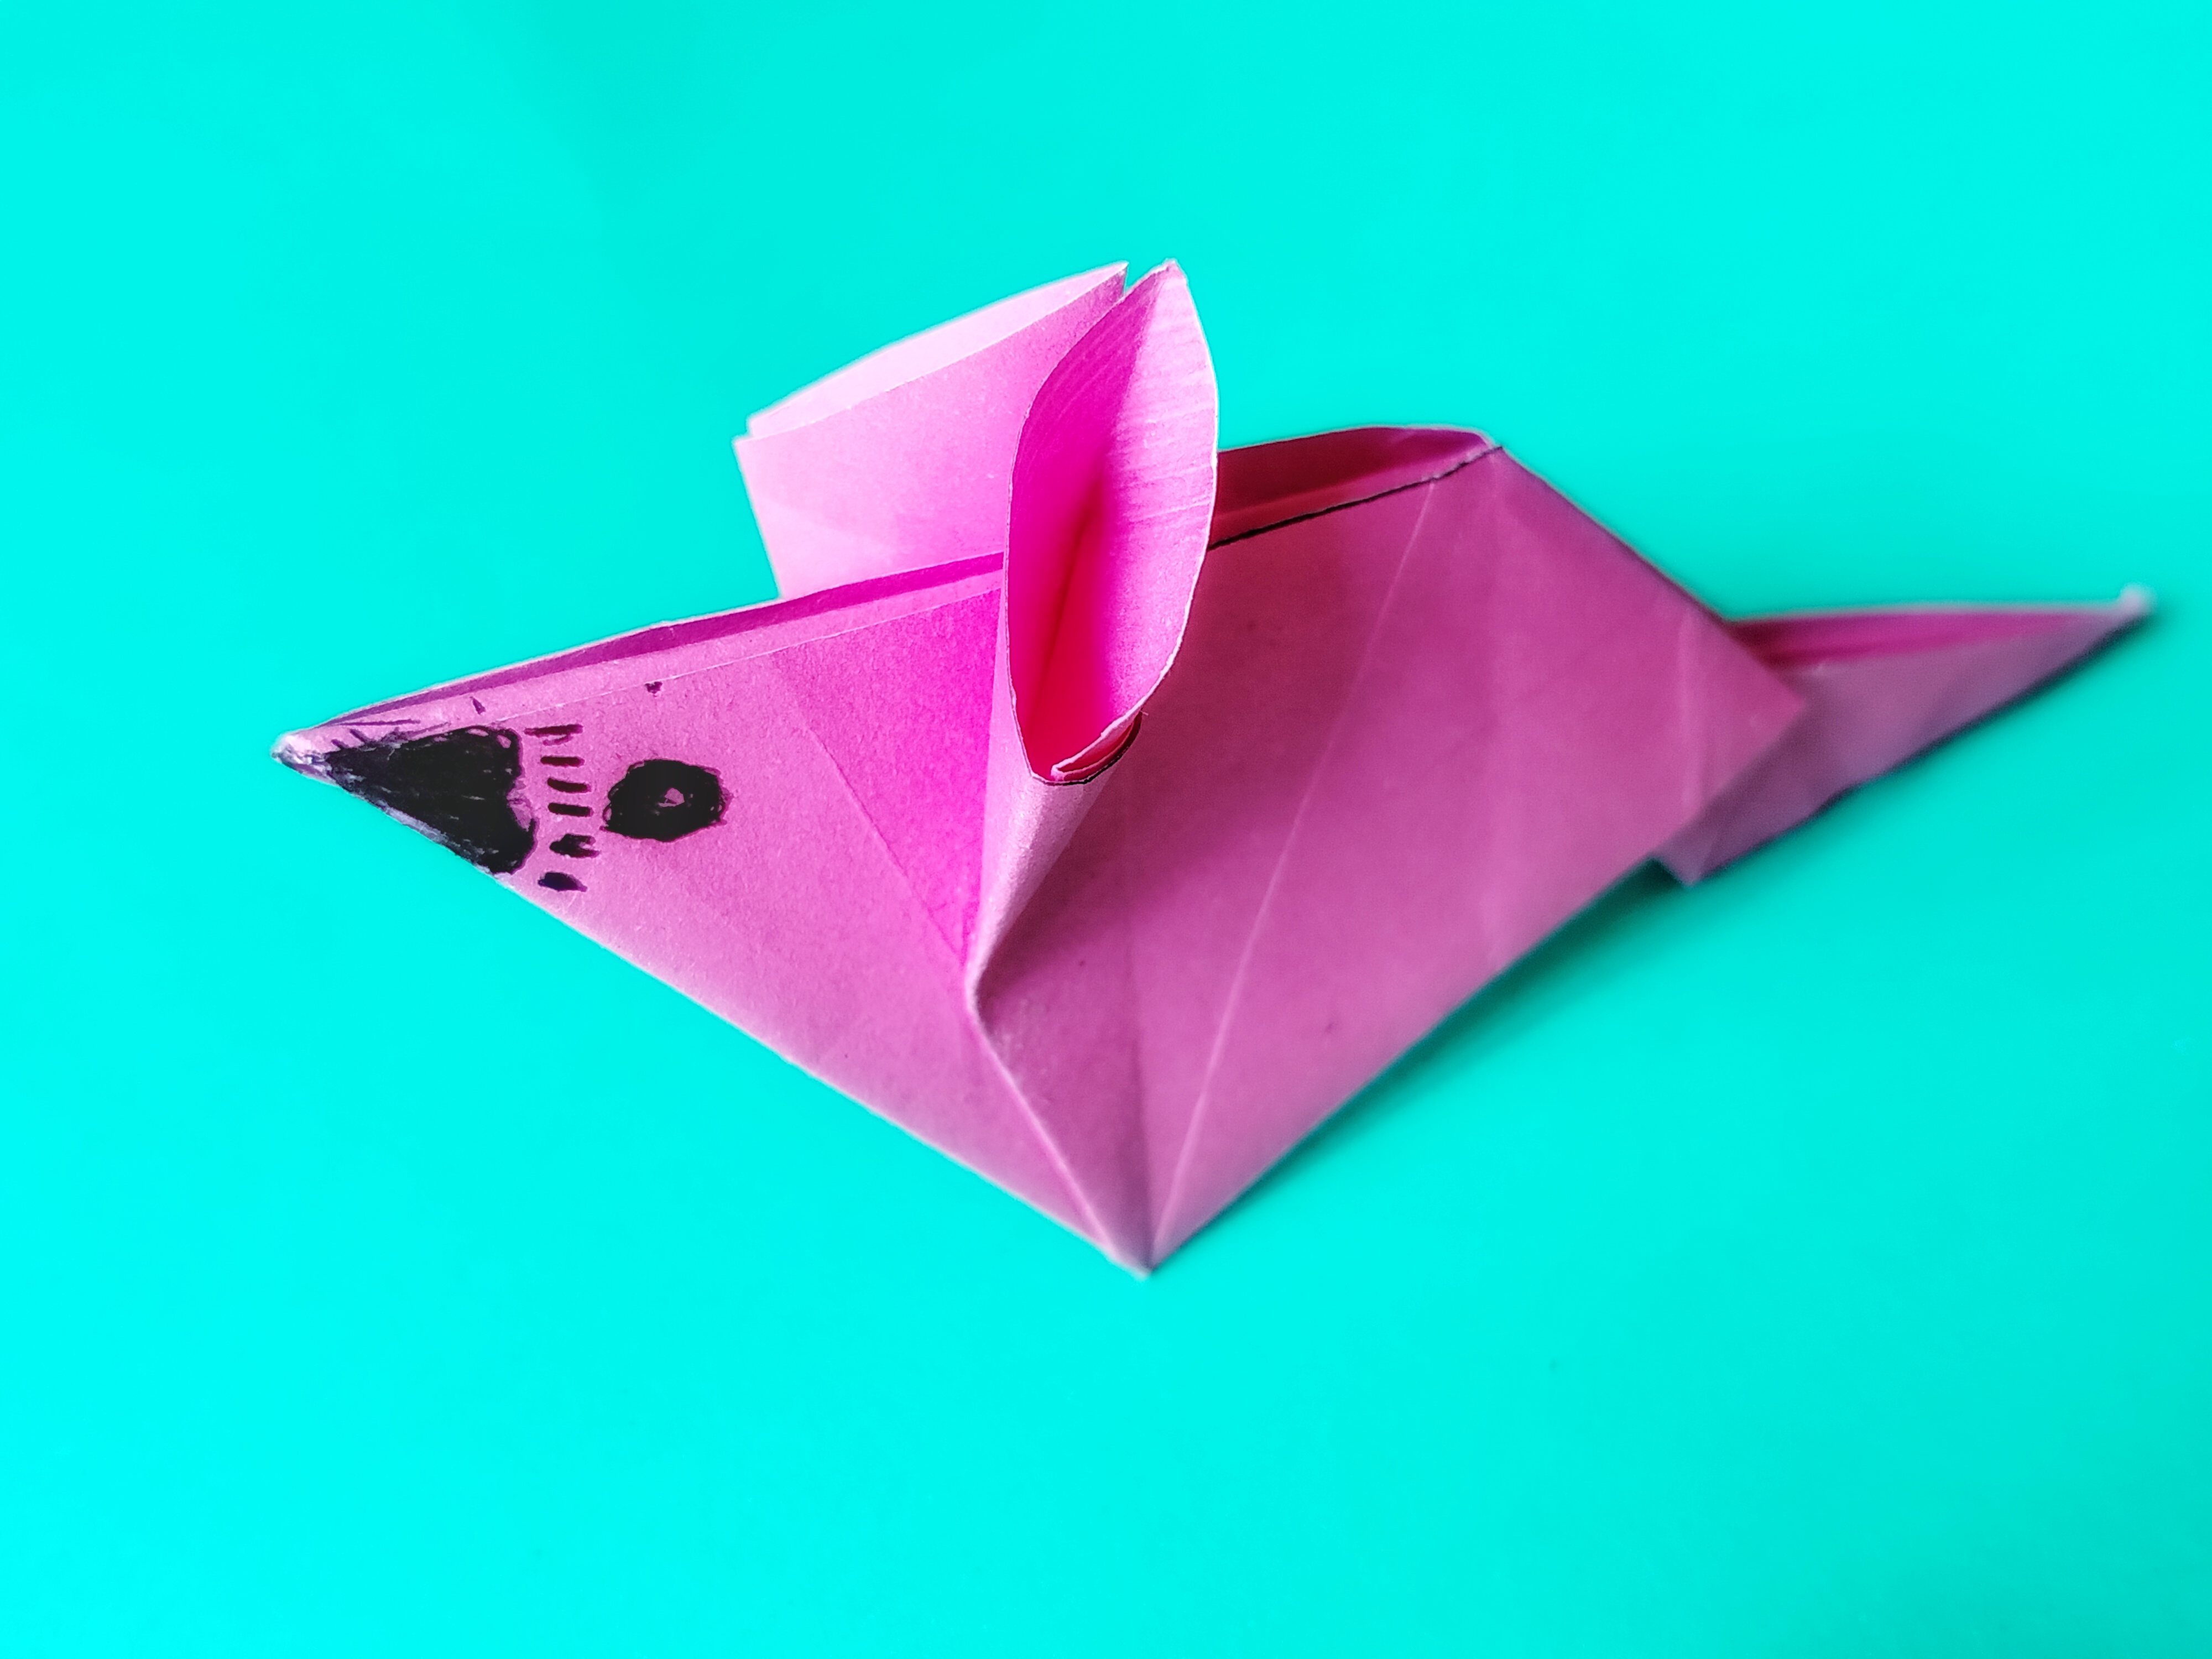</center>| |---| |<center>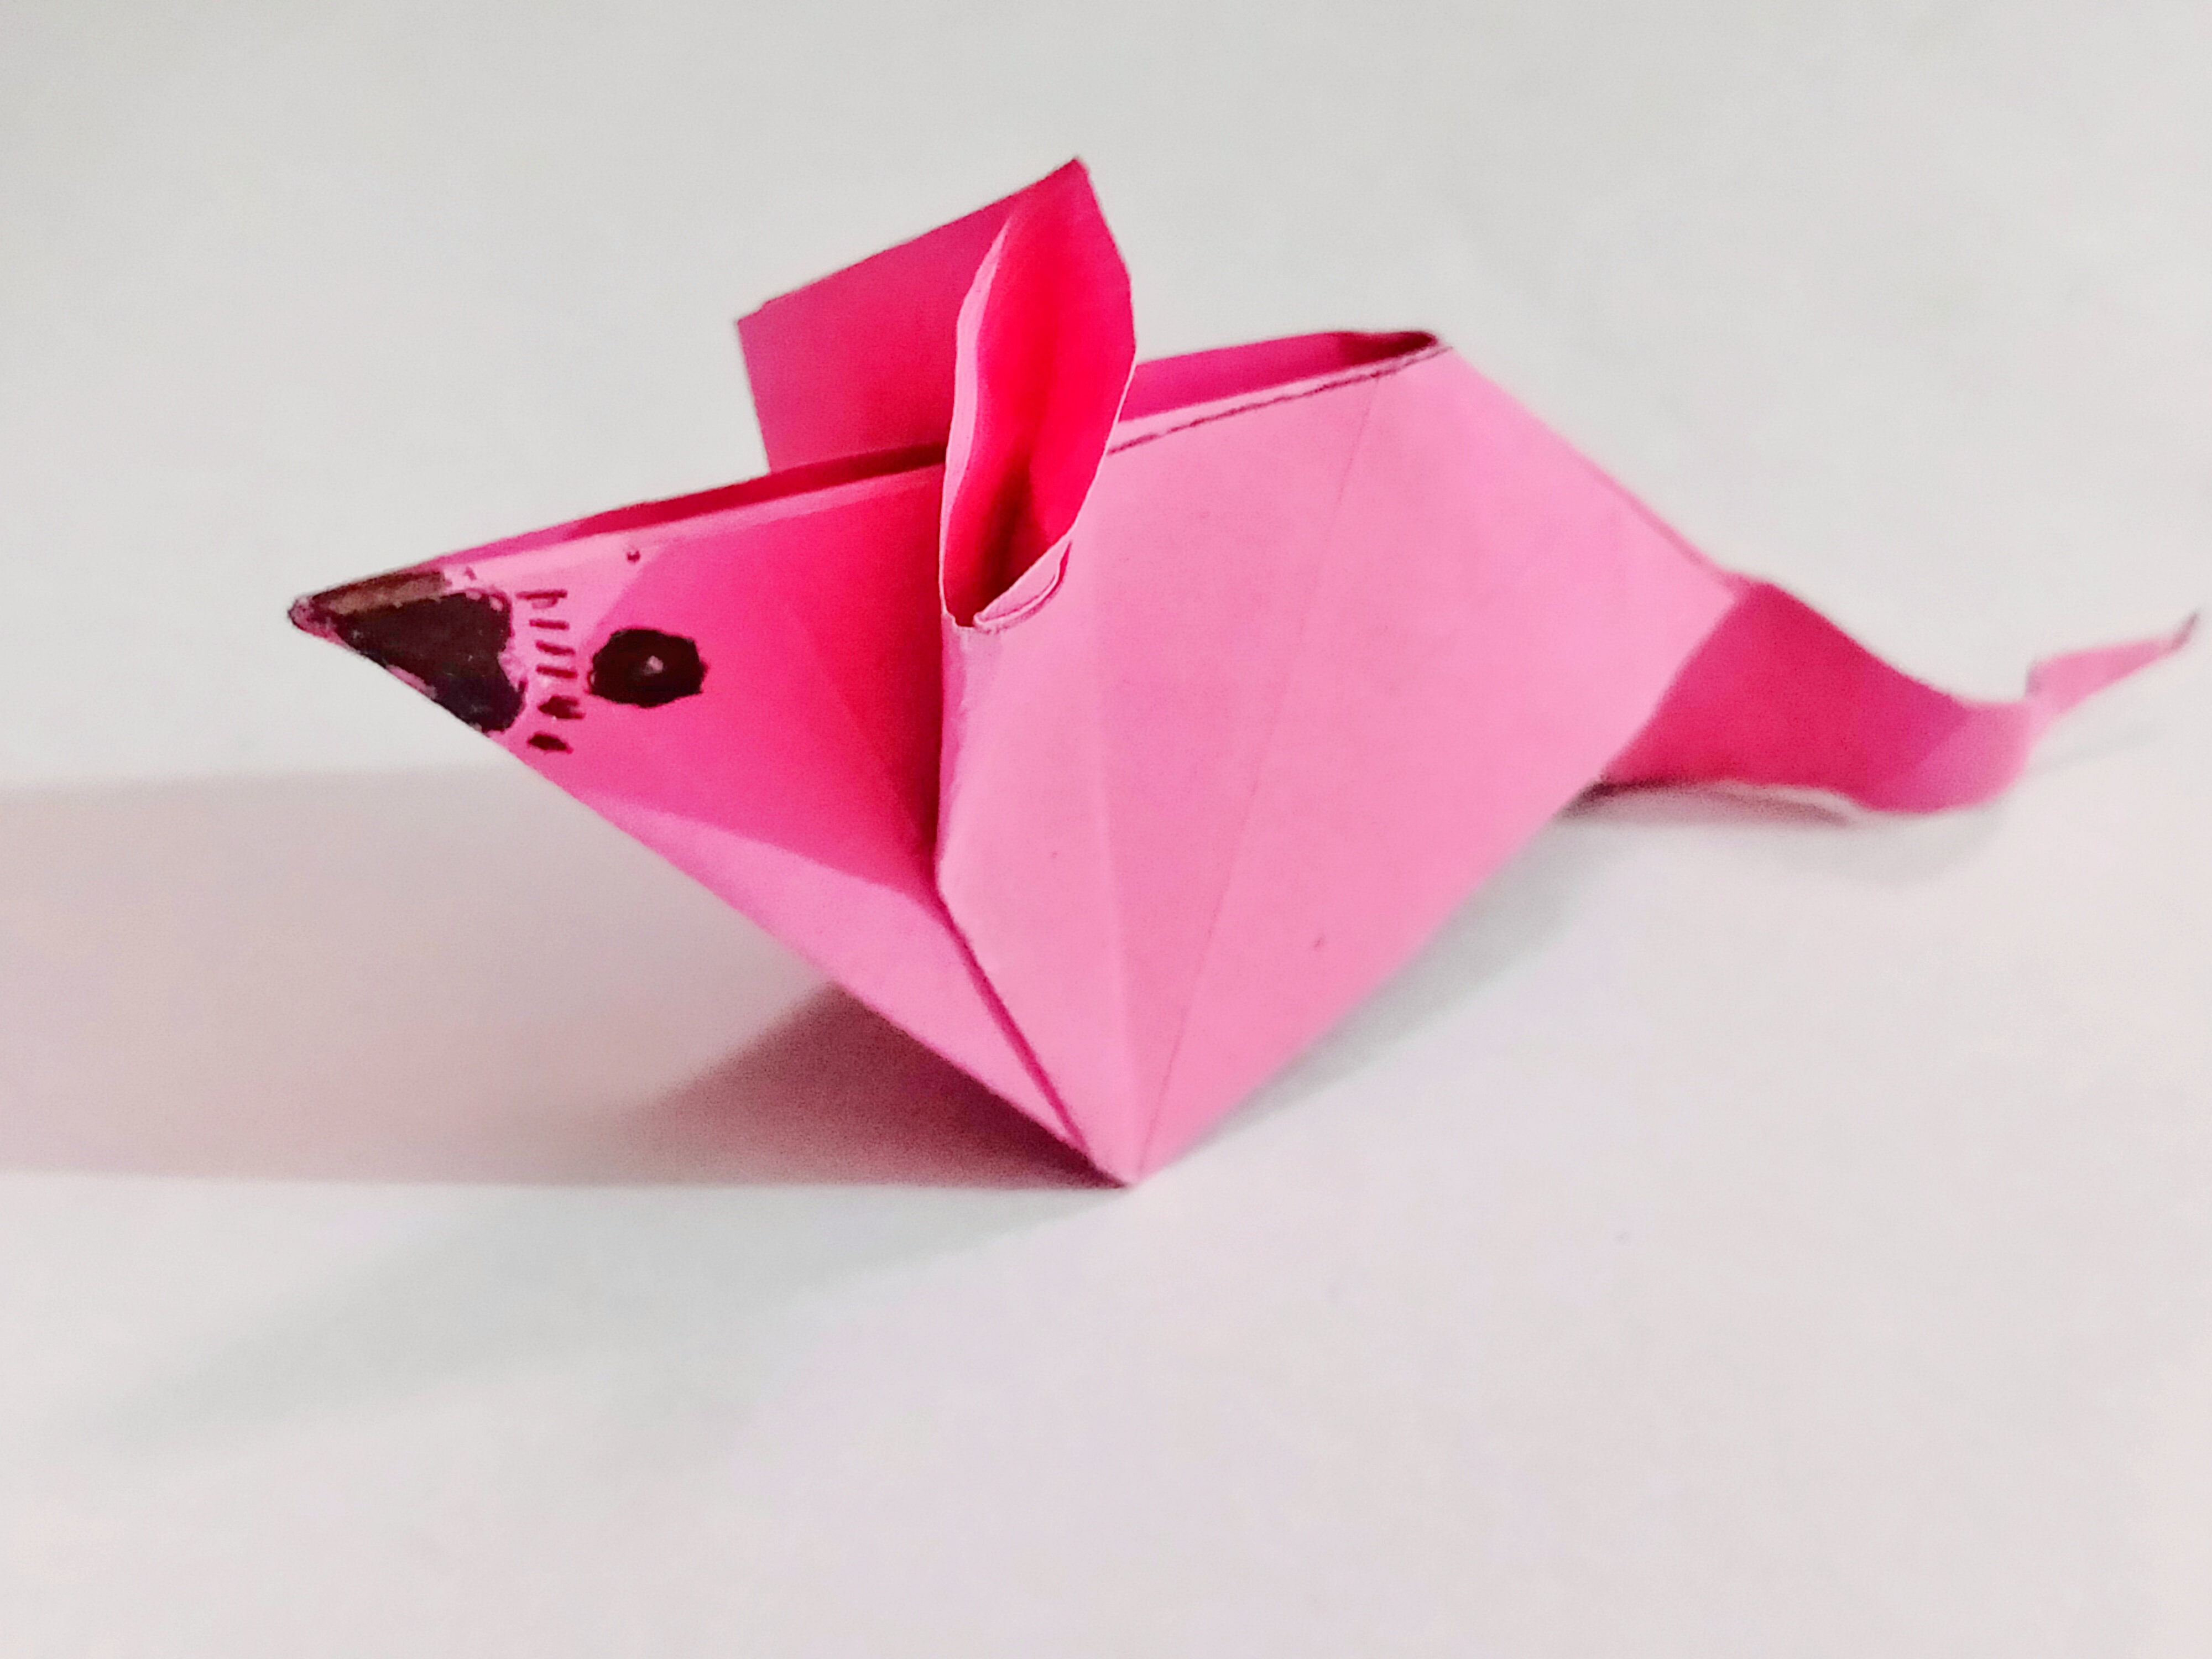</center>| |---| * এবার আমি কিউট ইঁদুর তৈরি করা শেষ। তার পরে আমি ইঁদুরটির বিভিন্ন ভাবে ফটোগ্রাফি করে নিলাম। বাস্তবে যদিও ইঁদুর দেখতে খারাপ লাগে। তবে রঙিন কাগজের তৈরি ইঁদুরটি দেখতে ভীষণ কিউট লাগতেছে। আমার ভাগ্নি জান্নাতুল ফারিয়া কিউট ইঁদুর পেয়ে ভীষণ খুশি হয়েছিলো। রঙিন কাগজের তৈরি জিনিস গুলো ছোটরা পছন্দ করে। আমার কাছে ও ভালো লেগেছে। আশাকরি আপনাদের সবার ভালো লেগেছে। কেমন লাগলো অবশ্যই জানাবেন? আপনাদের সবার সহযোগিতা কামনা করছি। আশাকরি আপনারা সকলেই পাশে থাকবেন ইনশাআল্লাহ। আজকের মতো এখানেই বিদায় নিলাম। সবাই ভালো থাকুন সুস্থ থাকুন সব সময়ই এই কামনাই করি। আল্লাহ হাফেজ 💞 |<center>পোস্টের বিবরণ:-</center>| |--- বিভাগ| অরিগ্যামি। ---|--- ডিভাইজ | realme 9 বিষয় | রঙিন কাগজ দিয়ে কিউট ইঁদুর তৈরি। লোকেশন | উত্তরখান, ঢাকা, বাংলাদেশ। ফটোগ্রাফার | @limon88 ___ ___ .gif)  <div class="text-justify"> |<center>🙎♂️ "আমার পরিচয়" 🙎♂️</center>| |--| <div class="pull-left">  </div> > <sub>আমি মোঃ লিমন হক। আমার স্টিমিট একাউন্ট @limon88. আমি একজন বাংলাদেশী। আমার বাড়ি নীলফামারী জেলায়। আমি এখন বর্তমানে জীবিকার তাগিদে পরিবার নিয়ে ঢাকা উত্তরায় থাকি। আমি একটি কোম্পানিতে চাকরি করছি এবং পাশাপাশি স্টিমিট এ কাজ করে আসছি। আমার ব্লগিং ক্যারিয়ার আড়াই বছর। এখন আমার সবথেকে বড় পরিচয় আমি আমার বাংলা ব্লগের একজন ভেরিফাইড মেম্বার। আমি সত্যিই গর্বিত আমার বাংলা ব্লগের সাথে থাকতে পেরে। স্টিমিট আর আমার বাংলা ব্লগ আমার জীবনের একটা অংশ হয়ে গেছে, তাই যতদিন স্টিমিট রয়েছে ইনশাআল্লাহ আপনাদের সাথেই থাকবো। ভালোবাসি পড়তে ও লিখতে ব্লগিং, ফটোগ্রাফি, মিউজিক, রেসিপি, ডাই, আর্ট আমার অনেক পছন্দের। আমি ঘুরতে অনেক ভালোবাসি। আমি একজন মিশুক ছেলে আমি সবার সাথে মিশতে ভালোবাসি। আমি আমার মতো। আল্লাহ হাফেজ 💞</sub>  </div>  **<center> <div class="phishy"> >>>>>|| [এখানে ক্লিক করেন ডিসকর্ড চ্যানেলে জয়েন করার জন্য](https://discord.gg/7SyC6uWBTS) ||<<<<< </center>**   <h2><center>আমার ব্লগটি ভিজিট করার জন্য সবাইকে অসংখ্য 💞"ধন্যবাদ"💞</center></h2>  </div>
# <code><div class="phishy"><strong><em>Dear Ukraine on Steem community!</em></strong></div></code> <center><i>Hello friends, how are you all? Everyone must be fine..I came today to participate in the handmad contest in Ukraine on Steam community. Today I will show you some paper crafts. I always try to be consistent in this competition. I really like this competition. I love making little things with papercraft all the time. So I will make something small with the paper cups that I had at hand and present it to you today. I cut some fruit with paper today. Three fruits cut today. |Number|Fruits name| | :-- |--- 1 |🔹strawberry| 2 |🔹watermelons| 3 |🔹Eggplants | 4|🔹Apple| # <code><div class="phishy"><strong><em>1st picture,[Strawberry]</em></strong></div></code> First I took a red colored paper and with this paper I shaved a strawberry and cut a paper. Then I took green colored paper to make the strawberry botata. Strawberries are made with green colored paper.  # <code><div class="phishy"><strong><em>second picture,[ watermelon]</em></strong></div></code> Then as I didn't have red colored paper, I made watermelon sap using sweet colored paper. Then I made a watermelon chocha with green paper. I made a paper watermelon with these two color combinations.  # <code><div class="phishy"><strong><em>Third picture,[Eggplant &Apple]</em></strong></div></code> I cut two brinjals with the color paper that I got at hand. I cut a purple paper and made an eggplant with a pink paper. I cut two eggplants of two sizes. And I gave the brinjal botata with green colored paper. What you can see with it is an apple cut into small pieces. I have made the apple in the shape of an apple using red color paper. And made an apple stick with green color paper.  Hope you like my process of making four fruits with color paper. I do these little night jobs to pass the time when I have paper to hand. It also makes my time good and I like to work. Hope you will like my crafting works. I have made all the works here by myself with color paper. I am not taking your time for so long. Good night everyone. Have a nice dream everyone and wish everyone a good night's sleep.</center></i> Thanks to you, @strecoza I am inviting @animal-shelter ,@darina14 & @o1eh 
|<center>💕Bismillahir Rahmanir Rahim💕</center>| |-| |<center>Assalamu Alaikum Wa Rahmatullah</center>| |-| <h2><center><i> <table> <tr></tr> <th>I am Mohua Tumpa. I use the username @muntumpa on. I am from #Bangladesh among you.</center></h2></a> </th> <tr></tr> </table> <hr/> </i></center></h2></a> <div class ="text-justify">Assalamu Alaikum. how are you all? Starting my today's blog with greetings of Mahe Ramzan. Today I came to Ukraine on Steam community to participate in the handmade contest. I will make a paper flower basket today. I hope you will like my handmade flower basket making. Today I have made a flower basket with color paper. We saw different types of baskets. But today I made a flower basket out of paper. I have also made many flowers and leaves. It looks amazing. It is very easy to make. It takes some time to make the basket. If you keep this basket at home, it will look beautiful. |<center><div class ="phishy">Flowers Basket with color paper</div></center>| |-|  # Step 1: First I took the color page.  # Step 2: I have cut a paper round. Cut the round apple as big or small as you want.  # Step 3: Then I cut the color pages with long, thin strips.  # Step 4: I cut another hard paper round. Now I have joined 2 pieces of paper with glue.  # Step 5: Now cut the pages long. I have attached the round shape paper with glue.  # Step 6: Now I have cut a long shape with another color page. Then I took it round.  # Step 7: I have left one page of the round shape, one page of the thin shape, and given it in the thin pages of the long shape. I did several like this. Now a basket of oysters came.  # Step 8: The face of the extra long paper was flattened and glued to the inside.  # Step 9: This is how I made the basket.  # Step 10: To hold the basket, I made a handle with a color paper. And I glued paper flowers to the handle.  # Step 11: Now I cut flowers and leaves with different color paper.  # Step 12: With a thick paper in the middle of the empty space, I left a little gap in the mouth of the basket and attached it with glue.  # Step 13: Now I put different flowers and leaves on the mouth of the basket. It looks like there are flowers in the basket.  This is how our paper flower basket was made. Hope you like it. I hope you will like this work of mine. Your love will motivate me to work.Thanks and love to all.</div> Thank to you, @strecoza I am inviting @josepha, @goodybest, @pandora2010, @kuzboy and @anthony002 <center><i>◦•●◉✿ Thank You ✿◉●•◦ Everyone prays for me. Thank you so much for reading my post so patiently. Best Regards</center></i> 
<div class="text-justify"> I was hoping to have finished this project by now. I've been stranded on sleeve island for about four days : it's been a long and repetitive process though at least the rows were fairly short with only about 50 stitches. I decided to finish both sleeves before finishing the body to make sure I had enough yarn for them. The photo below shows you what the cardigan looks like at the moment. <CENTER> 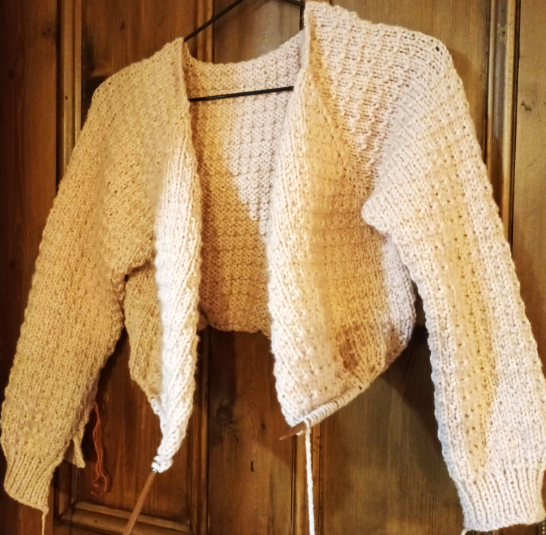 </CENTER> The cable of the circular needle I'm using is not long enough to show the real width of the cardigan clearly. I've tried it on and it seems okay so far. <CENTER> 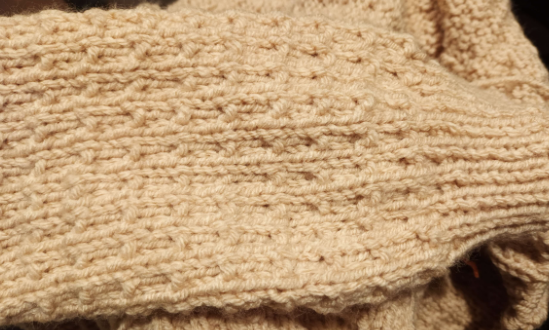 <sub>Closeup of the Andalusian stitch and the cuff.</sub> </CENTER> I used a coat hanger for display purposes only as you're not supposed to hang knitwear on hangers to avoid stretching. The cardigan now weighs about 400g so it's becoming a bit hard to knit comfortably. As I'm now knitting the body of the cardigan each row takes a long time with over 130 stitches. After I've finished the body (I'd envisage another 10 cm) comes the waistband (about 5cm like the cuffs) and beyond that it's just the button band (another 4cm). My calculation is that I'll have just enough yarn to complete this project. When I started it I thought 600g should be plenty (and it should) but the texture of the Andalusian stitch has a 'shortening' effect on the length. <HR> I've now also started looking at how to make a neat button band. I know how to pick up stitches on the edge but I'm also aware from experience that there's a technique and I'm still to learn it. I've initially found this video below: <CENTER> <iframe width="560" height="315" src="https://www.youtube.com/embed/CoKQamNNZTI?si=7ToBhuQY-t7NzMVr" title="YouTube video player" frameborder="0" allow="accelerometer; autoplay; clipboard-write; encrypted-media; gyroscope; picture-in-picture; web-share" referrerpolicy="strict-origin-when-cross-origin" allowfullscreen></iframe> </CENTER> <HR> The video clearly tells you about proportions and how you're not supposed to pick up every stitch. If you do, the button band will tend to 'fan out' when the cardigan is worn. I'm aware of this issue but was unsure about the number of stitches to pick up. I'm also trying to prevent future issues considering how thick the yarn is. It all takes time though. Anyhow, thank you for reading ! </div>
https://cdn.steemitimages.com/DQmbtw695roAGAxoUJ2CCKHejE7bPuRVBrQqYSczHhTuggf/WhatsApp%20Image%202024-01-20%20at%203.04.06%20PM.jpeg
<center><sub>Diseño realizado por @nelsondoor [Fuente]( https://blog.pintalacuadros.com/wp-content/uploads/2020/10/brushes-3129361_640.jpg )</sub></center>
<div class="text-justify">
Saludos Amigos de [RECREATIVE STEEM](https://steemit.com/trending/hive-141434), les presentamos las Cuatro publicaciones nominadas a Booming. Los Martes les invitamos a realizar sus publicaciones de Arte y Oficios, engalanando la Comunidad.
Apoyamos y Valoramos el Arte en todas sus expresiones, les animamos a todos los Artistas a encender sus Steem y entrar al club5050, club 75 o al club100 respectivamente.
</center>
<div class="phishy">Recuerda incluir los Martes en tus post de Arte y Oficios la etiqueta #art #recreative-art #crafts #creativity</div>
</center>
</div>
<center>.png)</center>
<center><p>
----
<center><p>
# @marulobo
🎨 Concurso: Sabores en semana Santa

</center>
<center>[Publicación]( https://steemit.com/hive-141434/@marulobo/concurso-sabores-en-semana-santa )
</center>
----
<center><p>
# @dilialy
🎨 Martes de Artes y oficios // Dibujando una tierna tortuguita // 26-03-2024

</center>
<center>[Publicación]( https://steemit.com/hive-141434/@dilialy/martes-de-artes-y-oficios-dibujando-una-tierna-tortuguita-26-03-2024 )
</center>
-----
<center><p>
# @soy-anahel
🎨 Recreative-art: Mi conejito de Pascua pintado con Acuarelas 🐰🌷

</center>
<center>[Publicación]( https://steemit.com/hive-141434/@soy-anahel/recreative-art-mi-conejito-de-pascua-pintado-con-acuarelas )
-----
<center><p>
# @dexsyluz
🎨 The Diary Game (24-03-24) El ministerio de la Mujer
</center>

</center>
<center> [Publicación]( https://steemit.com/hive-141434/@dexsyluz/the-diary-game-24-03-24-el-ministerio-de-la-mujer )
----
<center>.png)</center>
<h4><center><div class="phishy">Información importante</div></center></h4>
<center>
[¿Qué hacer para obtener un voto Booming?](https://steemit.com/hive-141434/@hive-141434/que-hacer-para-obtener-un-voto-booming )
[NUEVA ACTUALIZACIÓN DE PROTOCOLO DE CONTENIDO || Que puedo publicar en RECREATIVE STEEM??](https://steemit.com/hive-141434/@hive-141434/6qwtt3-nueva-actualizacion-de-protocolo-de-contenido-or-or-que-puedo-publicar-en-recreative-steem)
</center>
</div>
<center>.png)</center>
<sub> Te invitamos a seguir a Steemit en Instagram: </sub>
<center><a href=https://www.instagram.com/solosteemit/>@solosteemit</a></center>
<center>.png)</center>
<table border = "1" bordercolor = "Blue" bgcolor = "yellow">
<tbody> <tr>
</tr>
<tr>
</tr>
<tr>
</tr>
<tr>
<td> <a href="https://steemlogin.com/sign/delegateVestingShares?
delegator=&delegatee=hive-141434&vesting_shares=50%20SP"> 50SP </a> </td>
<td> <a href="https://steemlogin.com/sign/delegateVestingShares?
delegator=&delegatee=hive-141434&vesting_shares=100%20SP"> 100SP </a> </td>
<td> <a href="https://steemlogin.com/sign/delegateVestingShares?
delegator=&delegatee=hive-141434&vesting_shares=150%20SP"> 150SP </a> </td>
<td> <a href="https://steemlogin.com/sign/delegateVestingShares?
delegator=&delegatee=hive-141434&vesting_shares=200%20SP"> 200 Sp </a> </td>
<td> <a href = "https://steemlogin.com/sign/delegateVestingShares?
delegator=&delegatee=hive-141434&vesting_shares=250%20SP"> 250SP </a> </td>
<td> <a href = "https://steemlogin.com/sign/delegateVestingShares?
delegator=&delegatee=hive-141434&vesting_shares=500%20SP"> 500SP </a> </td>
</tr>
</tbody> </table> </ center >
----
</p></center>
---
<center><h4><div class="phishy">Síguenos en nuestras Redes Sociales </div></h4></center>
<center>
[Telegrama](https://t.me/joinchat/KBDRe0y6ELQwYWNh)
[Twitter](https://twitter.com/recreativesteem)
[Instagram](https://www.instagram.com/recreativesteem/?hl=tr)
[Discordia](https://discord.gg/nq39dCqA5w)
</center>
<center>.png)</center><div class="text-justify"> <div class="phishy"><h3><center>💫"সৃজনশীলতাই শক্তি" 💫</center></h3> </div> |<center><a href="https://steemit.com/trending/hive-129948">অরিগ্যামি:)- রঙিন কাগজ দিয়ে মাছ তৈরি।</a><br><sub><sup>💐 "আমার ব্লগে সবাইকে স্বাগতম" 💐</sup></sub></a></center>| |---| |<center></center>| |---| <center><sub>"ছবিটি Canva দিয়ে তৈরি"</sub></a></center> ### শুভ সকাল 🌅 হ্যালো আমার বাংলা ব্লগ পরিবার। প্রথমেই সবাইকে আমার সালাম ও আদাব। কেমন আছেন সবাই? আশাকরি আপনারা সকলেই আল্লাহর রহমতে ভালো আছেন। আমিও আলহামদুলিল্লাহ আল্লাহর রহমতে ভালো আছি। গতকাল ছিলো স্বাধীনতা দিবস ছুটির দিন। তাই একটু হাতে সময় পেলাম। অনেক দিন থেকে কোন ডাই এবং অরিগ্যামি করা হয়না। এজন্য ভাবলাম একটা অরিগ্যামি তৈরি করলে কেমন হয়। রঙিন কাগজের সাথে আমার পুরানো দিনের বন্ধুত্ব রয়েছে। সেই সুবাদে রঙিন কাগজ নিয়ে একটি মাছের অরিগ্যামি তৈরি করার জন্য বসে পরলাম। আশাকরি প্রতি সপ্তাহে একটি করে ডাই অথবা অরিগ্যামি আপনাদের মাঝে শেয়ার করবো। আমি কিভাবে রঙিন কাগজ দিয়ে মাছের অরিগ্যামি তৈরি করলাম। চলুন এবার ধাপে ধাপে দেখা নেওয়া যাক! |<center>**✂️ "প্রয়োজনীয় উপকরণ" ✂️</a>**</center>| |--| <center></center>| |---| * রঙিন কাগজ। * পেন্সিল। * রং পেন্সিল। * কাঁচি। * এস্কেল। * আঠা। |<center><sub> "তৈরির প্রক্রিয়া চলছে" </sub></a></center>| |--| <center></center>| |---| * প্রথমেই আমি রঙিন কাগজ নিয়ে ১৫ সে.মি করে কাঁচি দিয়ে কেটে নিলাম। এর পরে কোনাকুনি ভাবে ভাঁজ করে নিলাম। তার পরে অপর পাশে ভাজ করে নিলাম। এবার আমি কাগজটিকে ঘুরিয়ে নিলাম। তার পরে আবার ও দুপাশে ভাঁজ করে নিলাম। |<center><sub> "তৈরির প্রক্রিয়া চলছে" </sub></a></center>| |--| <center></center>| |---| * এর পরে আমি ভাঁজ গুলোকে ভিতরে ঢুকিয়ে দিলাম। এর পরে দুপাশে ভাঁজ করে নিলাম। তার পরে ভাজ টিকে খুলে নিলাম। এখন আমি সামনের দিকে ভাঁজ করে নিলাম। |<center><sub> "তৈরির প্রক্রিয়া চলছে" </sub></a></center>| |--| <center></center>| |---| * এর পরে আমি নিচের দিকের কাগজ গুলোকে উপরের দিকে ভাঁজ করে নিলাম। তার পরে দুপাশে ভাঁজ করে নিলাম। এবার আমি কাগজ টিকে উপরের দিক থেকে নিচের দিকে ভাঁজ করে নিলাম। |<center><sub> "তৈরির প্রক্রিয়া চলছে" </sub></a></center>| |--| |<center></center>| |---| * এবার আমি মাছটির লেজ বানিয়ে নিলাম। মাছের ঠোঁট এবং চোখ সাইন পেন দিয়ে বানিয়ে নিলাম। তার পরে মাছটির গাঁয়ে সাইন পেন দিয়ে বিভিন্ন ধরণের ডিজাইন করে নিলাম। |<center><sub>"ফাইনাল আউটপুট"</sub></a></center>| |--| <center></center>| |---| <center></center>| |---| <center></center>| |---| * রঙিন কাগজ দিয়ে মাছের অরিগ্যামি তৈরি করা হয়েছে। এবার আমি মাছের কয়েকটি ফটোগ্রাফি করে নিলাম। মাছের অরিগ্যামি আমার কাছে ভীষণ ভালো লেগেছে। এধরনের কাজ গুলো করতে এবং দেখতে অনেক বেশি ভালো লাগে। আশাকরি আপনাদের সবার মাছের অরিগ্যামি দেখে ভালো লেগেছে। কেমন লাগলো অবশ্যই জানাবেন? আপনাদের সবার সহযোগিতা কামনা করছি। সবার সুন্দর মন্তব্যের অপেক্ষায় রইলাম। এই ছিলো আমার আজকের আয়োজন। আজকের মতো এখানেই বিদায় নিলাম। সবাই ভালো থাকুন সুস্থ থাকুন সব সময়ই এই কামনাই করি। |<center>পোস্টের বিবরণ:-</center>| |---| বিভাগ| অরিগ্যামি:)- । ---|--- ডিভাইজ | realme 9 বিষয় | রঙিন কাগজ দিয়ে মাছ তৈরি। লোকেশন | উত্তরখান, ঢাকা, বাংলাদেশ। ফটোগ্রাফার | @limon88 ___ ___ .gif)  <div class="text-justify"> |<center>🙎♂️ "আমার পরিচয়" 🙎♂️</center>| |--| <div class="pull-left">  </div> > <sub>আমি মোঃ লিমন হক। আমার স্টিমিট একাউন্ট @limon88. আমি একজন বাংলাদেশী। আমার বাড়ি নীলফামারী জেলায়। আমি এখন বর্তমানে জীবিকার তাগিদে পরিবার নিয়ে ঢাকা উত্তরায় থাকি। আমি একটি কোম্পানিতে চাকরি করছি এবং পাশাপাশি স্টিমিট এ কাজ করে আসছি। আমার ব্লগিং ক্যারিয়ার আড়াই বছর। এখন আমার সবথেকে বড় পরিচয় আমি আমার বাংলা ব্লগের একজন ভেরিফাইড মেম্বার। আমি সত্যিই গর্বিত আমার বাংলা ব্লগের সাথে থাকতে পেরে। স্টিমিট আর আমার বাংলা ব্লগ আমার জীবনের একটা অংশ হয়ে গেছে, তাই যতদিন স্টিমিট রয়েছে ইনশাআল্লাহ আপনাদের সাথেই থাকবো। ভালোবাসি পড়তে ও লিখতে ব্লগিং, ফটোগ্রাফি, মিউজিক, রেসিপি, ডাই, আর্ট আমার অনেক পছন্দের। আমি ঘুরতে অনেক ভালোবাসি। আমি একজন মিশুক ছেলে আমি সবার সাথে মিশতে ভালোবাসি। আমি আমার মতো। আল্লাহ হাফেজ 💞</sub>  </div>  **<center> <div class="phishy"> >>>>>|| [এখানে ক্লিক করেন ডিসকর্ড চ্যানেলে জয়েন করার জন্য](https://discord.gg/7SyC6uWBTS) ||<<<<< </center>**   <h2><center>আমার ব্লগটি ভিজিট করার জন্য সবাইকে অসংখ্য 💞"ধন্যবাদ"💞</center></h2>  </div>
**Buenas tardes mis queridos Steemians en este Martes de Arte 🎨 les dibujé un Búho 🦉**  </div class=" text-justify">Aparte del dibujo les traigo una pequeña reseña. Es un ave rapaz que caza en la oscuridad es un especie de ave estrigiforme de la familia strigidae, canta cuando hay luna llena, muchos la asociación con mal suerte y cosas negativas. El búho representa la sabiduría y la comprensión de la ley, los búhos se asocian a la inteligencia, su visita puede ser una especie de recordatorio de tomar decisiones. El búho cuenta con una gran poder teniendo en cuenta que simboliza la sabiduría y la intuición.</div> >Ahora le voy a pasar los materiales que utilice. *Mi tabla *Hoja blanca *Lápiz *Colores *Marcador negro *Sacapunta *Borrador ></div class=" pull-right">https://cdn.steemitimages.com/DQmWzH5MzW81GYFoRkTAoz83iVF8XYRZh8ixgYNynD5oukn/IMG_20240326_153950_406.jpg</div> Foto tomada con mi teléfono tecno Nova. ## Mi pasó a pasó haciendo mi dibujo. </div class=" text-justify"> Tomo mi lápiz de grafito y comienzo haciendo el pico de hay seguidamente le hago sus ojos con la ayuda de mi sacapuntas para que me salgan bien redondos prosigo haciendo la silueta de búho, cabeza, cuerpo y sus patas agarrando una rama de un árbol en medio de la noche. </div> </div class="pull-right">https://cdn.steemitimages.com/DQmTqDNkqbpftetxrJXJTEVoFrRqt9k1St1BJUiMMZ5hFaJ/Live%20Collage_2024326182146508.jpg</div> Hago la rama del árbol con unas hojitas, después lo que sería su plumaje en todo lo que es su pecho. ## Mi proceso de pintado </div class="text-justify"> Para comenzar el proceso de pintado primero remarcó su plumaje con marcador negro, me dispongo a colorear y empiezo por su pico de amarillo fuerte y su entorno de los ojos de negro claro y todo su entorno con marrón oscuro incluyendo su cara y de azul oscuro unas franjas que tiene en sus alas, ahora paso a pintar las ramas de verde claro y uno más oscuro a las ramas le pongo marrón dos tonos de marrón para darle contraste sus patas las pinto de amarillo fuerte y marrón suave, continúo con su plumaje el cuál pindo con diversos colores como azul naval, morado oscuro, rosado fuerte, azul claro me gustó esa combinación de colores ya al terminar con el búho pintó el sol de amarillo y le hgo unos retoques con color naranja, pinto el fondo con residuos de azul oscuro y negro li cuál difuminó con la yema del dedo índice por todo el dibujó ya por último le hago luz con el borrador de mi lápiz y así culminó mi dibujó</div>  >Ya por último les dejo el resultado final de mi dibujó en el di de hoy </div class="pull-right">https://cdn.steemitimages.com/DQmczTjyBaNnB7uAfkken6WM4E3GQ2H9TR1osgBUXCfP8FX/Live%20Collage_20243261629038.jpg</div> Gracias por leer mi post y agradeciendo su apoyo. >Todas las fotos son de mi propiedad tomada con mi teléfono tecno Nova exclusivamente para Recreative Steem. 
I'm @rajusam , from #Bangladesh

<div class ="text-justify">Hello friends, how are you all? I'm sure everyone is fine. First of all, my best wishes to all of the Ukraine on steem community. I have come today to participate in the handmade competition. I am here today with a different kind of handmade. I love this contest so much I try to participate every week. Today I will show you how to make something different with paper. I made some fruit with color paper.

# <code><div class="phishy"><strong><em>first picture,</em></strong></div></code>

|<center><div class ="phishy">Carrot fruit</div></center>|
|-|

https://cdn.steemitimages.com/DQmey1JJjyYJ2hwTCFD5difN1enW8tp1PAr2wswACEFq77E/IMG_20240324_202112_949.jpg

This picture is made of carrot design using orange colored paper. I made carrot with orange color paper and green color paper.

# <code><div class="phishy"><strong><em>second picture,</em></strong></div></code>

|<center><div class ="phishy">Grape fruit</div></center>|
|-|

https://cdn.steemitimages.com/DQmcVNSwuZgruafTxdUbRfEN3R3kW8hSe6mUQrwJK1FiqyZ/IMG_20240324_202049_473.jpg

  My second picture is made of grape shape with red color paper. I made the grape bota with black paper. Thus a grape is made by combining two papers.

# <code><div class="phishy"><strong><em>Third picture,</em></strong></div></code>

|<center><div class ="phishy"> Dragon fruit</div></center>|
|-|

https://cdn.steemitimages.com/DQmaSnURUTUpYRpfVrjmRyncmnfjdwrhbqGMtzMu8igrRis/IMG_20240324_202032_323.jpg

  I made my third film Dragon Fruit. I made the dragon fruit sepet out of pink paper. Then I made the thorns of the dragon fruit with green paper. And I made dragon fruit botata with green paper. I made the dragon fruit by combining these two papers.

# <code><div class="phishy"><strong><em>Fourth  picture,</em></strong></div></code>

|<center><div class ="phishy">  pumpkin fruit</div></center>|
|-|

https://cdn.steemitimages.com/DQmSjZYd2qA5yBRihTUbdNFHSczbAQh3TNcgRg5g1mKv4Zg/IMG_20240324_202009_736.jpg

  My fourth picture made is a sweet pumpkin out of paper. I love this fruit so chose the sweet pumpkin fruit for the craft. I made the sweet pumpkin fruit with green, orange, black paper. My sweet pumpkin fruit made from paper is made by combining these three colors of paper.

  I made these four fruits with color paper. Hope you will like my fruit crafting.  I am saying goodbye to everyone. Good night.</div>

I invite @apa07 @bazer, and @mandarin2016 to participate in this contest.

|<center><div class ="phishy">  Thanks for being with me.</div></center>|
|-|
Best Regards
@rajusam

https://cdn.steemitimages.com/DQmd61E8xMiKZjpQpRCxwyhtyqTq7VVKubaYpRsoBhSysDk/image.png
<div class="text-justify"> <center><strong><sub> I'm @shawlin , from #Bangladesh</sub></strong> <table> <thead> <tr><th><center></center></th></tr> </thead> <tbody> </tbody> </table></center> Hello, my Steemian friend!! How are you all? I am fine by the grace of Allah. Before I start my post I would like to thank @strekoza.I am here today to participate in a contest organized by her. Crafting is a joy to me. Today I will show you a colorful paper umbrella craft. Which is easy to do and looks very beautiful.  [Canva](https://www.canva.com/design/DAGAaTNJSYw/xJWARed_fBA_RZn0gpPVXQ/edit) ### All the essentials needed to make a craft |Essential tools | | :-- | |🔹White paper | |🔹Color pencil | |🔹Glue | |🔹Cotton bar | |🔹Marker pen | ### Let's start making |<center>☂️Step 1☂️ </center> | | :-- | I cut white paper into 10 cm x 10 cm size with the help of a Scissor. After that, keep the paper in a flat place make a triangle shape, and fold it in the middle. ||| |-|-| |<center>☂️Step 2☂️ </center> | | :-- | After the first fold, I made a fold in the middle again. Its shape will still exist in triangles. When the second fold was finished, I made another fold on it in the same way. ||| |-|-| |<center>☂️Step 3☂️ </center> | | :-- | After completing the third fold, I drew a half circle on it with a pencil. Then I cut the draw part with the help of a Scissor. ||| |-|-| |<center>☂️Step 4☂️ </center> | | :-- | After cutting the drawing part, the fold of the paper should be completely unfolded. It then looks like an umbrella surface. With the help of a pencil, I made many marks on its surface and divided it into separate parts.  |<center>☂️Step 5☂️ </center> | | :-- | I have painted each part separately with different colors. So that it looks very colorful. Then I redraw the parts of the pencil with a marker pen. And I have slightly folded the last parts of the parts drawn on the marker pen. As a result, it created a wavy shape like the top of an umbrella. ||| |-|-| |<center>☂️Step 6☂️ </center> | | :-- | Glue the front part of a cotton bar and put it in the middle of the back part of the paper. The cotton bar must be held so that it dries properly and does not move. Finally, my paper colorful Umbrella is ready. ||| |-|-| .jpg) |<center><sub> My selfie with the final result of my Craft.</sub></center>| |-| That's all for today. I hope you all will like my paper umbrella. Here I bid you all farewell, and I hope you are all well physically. I invite @apa07 @bazer, and @mandarin2016 to participate in this contest. </div> |<center>*Thanks for being with me.*</center> |-| --- <center>Best Regards @shawlin </center> <center>  </center>
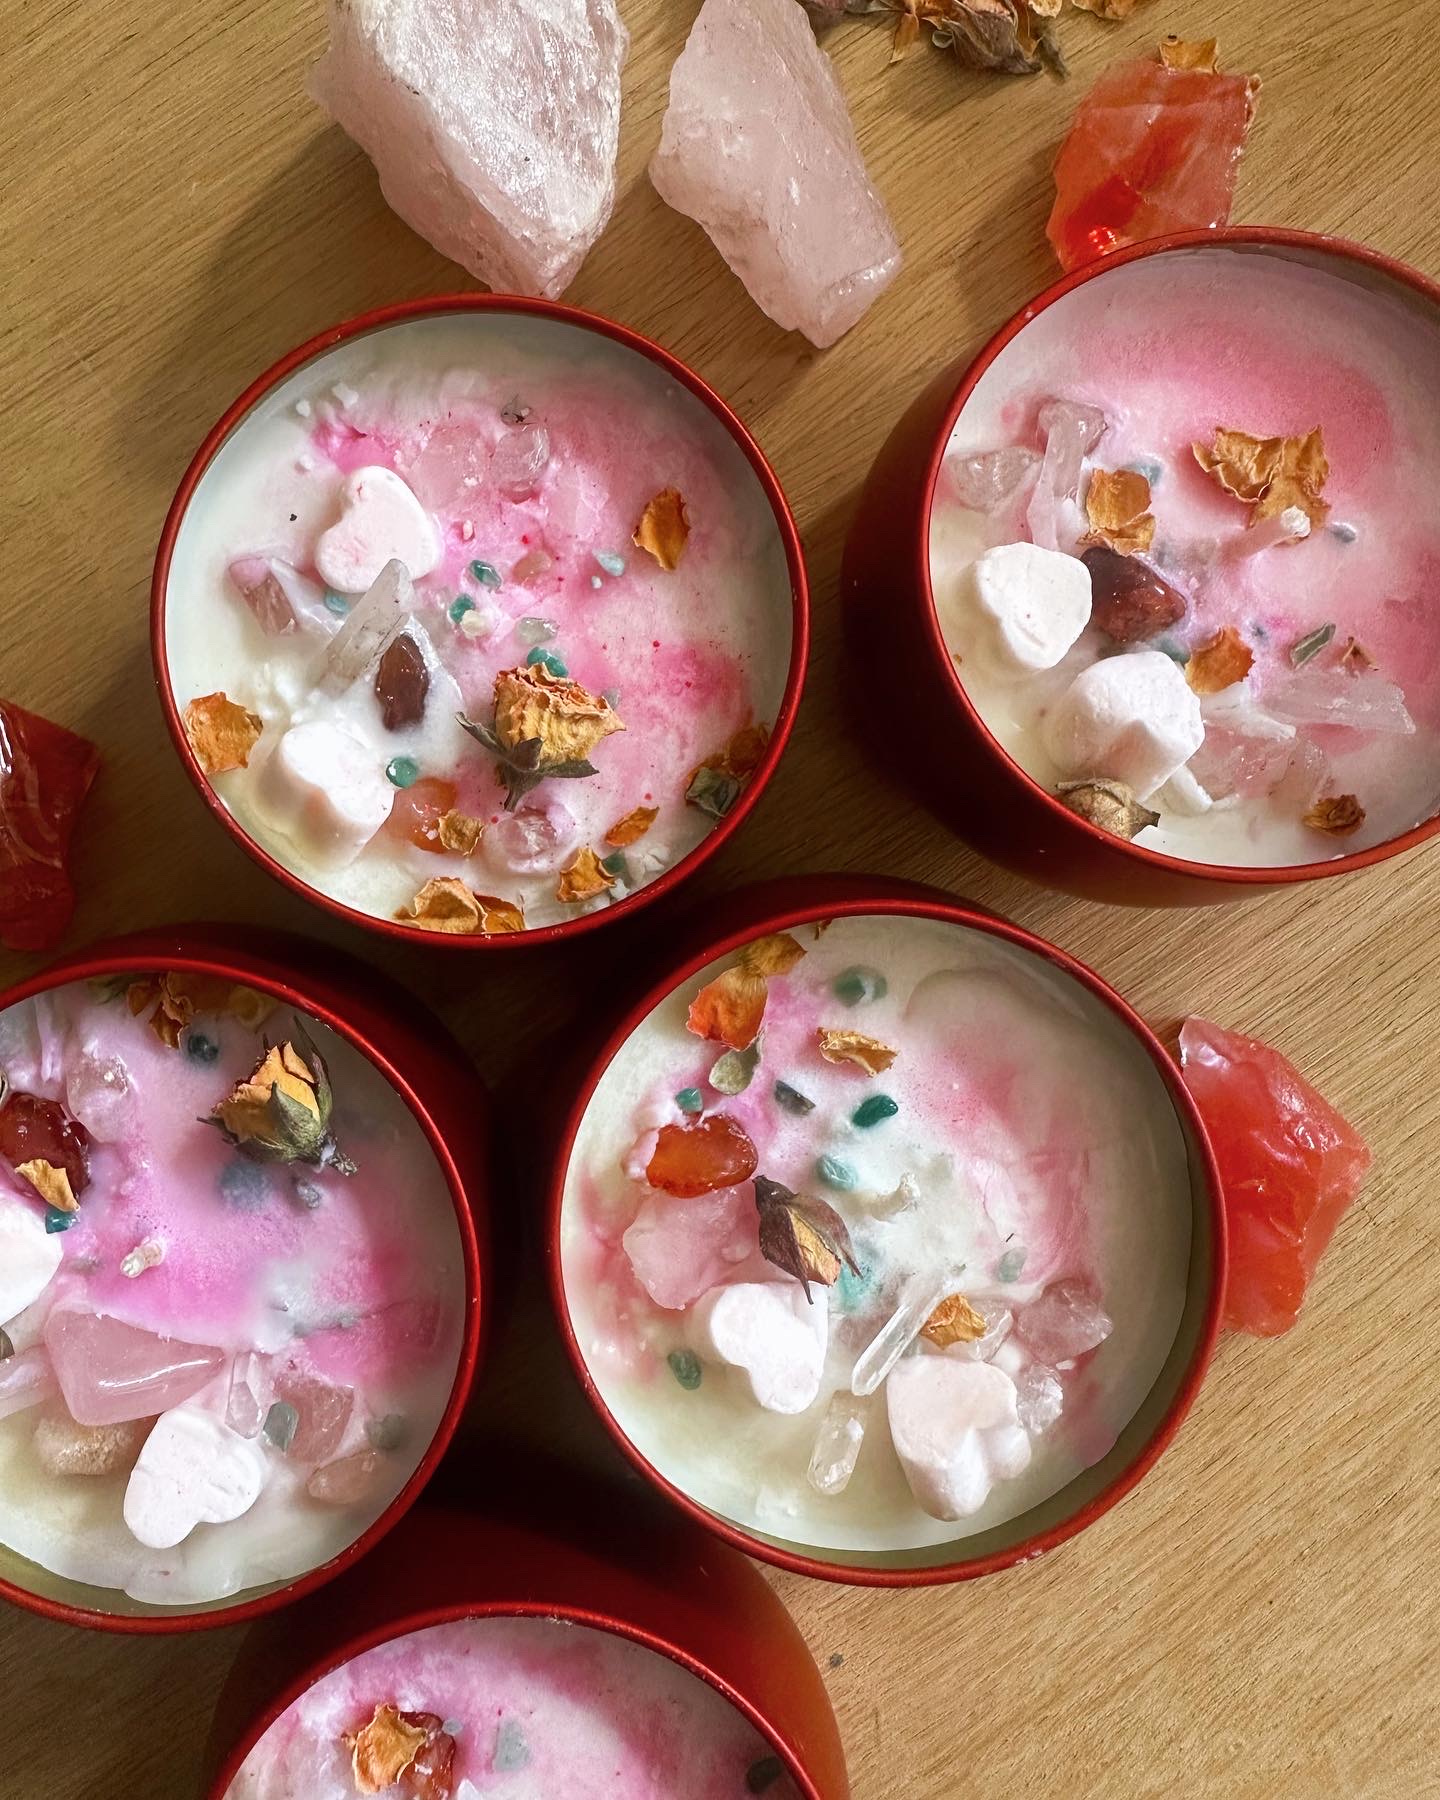
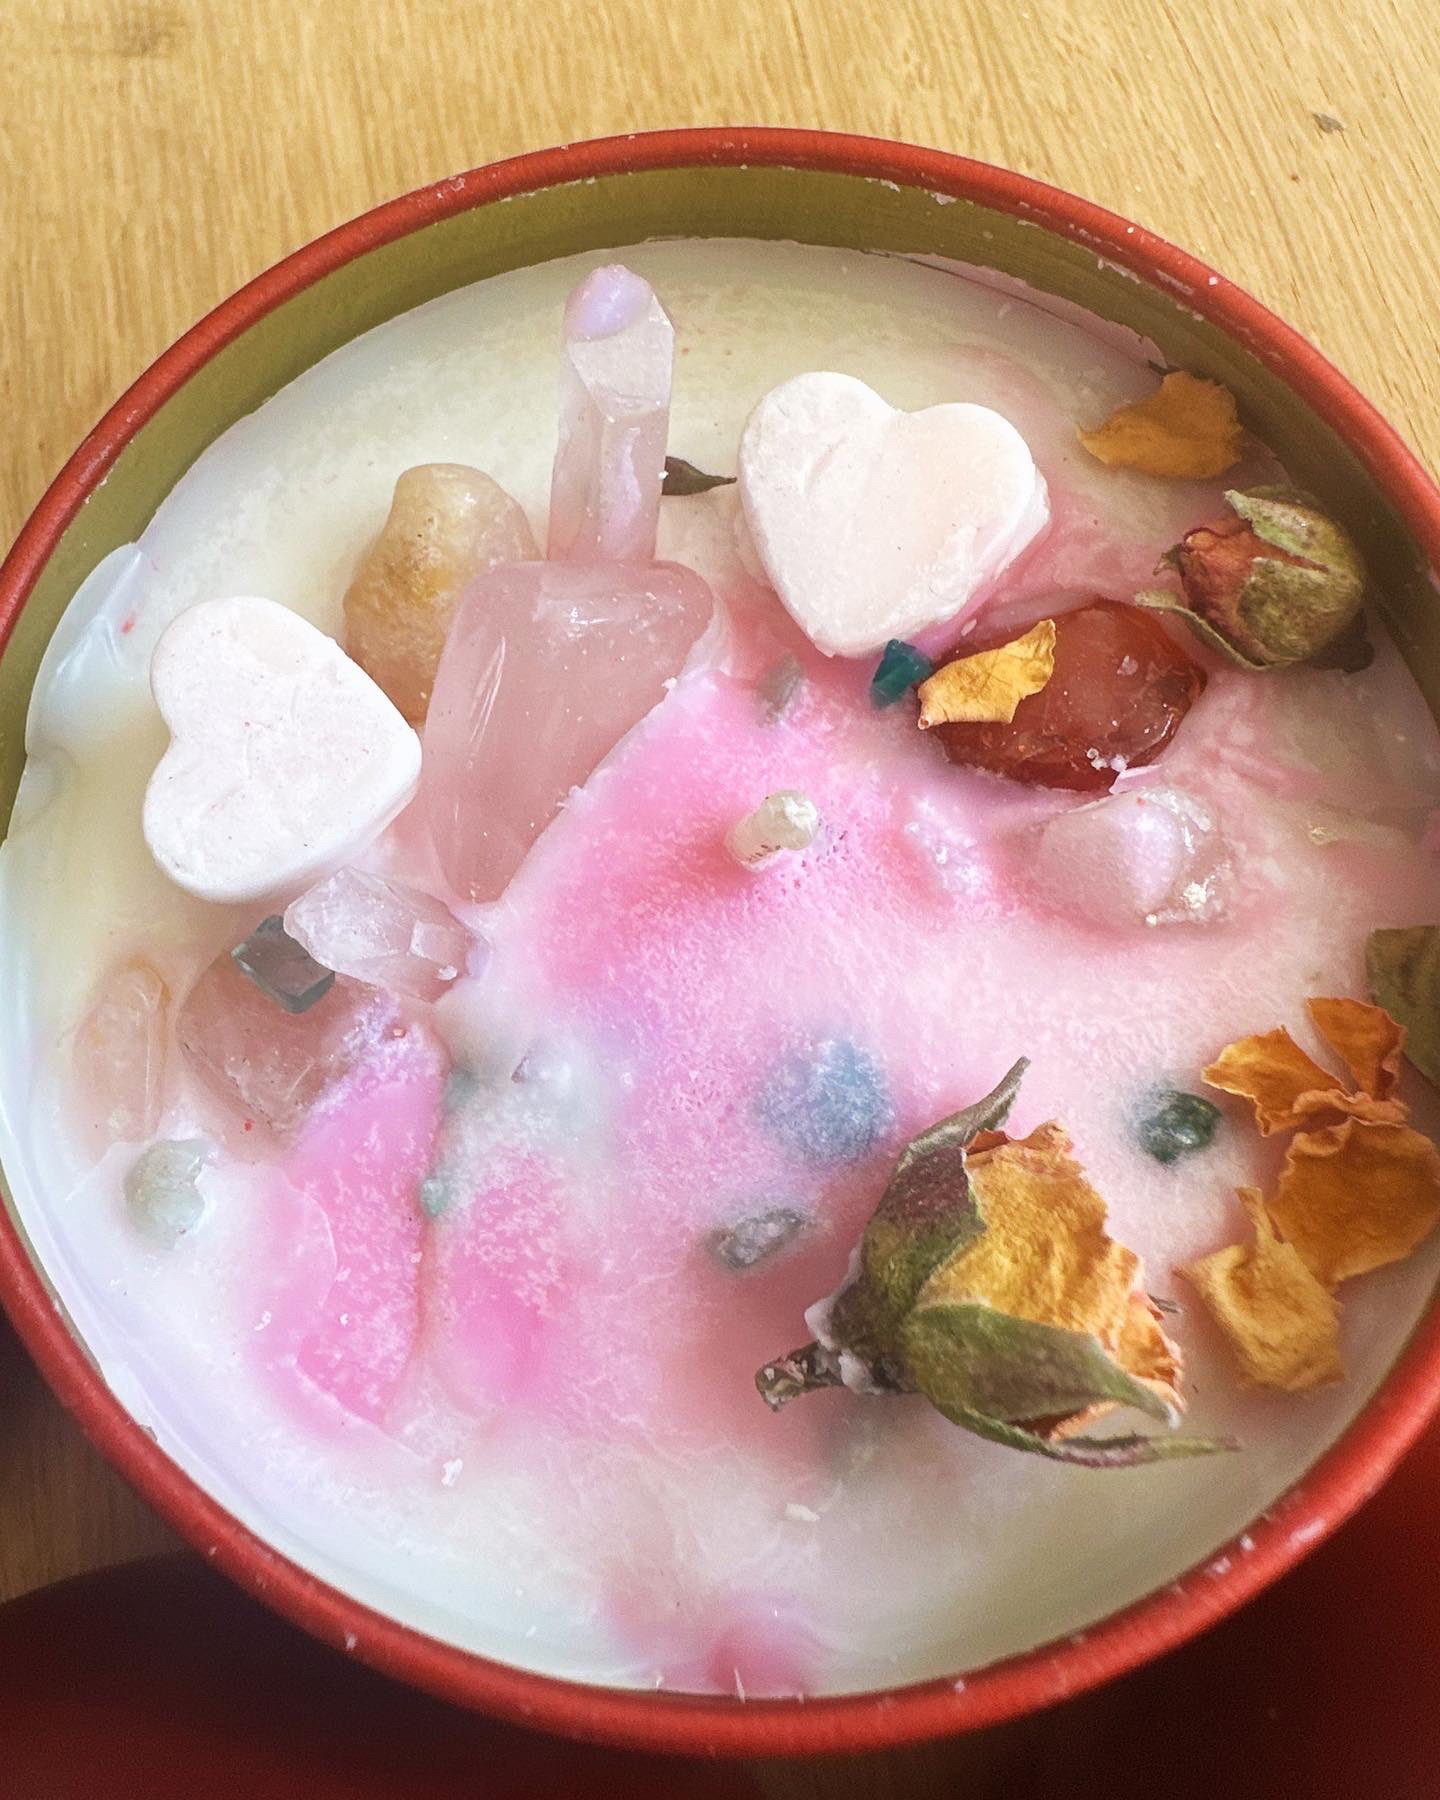
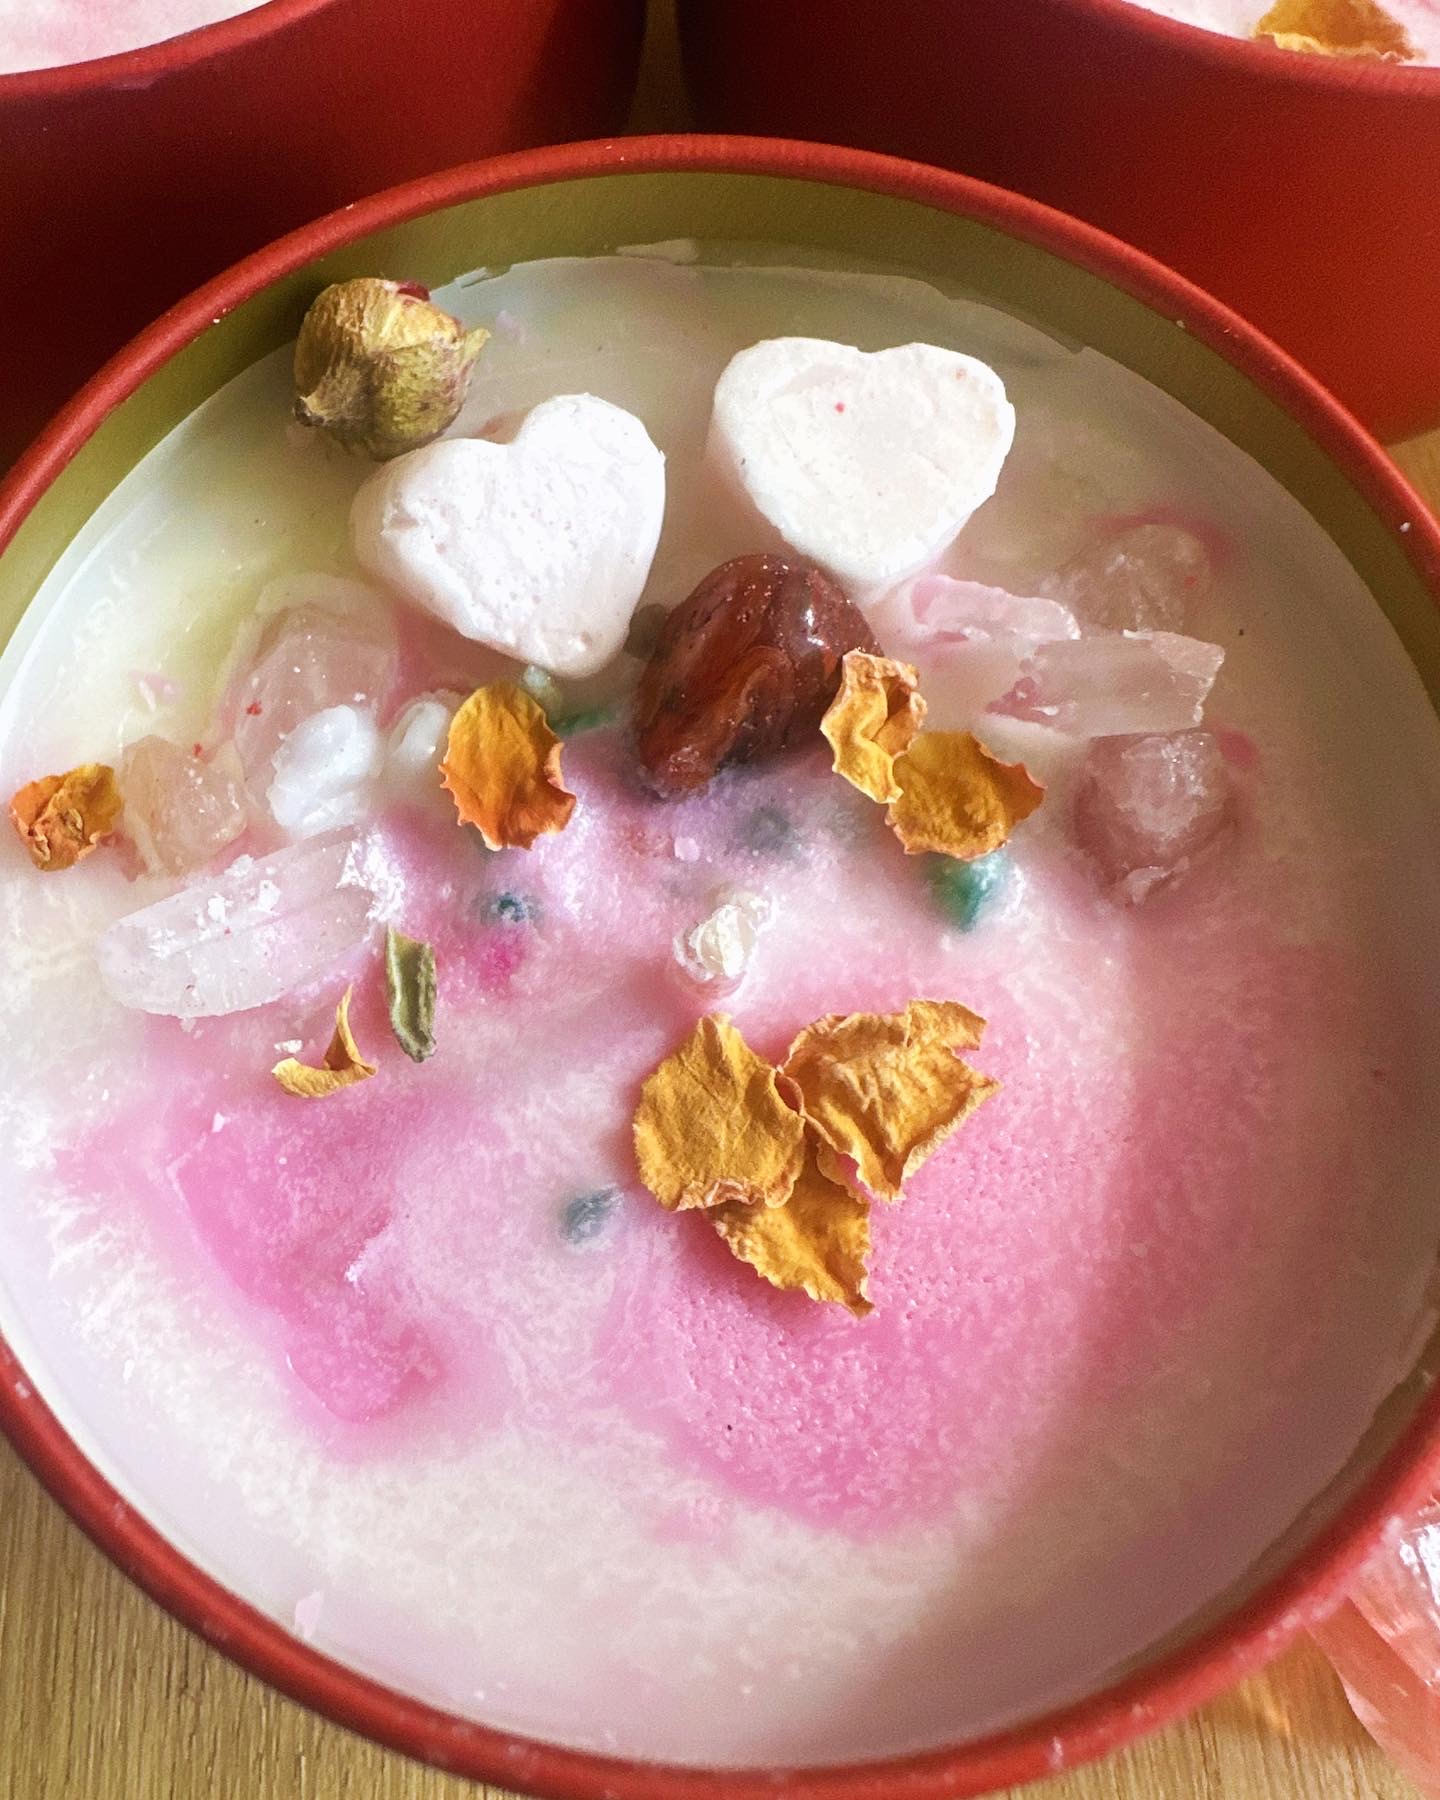
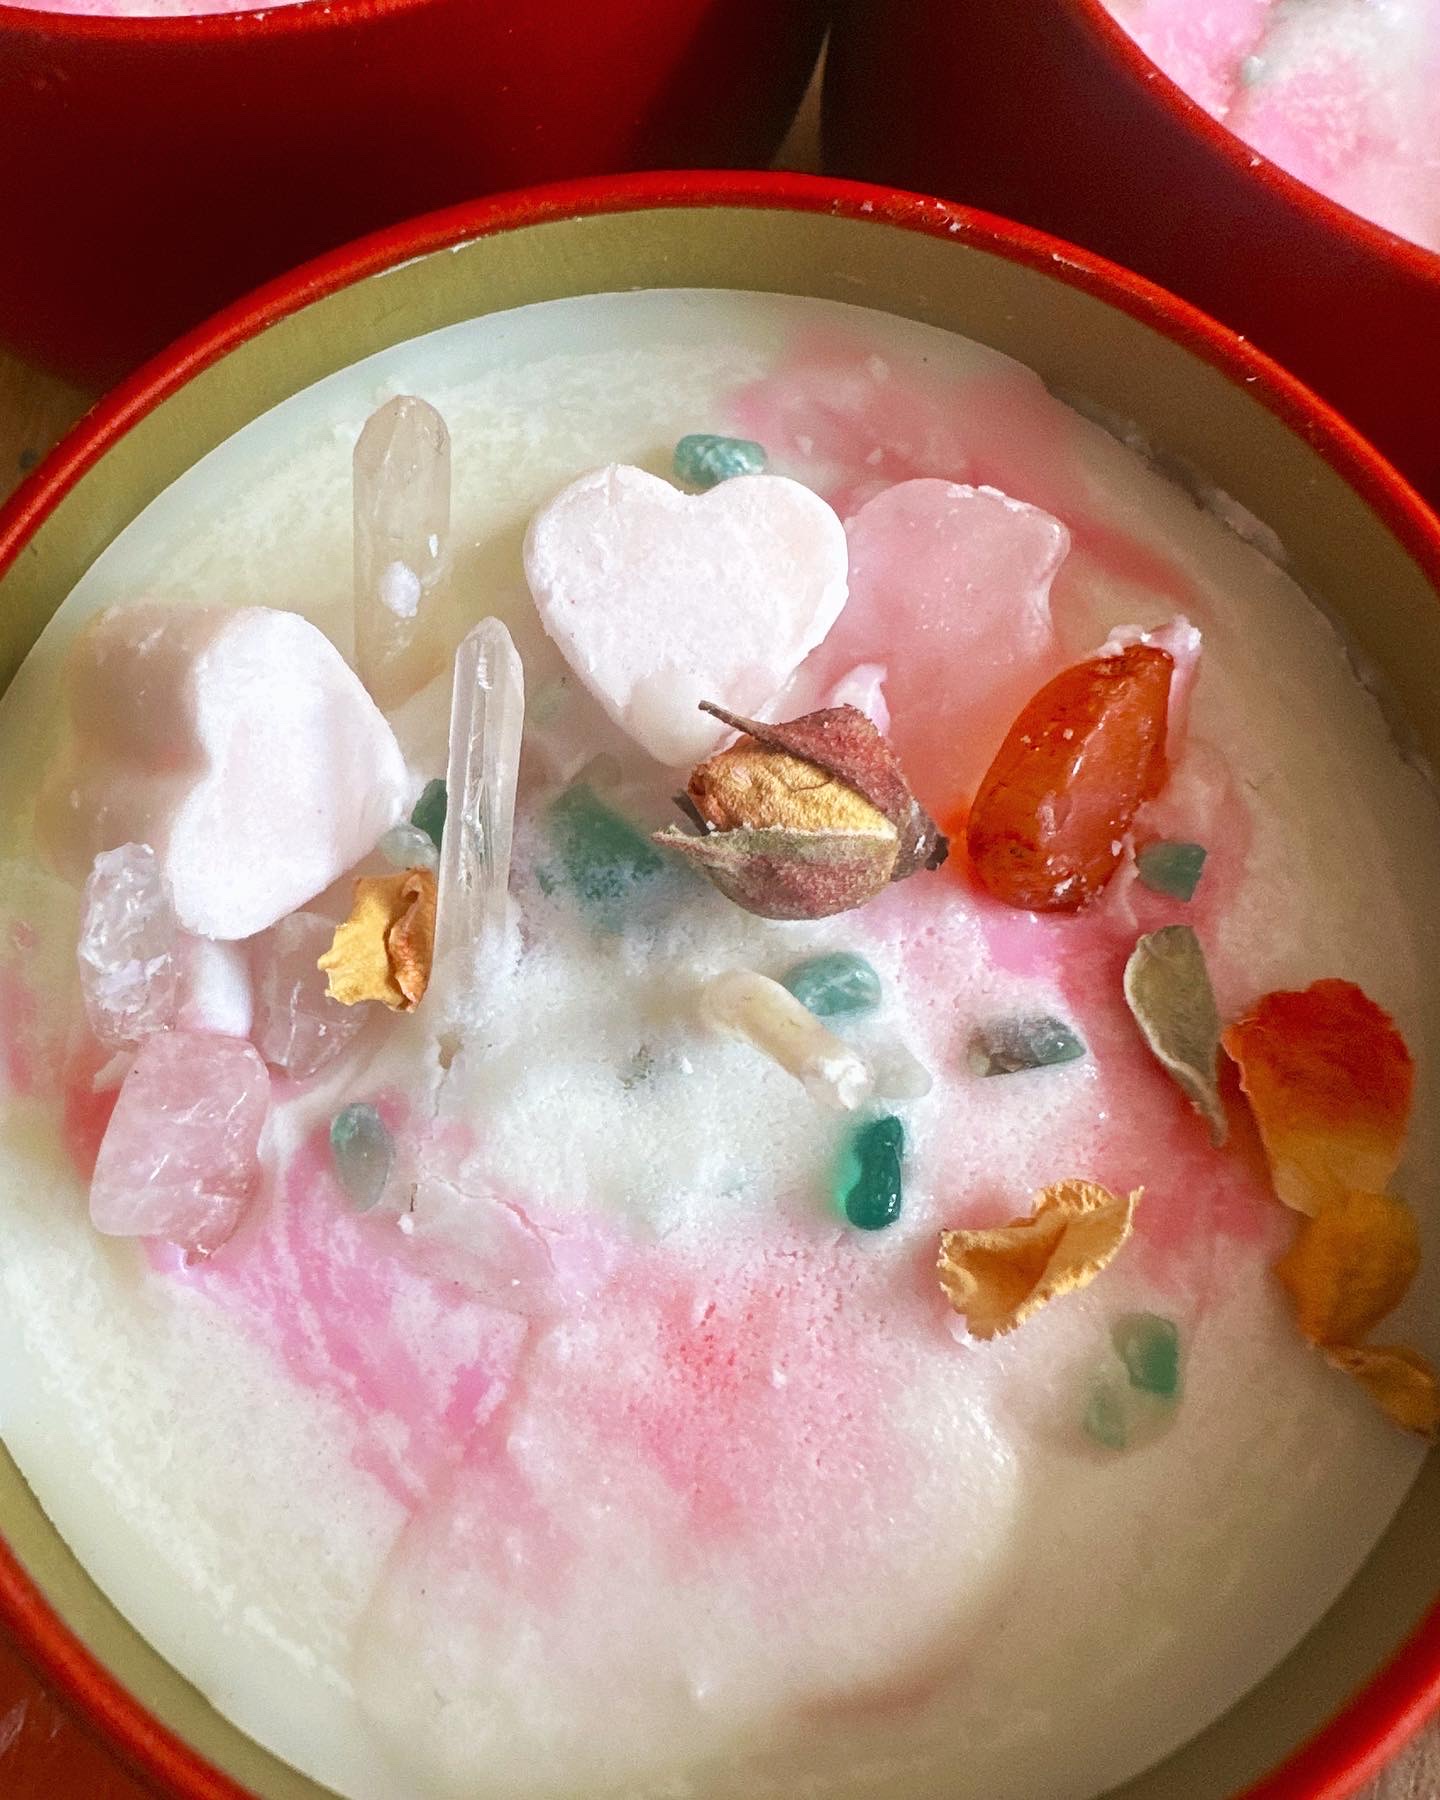
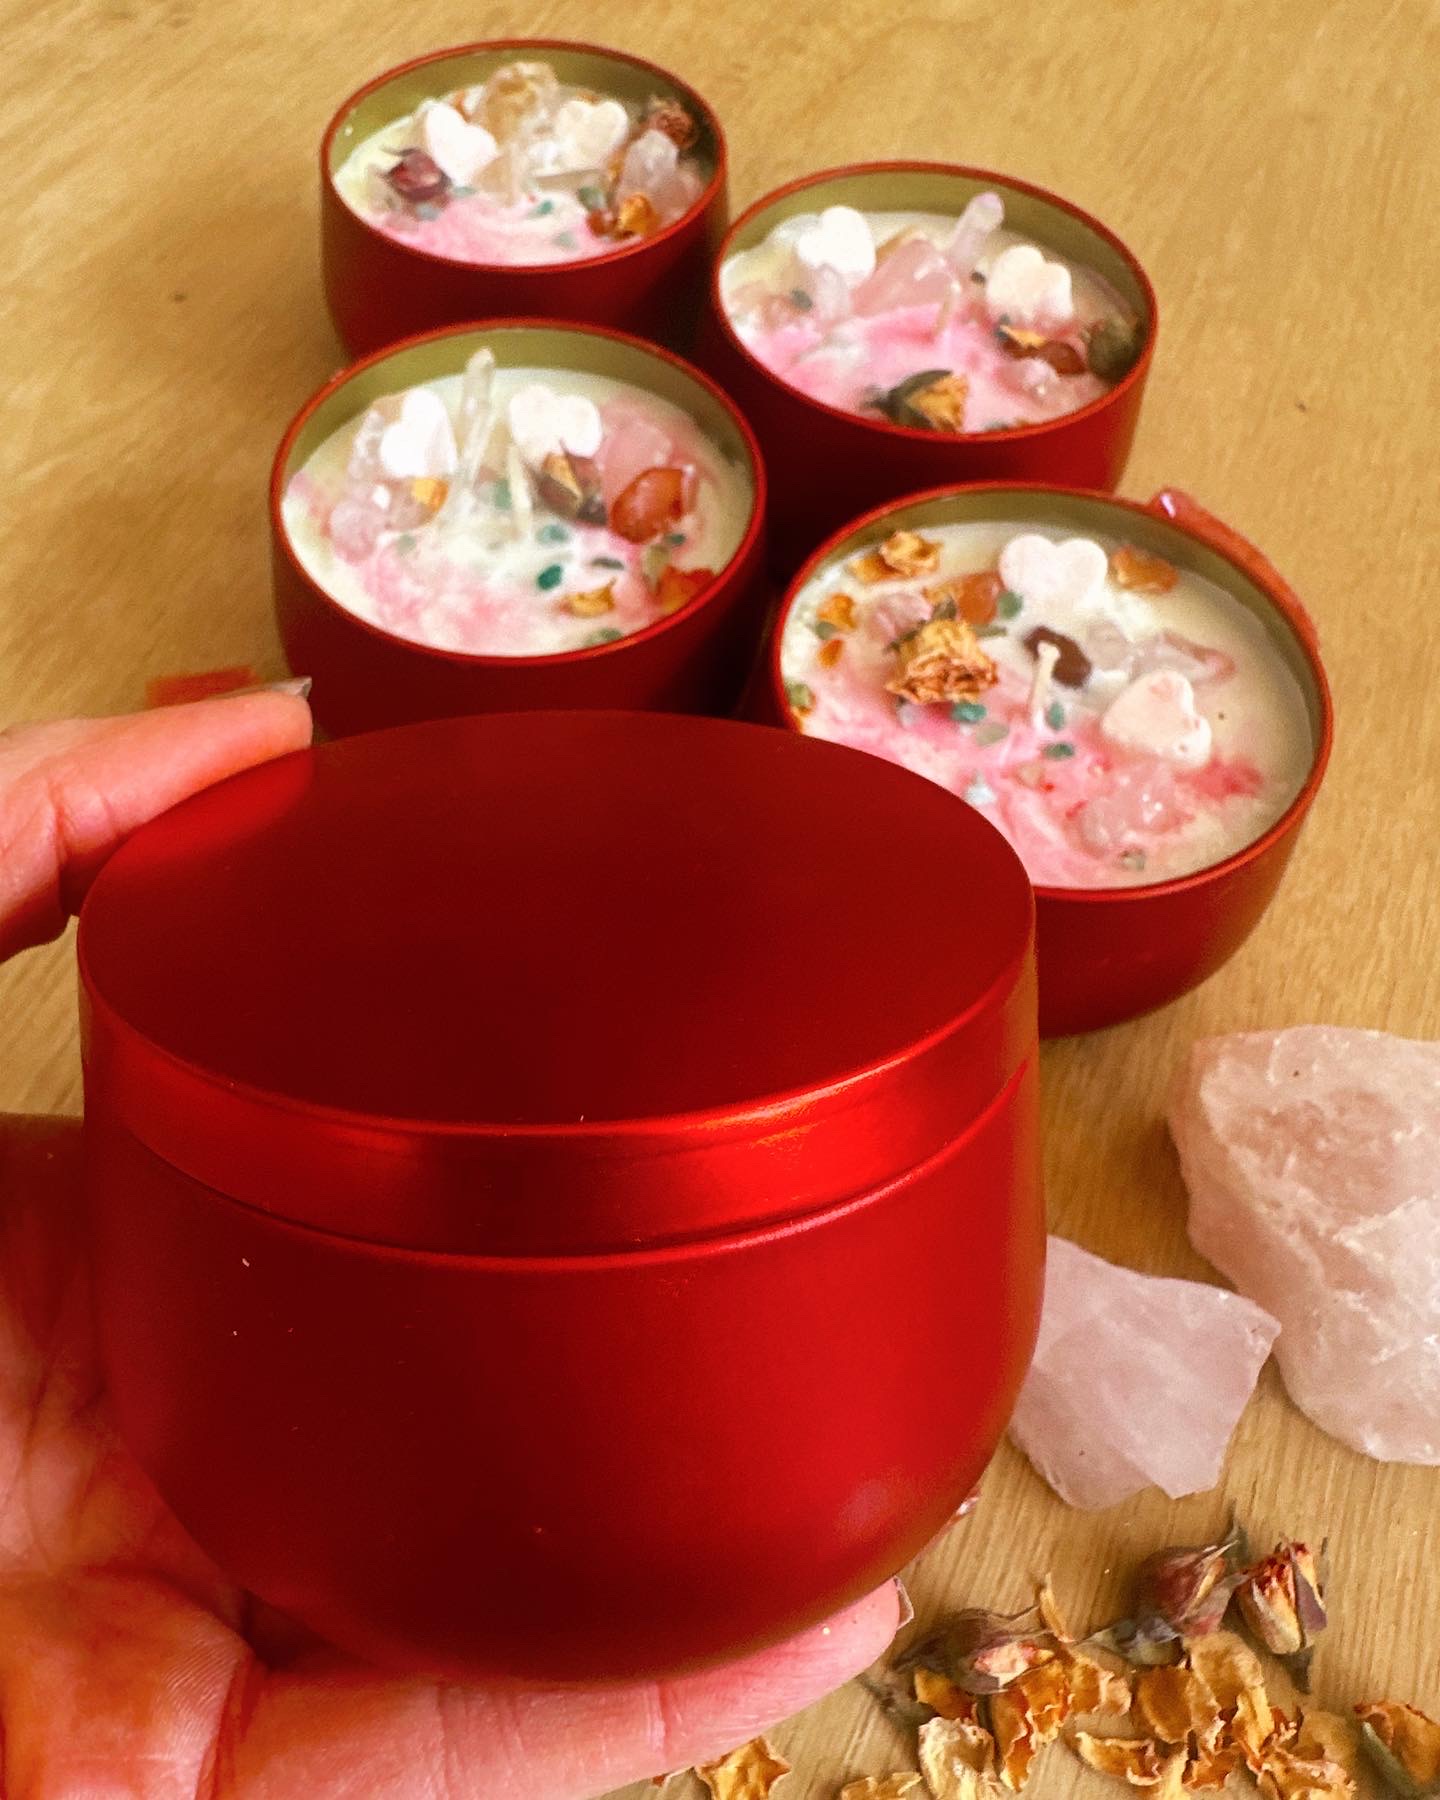
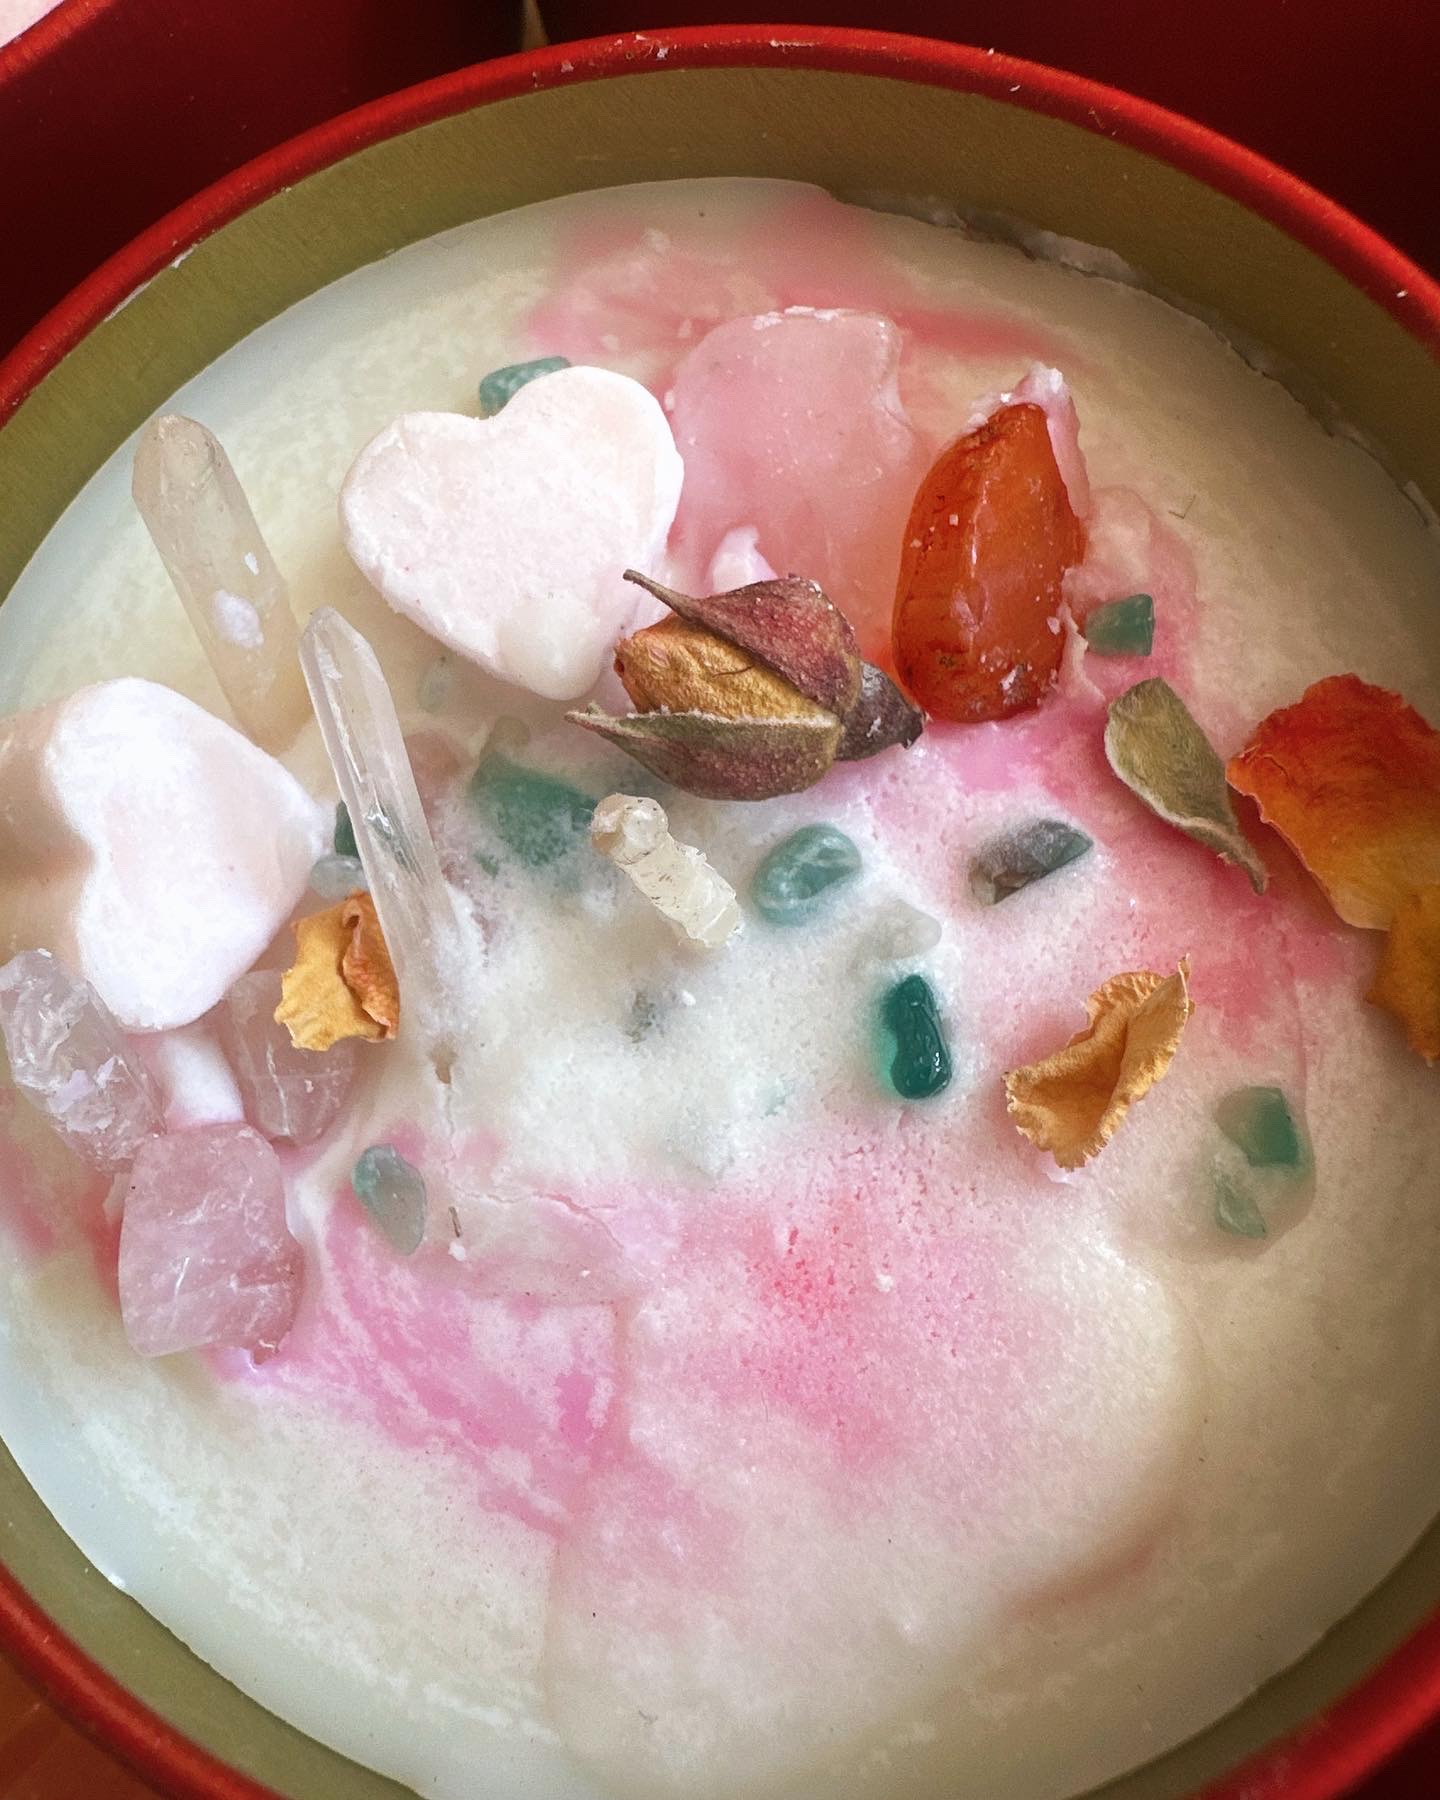
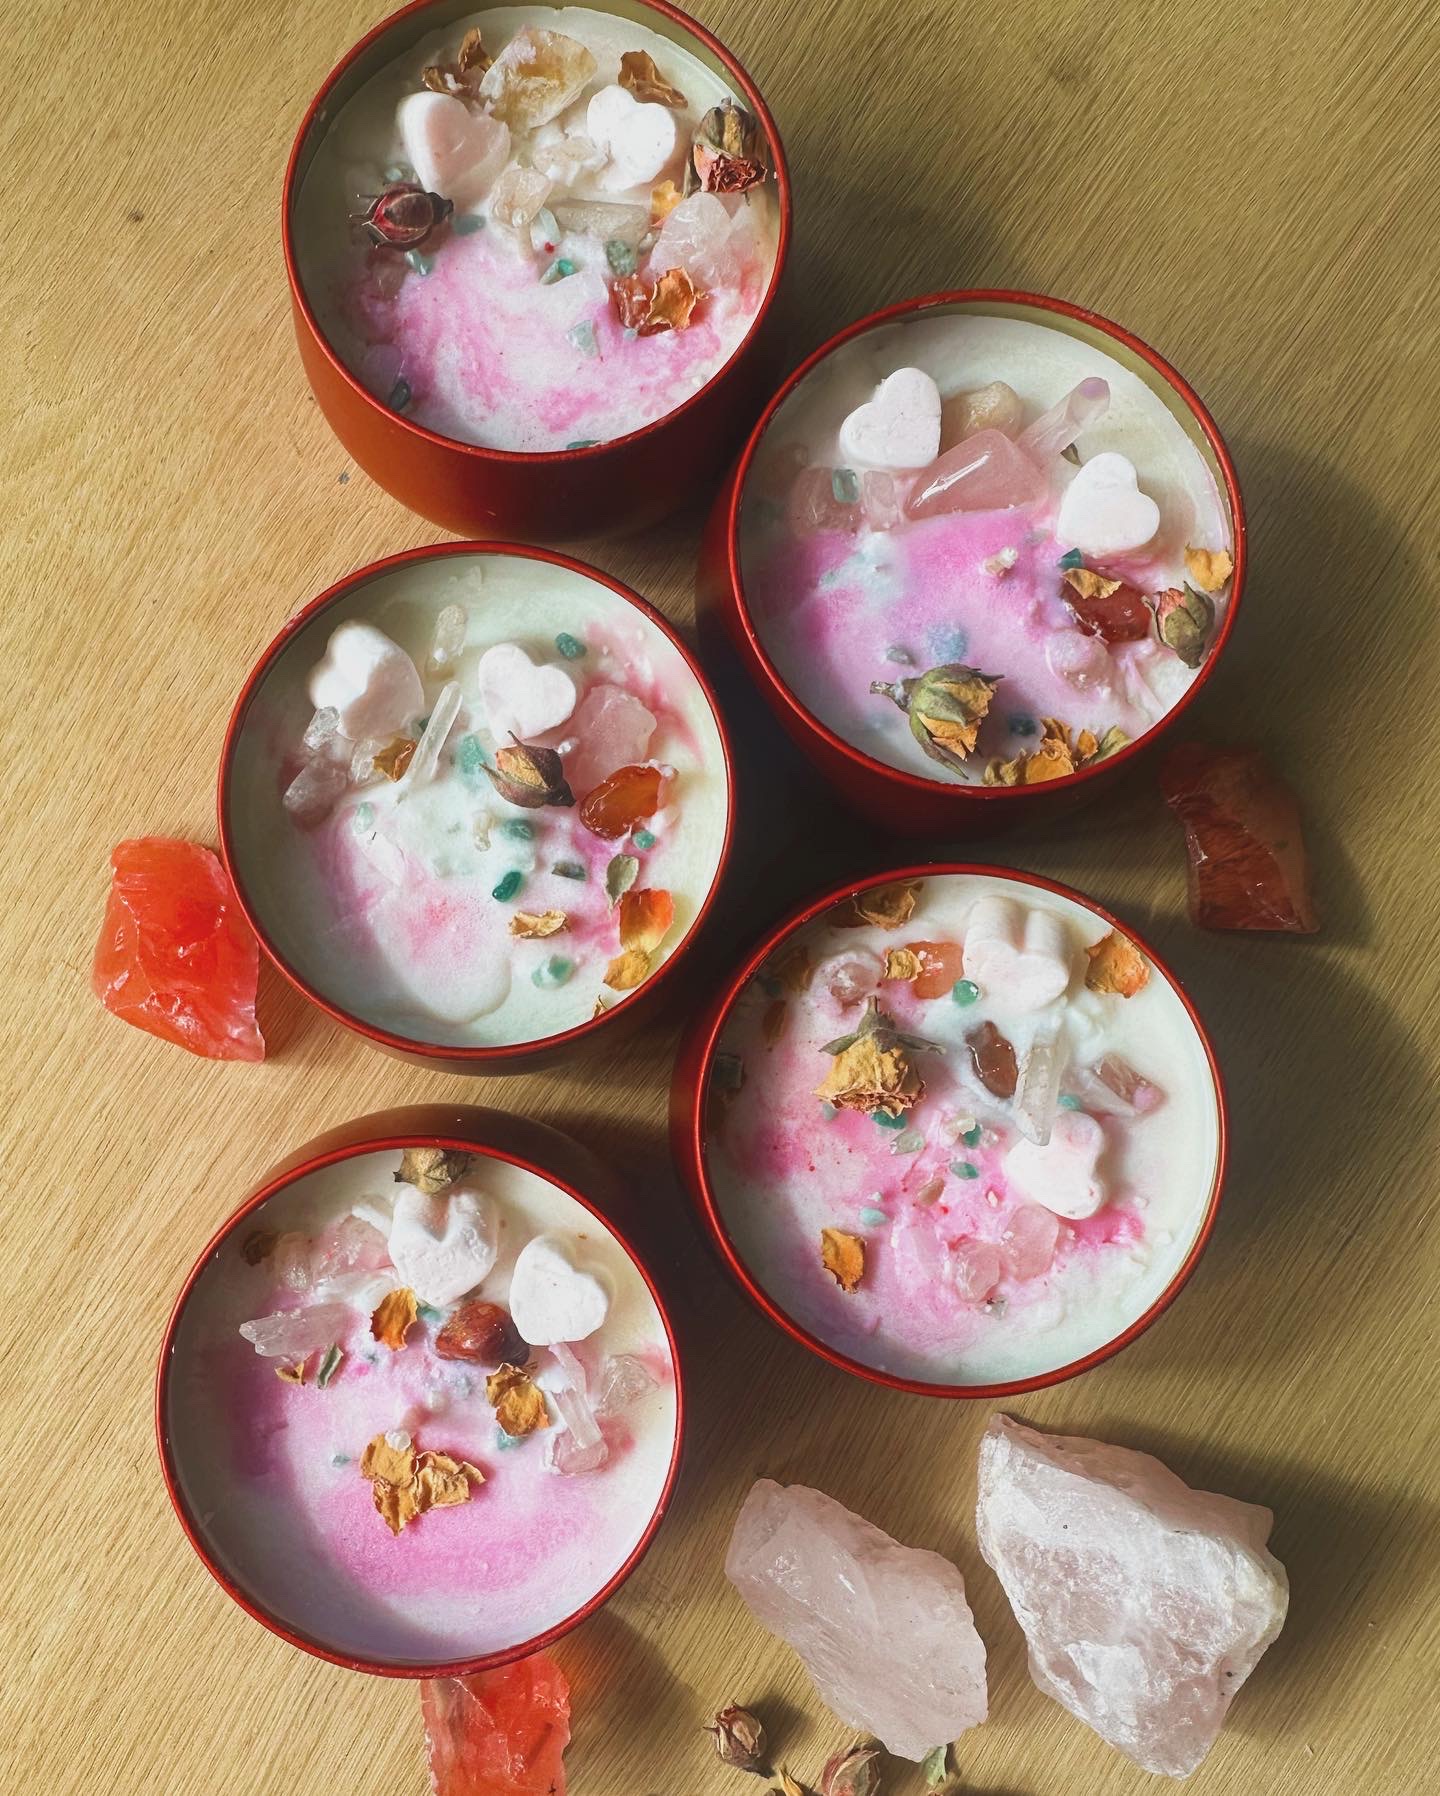
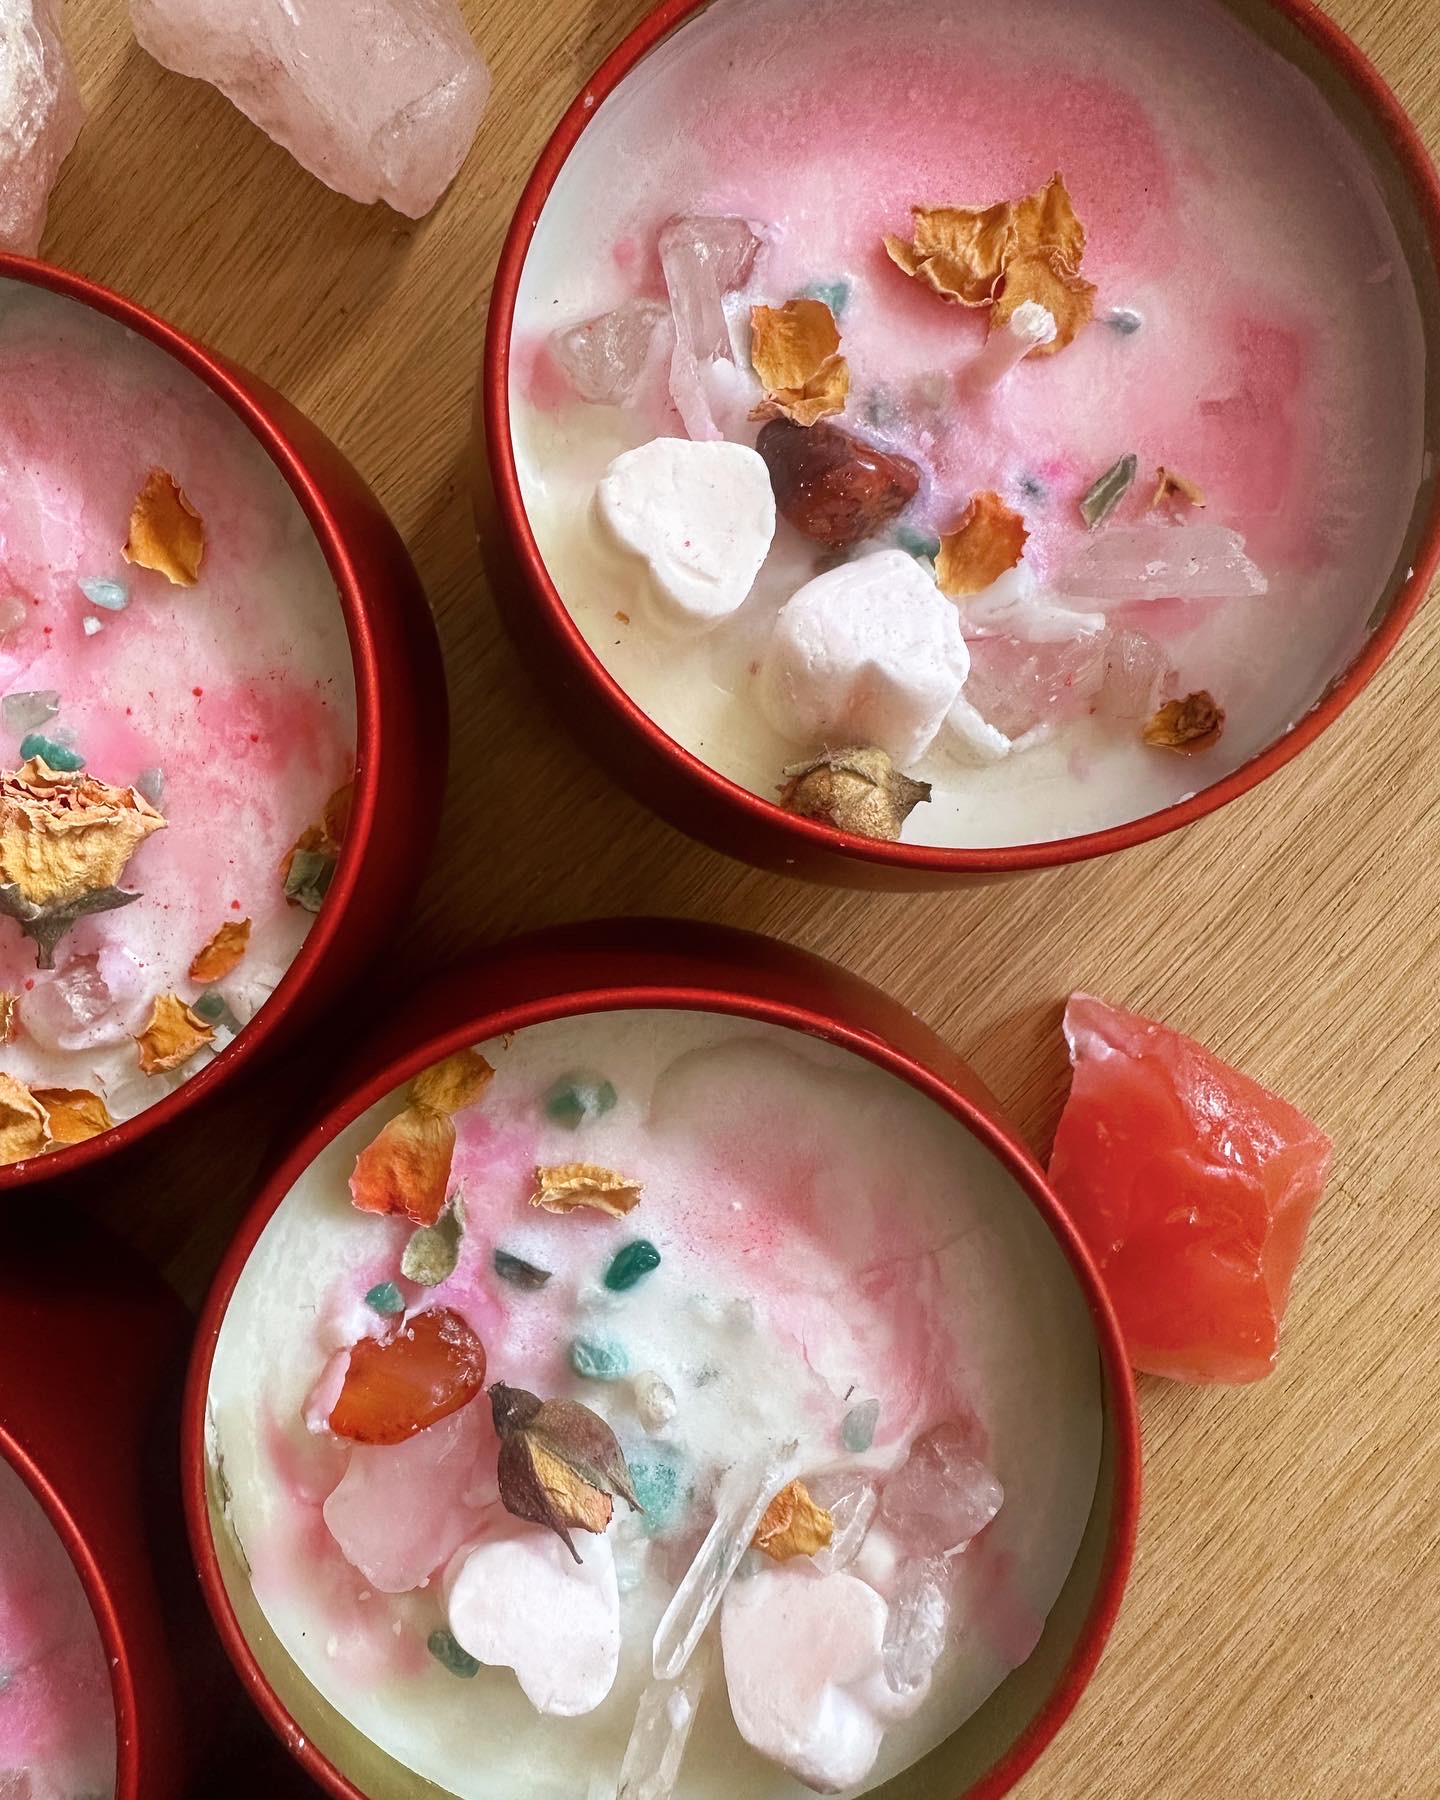
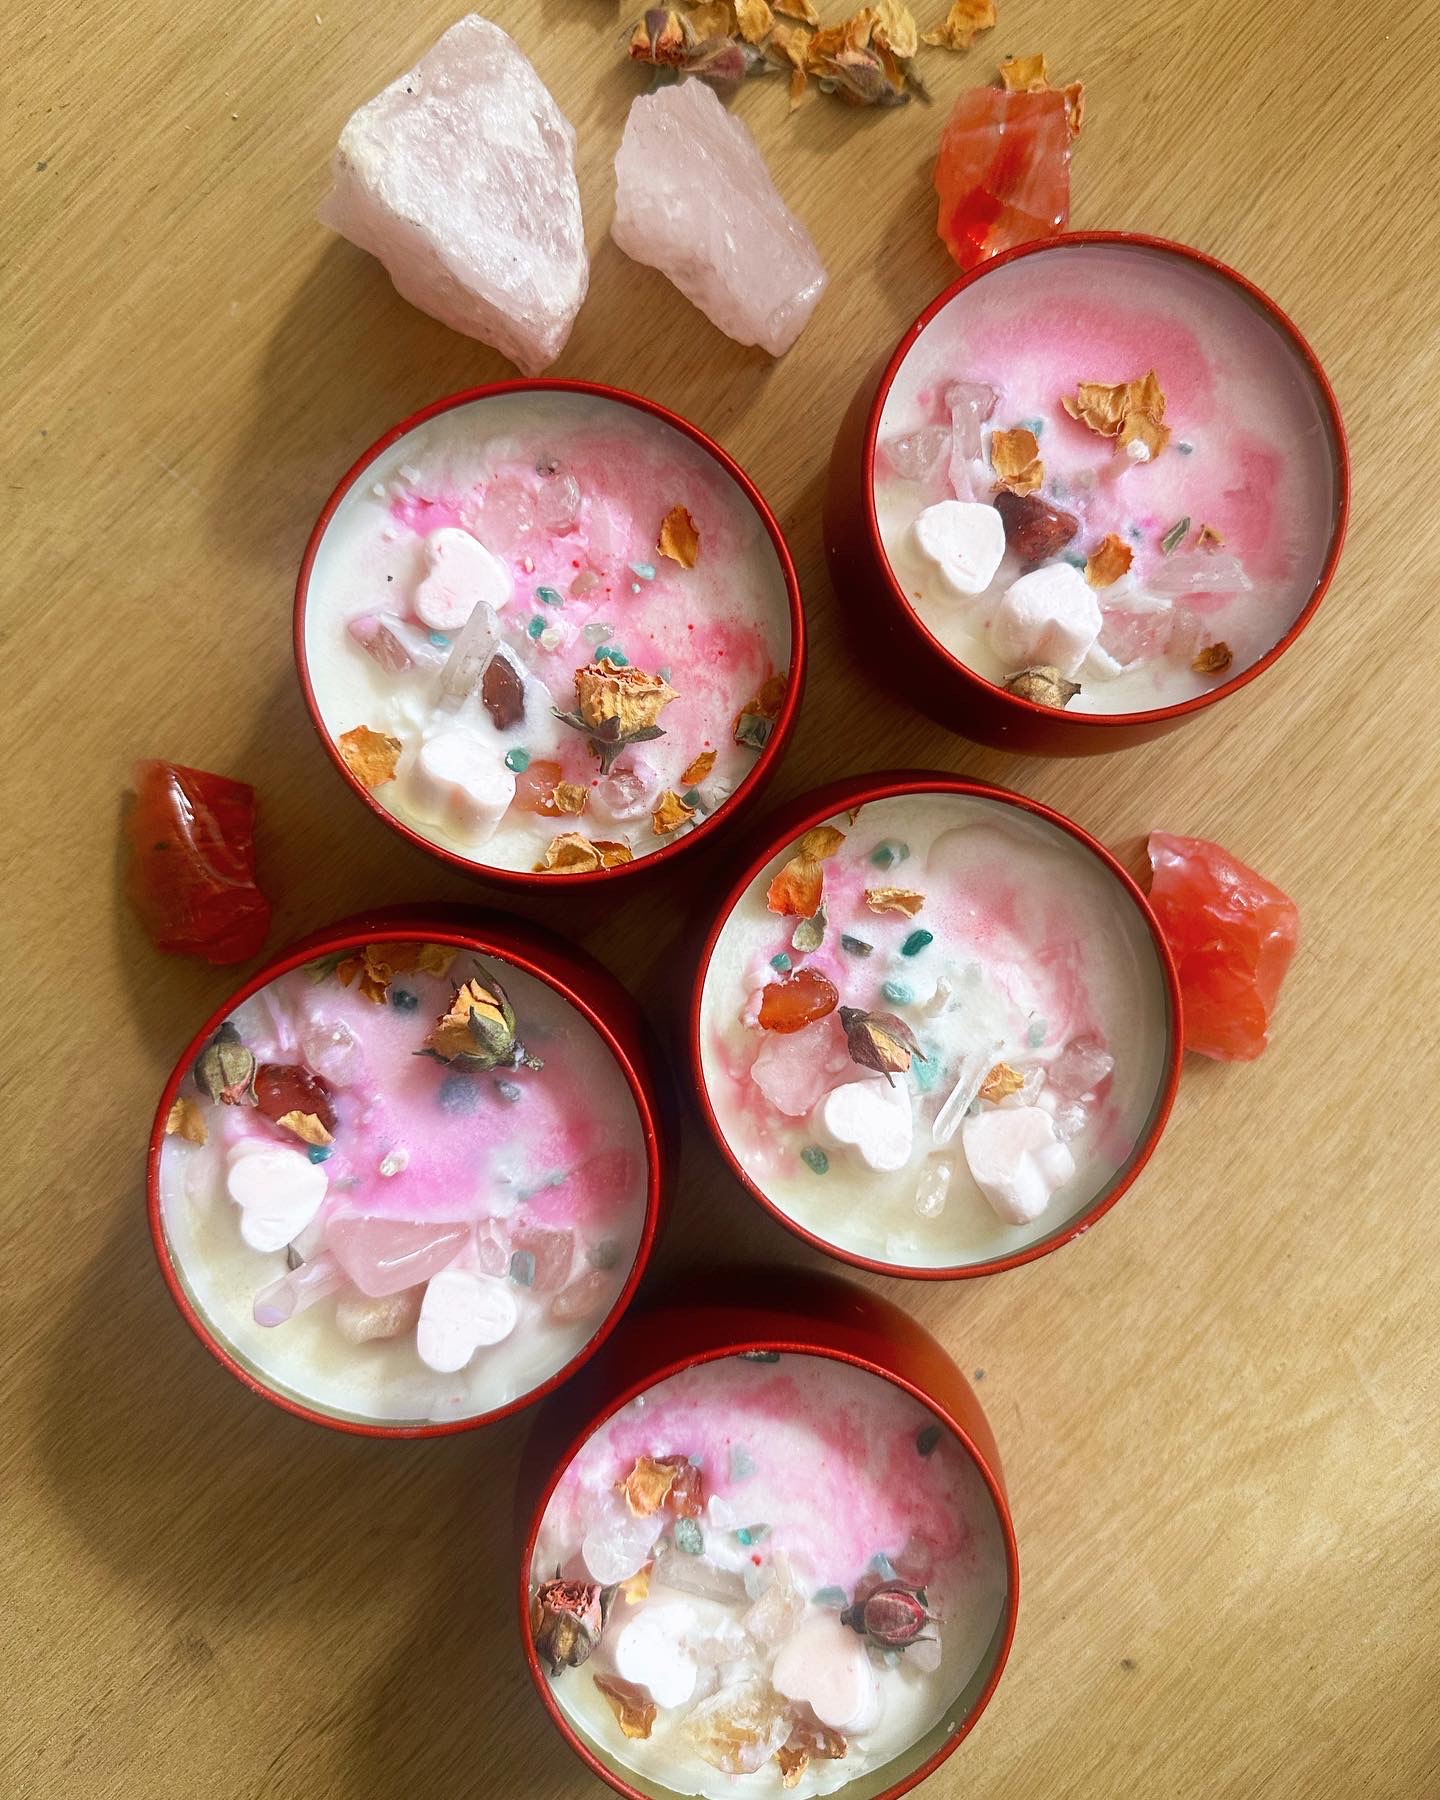
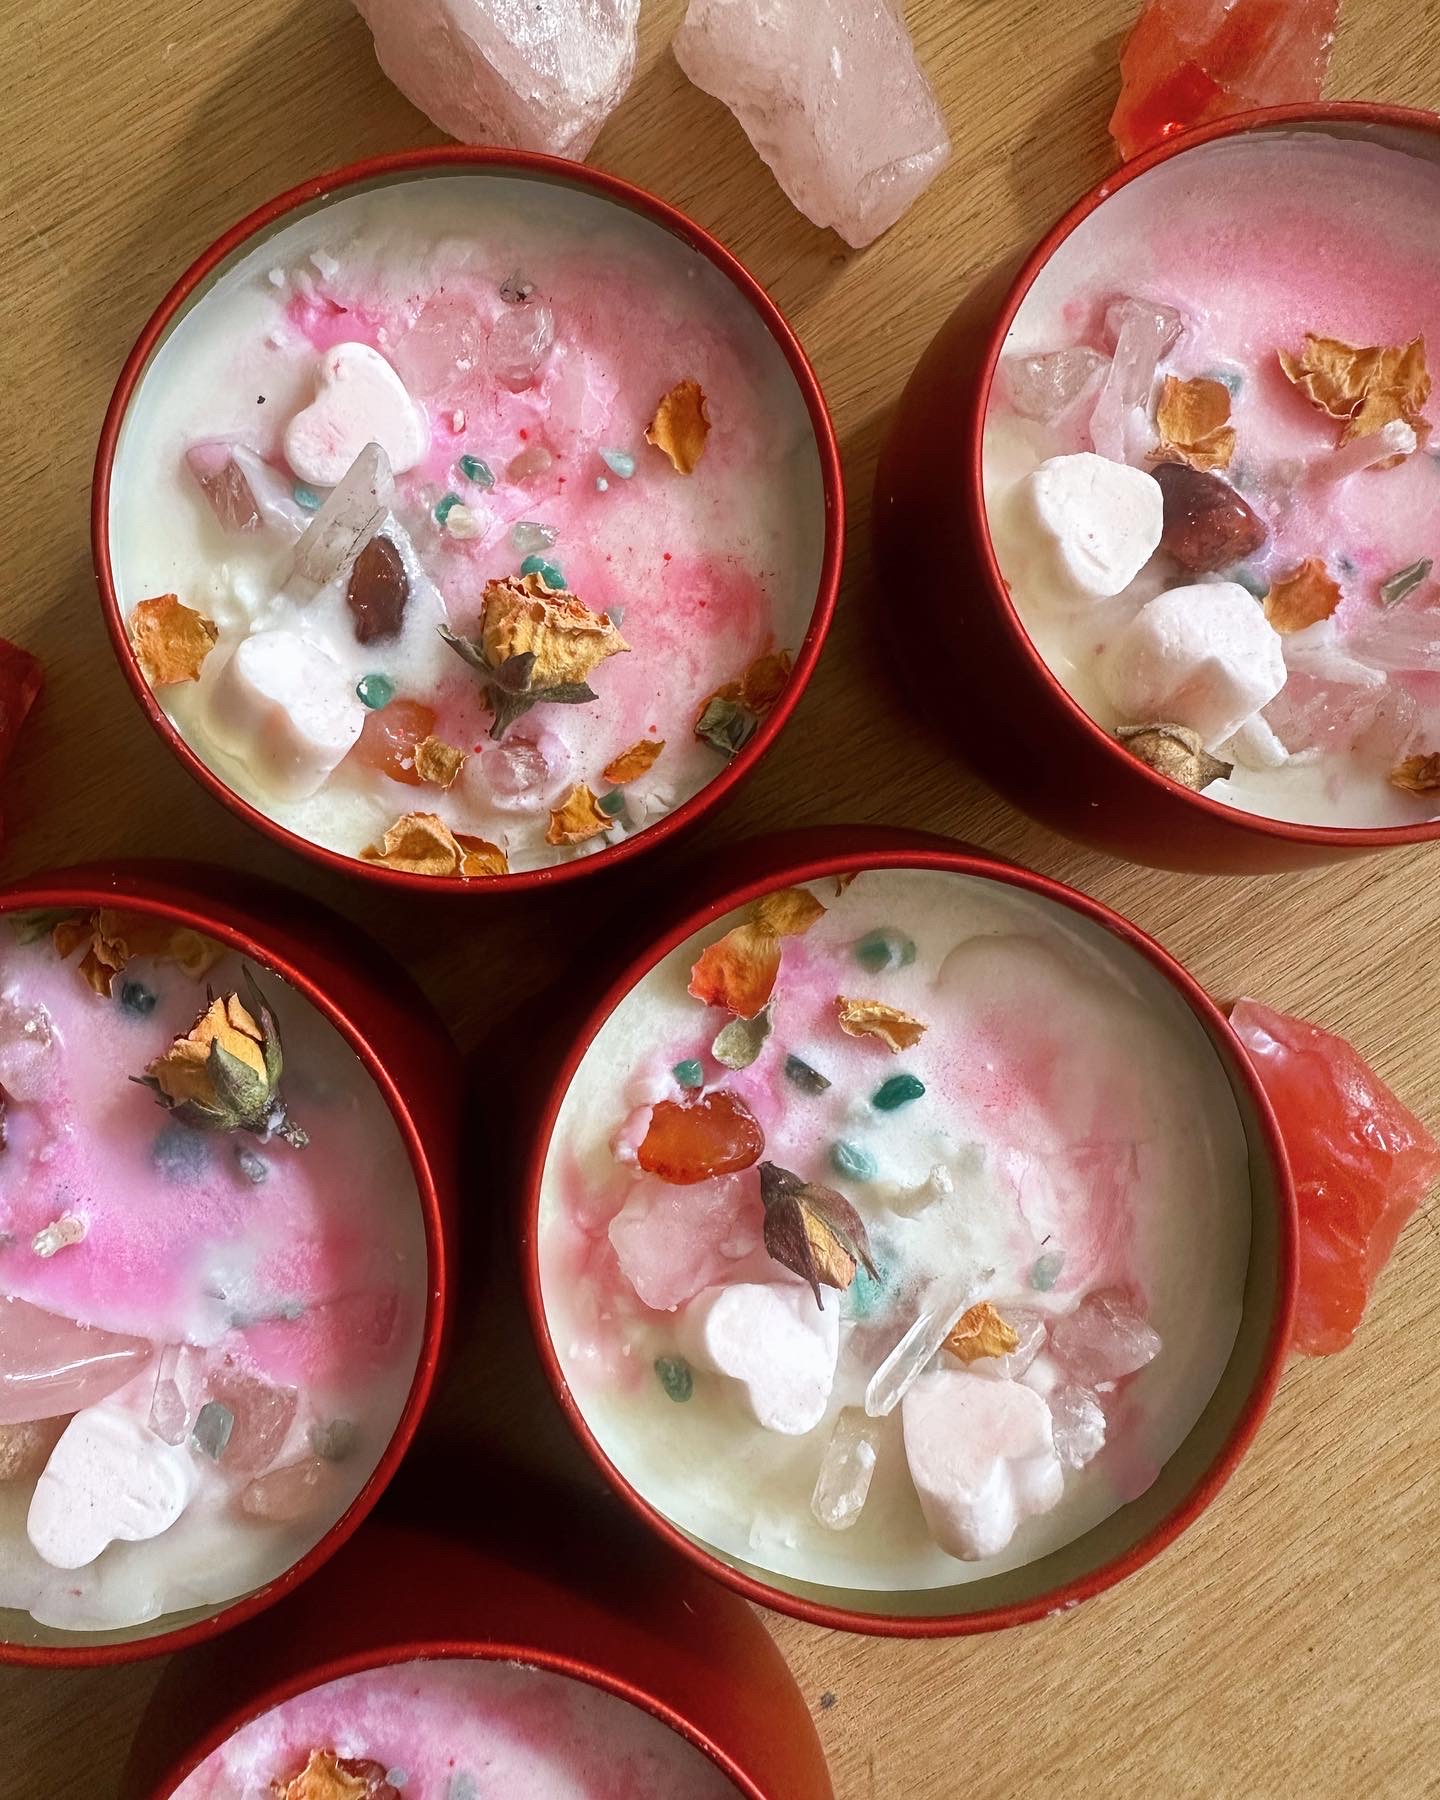
My second go at making some handmade candles, these are love candles with soy wax, rose essential oils, rose heart wax melts and crystals. They are colour change candles and have pink wax inside that shows as they burn. https://www.etsy.com/uk/listing/1584615315/true-love-twin-flame-soulmate-intention?click_key=3fa4cbed3f422daf1c6cb895c6a7f4d52c0432a6%3A1584615315&click_sum=bab1864d&ref=shop_home_active_1